

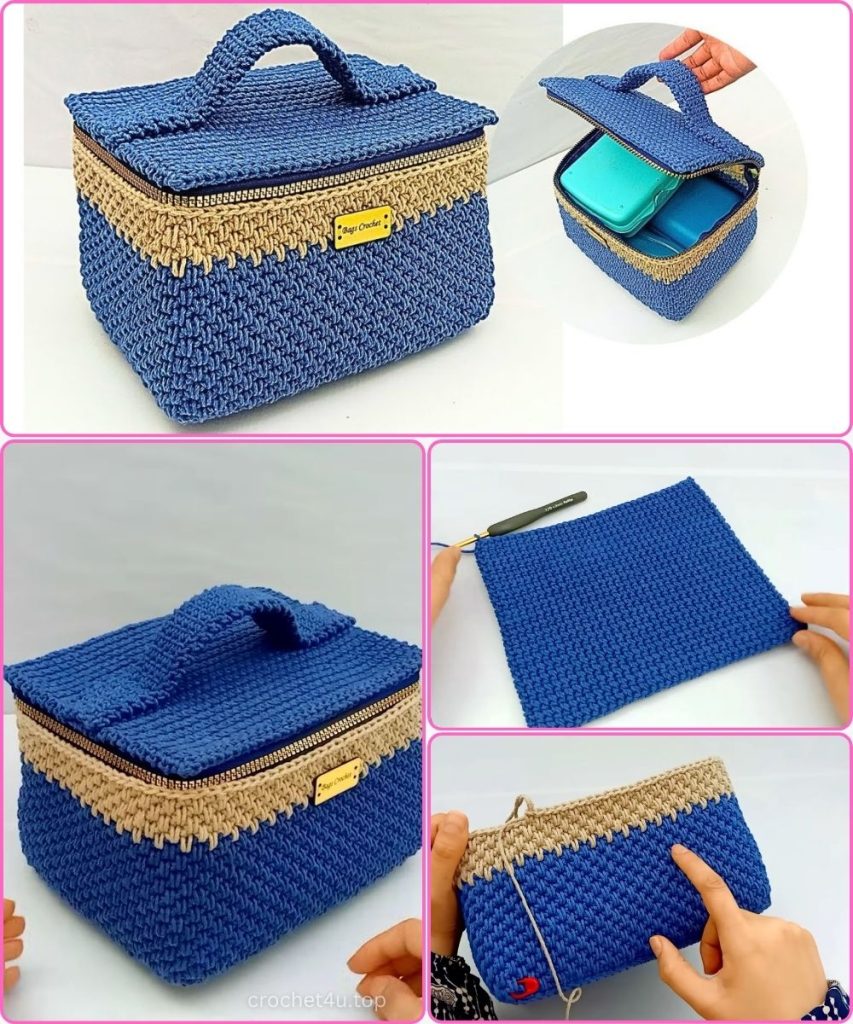
Welcome to your next favorite crochet project! In this tutorial, we are creating a sturdy, insulated, and incredibly stylish lunch bag. Using the high-density “Thermal Stitch,” this bag provides natural structure and thickness, making it perfect for keeping your meals secure and your style on point. Whether you’re heading to the office, a picnic, or packing a lunch for school, this lightweight yet durable bag is the perfect companion.
🧶 Materials & Essentials
Before we pick up the hook, let’s gather our high-quality supplies to ensure that boutique finish:
- Yarn: Cotton Macramé yarn (approx. 2.5 mm thickness). You’ll want a yarn that is durable and easy to clean.
- Hook Size: 4 mm crochet hook.
- Notions: * A zipper (slightly longer than the bag opening).
- Stitch markers (essential for working in continuous rounds).
- A tapestry needle for sewing and finishing.
- Measuring tape.
- Scissors.
📐 Final Dimensions
The bag shown in this pattern measures approximately 22 cm (Length) x 18 cm (Width) at the base, with a height of 12 cm. The thermal stitch results in a thick, 3D fabric that protects the contents of your bag.
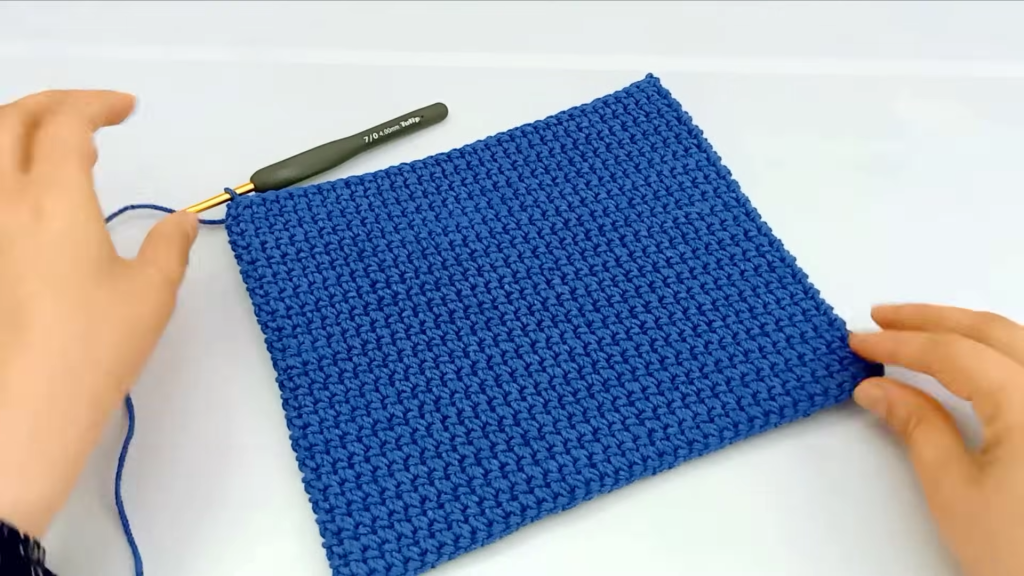
🧱 Part 1: Crafting the Sturdy Base (Thermal Stitch)
The secret to a great lunch bag is a thick base. We use the Thermal Single Crochet to create a fabric that is double the thickness of standard crochet.
- The Foundation (Double Chain): Measure about 2 meters of yarn for a long tail. Make a slip knot. Wrap the “tail” yarn over the hook from front to back, then grab the “working” yarn and pull through. Repeat this until you have 35 double chains.
- Row 1: Chain 1. Work 35 Single Crochets (SC) into the two loops of each double chain across.
- Row 2 (The Thermal Transition): Chain 1, turn. Insert your hook into the back loop of the SC from Row 1 AND the unworked loop of the foundation chain below. Complete a SC. Continue across the row.
- Row 3 and Beyond: Chain 1, turn. Insert your hook into the back loop of the current stitch AND the front loop of the stitch from the row below it. This “sandwich” technique creates the density.
- Completion: Work a total of 40 rows of Thermal Stitch.
- Finishing the Base: Chain 1. To seal the edge, work a row of slip stitches through the loops of the last two rows simultaneously.
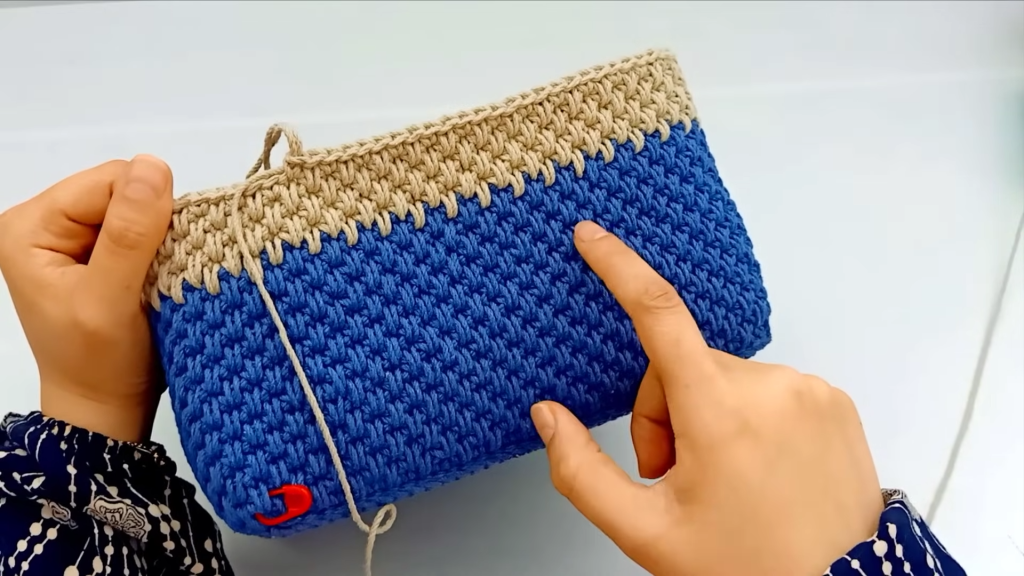
🧺 Part 2: The Body of the Bag (Spike Stitch Pattern)
Now we will build the walls of the bag using a beautiful “Long Single Crochet” (Spike Stitch) pattern.
- Preparation Round: Crochet SC around the entire perimeter of the base.
- Short sides: 20 stitches (approx. 1 stitch every 2 rows).
- Long sides: 35 stitches.
- Total count: 110 stitches.
- The Pattern Logic: To make the stitch work, we need an odd number of stitches. Add 1 SC into the starting chain corner to bring your total to 111 stitches. Mark this first stitch.
- Round 1:
- Above the first stitch, work a Long Single Crochet (insert hook into the stitch below the current row and pull up a long loop).
- In the next stitch, work a Standard SC through both loops.
- Repeat this sequence (Long SC, Standard SC) around.
- Round 2 and Beyond: We will work in continuous rounds.
- Where there is a Standard SC, work a Long SC.
- Where there is a Long SC, work a Standard SC.
- Height: Continue until the body reaches 12 cm (approximately 22 rounds). Fasten off and weave in ends.

📜 Part 3: The Flap
The flap is created separately and follows the exact same logic as the base.
- Start with 35 double chains.
- Work 40 rows of the Thermal Stitch.
- Finish with a row of slip stitches to match the edge of the base. This piece will serve as the top cover that keeps your lunch insulated.
⛓️ Part 4: The Handle
A sturdy handle is a must for portability.
- Start with 5 double chains.
- Work 58 rows of the Thermal Stitch (or until the handle measures 28 cm).
- Leave a long tail on both ends for sewing.

🪡 Part 5: Assembly & The Zipper
Now it’s time to put all the pieces together for that professional, store-bought look!
- Attaching the Handle: Find the center 5 rows of your flap. Sew one end of the handle to the flap, inserting the needle across 6 stitches to ensure it is secure. Repeat for the other side.
- The Height Adjustment: Before attaching the flap, join your yarn to the top back edge of the bag. Work 2 rows of standard SC across the back 35 stitches. This adds height so the flap sits perfectly over the zipper.
- The Zipper:
- Measure your zipper against the opening.
- Hand-sew the zipper into the opening of the bag in a straight line.
- Ensure both ends of the zipper are sealed and tucked neatly inside the crochet fabric.
- Final Join: Place the flap against the 2-row extension you just made. Sew the flap to the bag stitch-by-stitch across the 35 stitches.
Video Tutorial:
✨ Final Touches
Flip your bag open, zip it up, and admire your handiwork! The thermal stitch not only looks elegant but provides enough “padding” to keep your lunch containers safe.
Designer Tip: If you want a more rigid bag, you can insert a piece of plastic canvas or a thin cutting mat at the bottom before closing the assembly.
We’d love to see your version of the Thermal Lunch Bag! Tag us in your photos and happy crocheting! 🧶


