
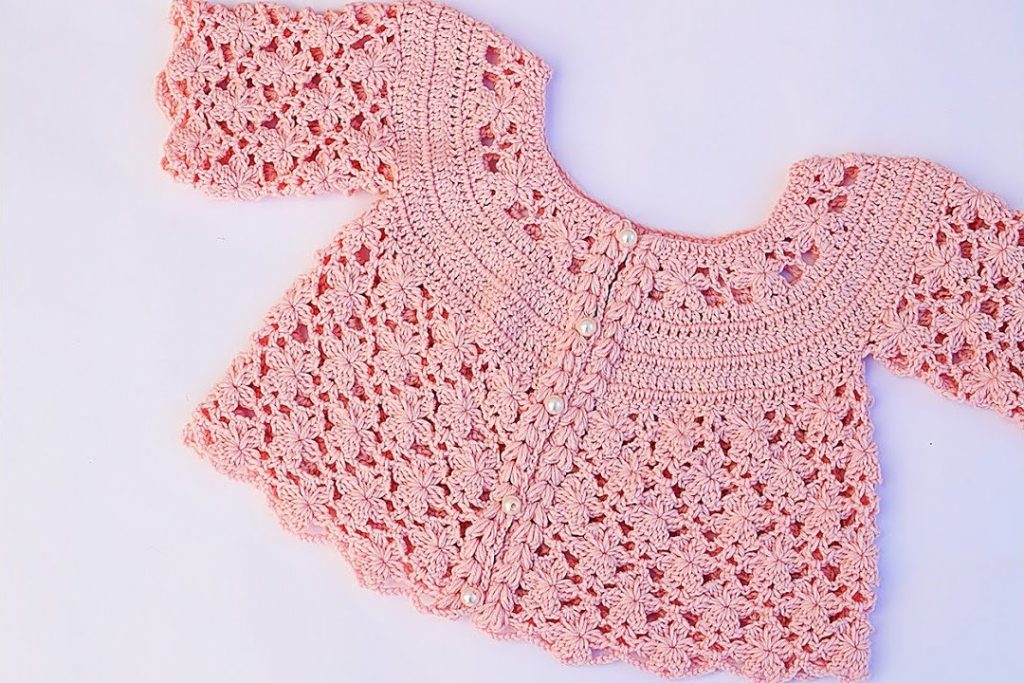
Capture the essence of vintage elegance with this gorgeous Floral Lace Cardigan! This delicate piece features a repeating, all-over floral lace pattern that creates a stunning, airy texture. The solid ribbed neck band and integrated front button placket make it a truly special garment, perfect for Christenings, photoshoots, or everyday wear.
This intricate pattern is designed for the 3-6 Month size and is suited for the Advanced Intermediate crocheter comfortable with complex lace repeats and garment shaping.
Materials Needed 🧶
- Yarn: Approximately 250-300 yards of Sport Weight (#2) or light DK Weight (#3) yarn. A soft cotton or acrylic blend that blocks well is recommended for the lace definition.
- Main Color (MC): Rose Pink (Solid)
- Crochet Hook: 3.0 mm (US C/D), or the size needed to obtain gauge.
- Buttons: 5-6 small pearl or decorative buttons (approx. 1/4 inch / 6mm).
- Tapestry Needle: For seaming and weaving in ends.
Skill Level & Notes 💡
- Skill Level: Advanced Intermediate. Requires concentration to maintain the lace pattern repeat and manage the raglan increases within the lace structure.
- Construction: The cardigan is worked flat from the top-down, with a continuous front opening.
- Stitch Multiples: The main body lace pattern is worked over a multiple of 6 stitches.
- Chains: Ch 3 at the beginning of rows always counts as the first DC unless noted otherwise.
Gauge 📏
In Half Double Crochet (HDC) (Neck Band) using a 3.0 mm hook: 16 HDC stitches and 13 rows = 4 inches (10 cm) square.
Abbreviations 📚
| Abbreviation | Description |
| ch | chain |
| sl st | slip stitch |
| sc | single crochet |
| hdc | half double crochet |
| dc | double crochet |
| tr | treble crochet |
| st(s) | stitch(es) |
| rep | repeat |
| sk | skip |
| CFS | Cluster Fan Stitch |
Export to Sheets
Special Stitch ✨
Cluster Fan Stitch (CFS)
This stitch creates the repeating floral shape.
- DC Cluster (DC-CL): [YO, insert hook into st/sp, YO, pull up a loop, YO, pull through 2 loops] 3 times in the same st/sp (4 loops on hook). YO, pull through all 4 loops.
- CFS: (DC-CL, ch 2, DC-CL, ch 2, DC-CL) all worked into the same stitch or space.
Part 1: The Neck Band (MC – Rose Pink) ⬆️
The neck band is worked in a solid stitch to provide structure.
Row 1 (Foundation): Ch 76. Hdc in the 2nd ch from hook and in each ch across. (75 hdc)
Rows 2-5 (Neck Band Ribbing): Ch 2 (does not count as st), turn. Hdc in the back loop only (BLO) of each st across. (75 hdc)
Row 6 (Yoke Setup/Raglan Count): Ch 3 (counts as dc), turn. Dc in the next 11 sts (Right Front). [Dc, ch 2, dc] in the next st (PM in ch-2 sp). Dc in the next 12 sts (Shoulder). [Dc, ch 2, dc] in the next st (PM). Dc in the next 21 sts (Back). [Dc, ch 2, dc] in the next st (PM). Dc in the next 12 sts (Shoulder). [Dc, ch 2, dc] in the next st (PM). Dc in the last 11 sts (Left Front). (79 dc, 4 ch-2 sps)
Part 2: The Yoke Lace & Raglan Shaping 🌸
We begin the lace pattern while continuing raglan increases.
Row 7 (Lace Row 1 – Raglan): Ch 3, turn. Dc in each st to the first ch-2 sp. [Dc, ch 2, dc] in the ch-2 sp. Rep the increase sequence 3 more times. Dc in each remaining st. (Increases by 8 dc.)
Row 8 (Lace Row 2 – CFS): Ch 1, turn. Sc in the first st. [Ch 3, sk 2 sts, sc in the next st] rep across to the first ch-2 sp. [Sc, ch 3, sc] in the ch-2 sp. Rep the pattern and corner increase sequence 3 more times. Continue [ch 3, sk 2, sc] across the remaining sts.
Row 9 (Lace Row 3 – CFS): Ch 3, turn. Work CFS (DC-CL, ch 2, DC-CL, ch 2, DC-CL) in the first ch-3 sp. [Sc in the next ch-3 sp, CFS in the next ch-3 sp] rep across. Work [CFS, ch 2, CFS] into the ch-3 sp at each raglan corner. Continue pattern across, working CFS into the centers of the previous round’s shells.
Rows 10-12: Continue increasing rows, alternating between the SC/Ch-3 net row (Row 8 repeat) and the CFS Row (Row 9 repeat), adjusting the number of stitches between corner increases. Work 1 sc/CFS directly into the corner ch-2 sp, ch 2, and another sc/CFS into the same corner for shaping.
- End on a Lace Row 3 repeat.
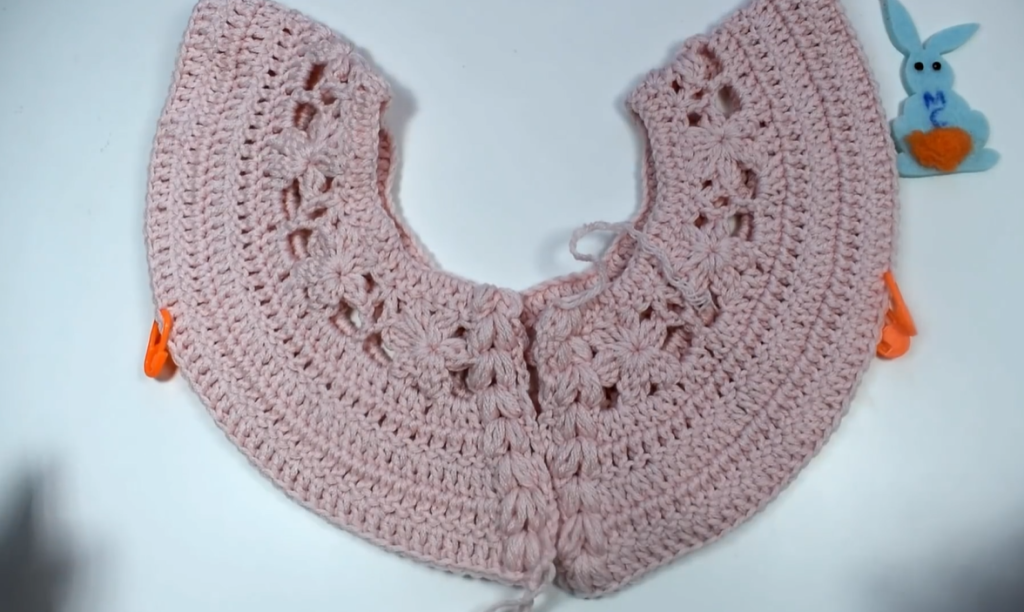
Part 3: Body Separation & Sleeve Split 👚
Row 13 (Body Separation – SC Net): Ch 1, turn. Work the SC/Ch-3 net pattern until the first raglan ch-2 sp. Sc in the ch-2 sp. Ch 4 (skips the sleeve). Sc in the ch-2 sp of the second raglan corner. Continue the SC/Ch-3 net pattern across the back to the third raglan ch-2 sp. Sc in the ch-2 sp. Ch 4 (skips the second sleeve). Sc in the ch-2 sp of the fourth raglan corner. Continue pattern to the end.
Part 4: The Body Lace 👗
We continue the lace pattern across the body, which now includes the ch-4 underarm spaces.
Row 14 (CFS Row): Ch 3, turn. Work the CFS row across the back. Work 2 CFS evenly into the ch-4 underarm spaces. Continue pattern across the front.
Rows 15-25: Continue alternating the SC/Ch-3 Net Row and the CFS Row for the desired length of the body. Do not turn on the final row (Row 25) so the hem is facing the correct direction for edging.
Part 5: Finishing & Edging 🎀
A. Front Placket (Button Loops):

- Right Front: Ch 1, turn. Sc evenly down the length of the right front edge. Fasten off.
- Left Front (Buttonholes): Attach yarn to the bottom left edge. Sc in the first 3 sts. [Ch 2 (buttonhole), sk 2 sts, sc in the next 5 sts] rep 5 times. Sc to the top. Fasten off.
B. Hem Scallop:
- Work a row of Small Shells: Ch 1, sc in the first st. [Sk 1 st, 5 dc in the next st (Small Shell), sk 1 st, sc in the next st] rep across the bottom hem edge. Fasten off.
C. Sleeve Edging (Make 2):
- Attach yarn to the underarm ch-4 sp. Work one round of sc evenly around the cap sleeve opening. Sl st to join.
- Scallop Edge: Ch 1. Sc in the first st. [Sk 1 st, 5 dc in the next st, sk 1 st, sc in the next st] rep around. Fasten off.
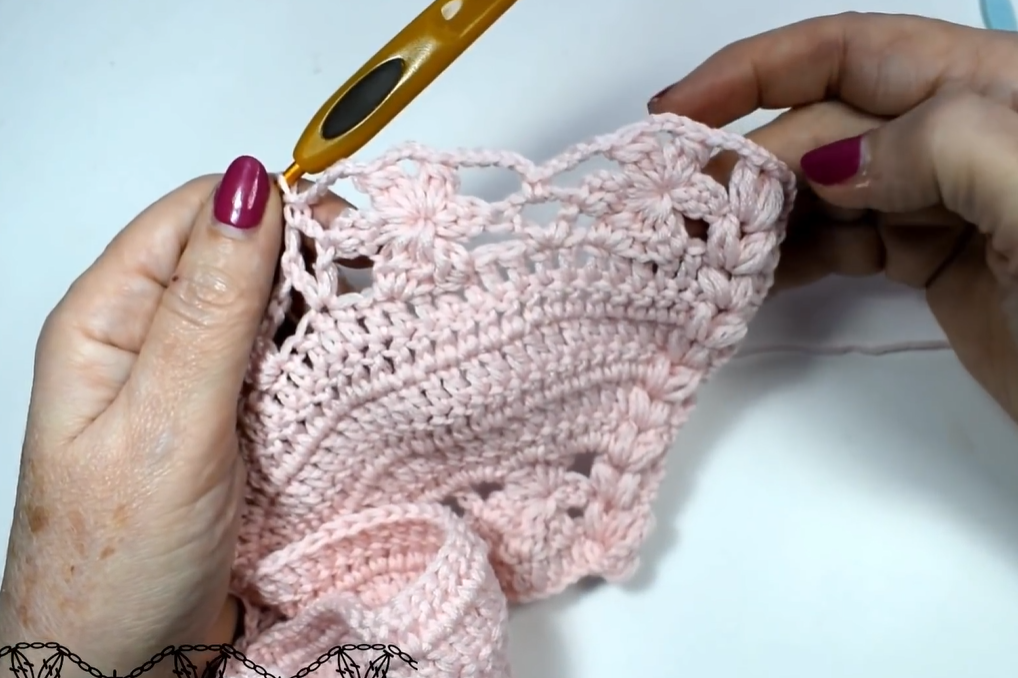
Video Tutorial:
Assembly and Final Touches 🫧
- Weave in all ends securely.
- Sew Buttons: Sew the 5-6 pearl buttons onto the Right Front placket, aligning them with the buttonholes on the Left Front.
- Blocking: This step is crucial for lace. Gently wet or steam block the cardigan. Pin the entire garment flat, carefully defining the scallops on the hem and sleeves. Pin the front plackets to ensure they lie straight. Allow to dry completely.
Your breathtaking Heirloom Floral Lace Cardigan is finished, a beautiful piece of wearable art!


