
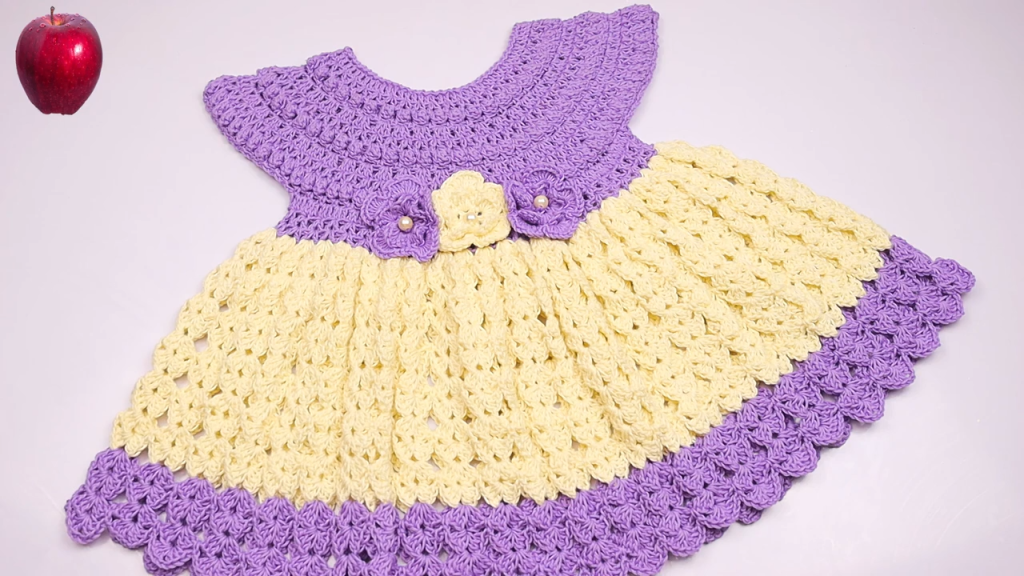
Welcome, fellow yarn lovers! Today, we’re diving into a project that is pure sunshine and springtime: the Lilac & Lemon Blossom Dress. This pattern is a showstopper, featuring a structured, round yoke in a rich color (lilac) and a beautifully textured skirt in a contrasting shade (lemon yellow), all tied together with a sweet flower detail.
This is a long and detailed pattern, best suited for an Intermediate crocheter who is comfortable with basic stitches, working in the round, and changing colors. Let’s get started on this heirloom piece!
🛍️ Section 1: Materials & Gauge
🧶 Supplies You’ll Need
- Yarn A (Lilac/Purple): Approx. 150-200 yards of DK weight (Category 3) yarn for the yoke and border.
- Yarn B (Lemon/Yellow): Approx. 250-300 yards of DK weight (Category 3) yarn for the skirt.
- Hook: 4.0 mm (G/6) crochet hook, or size needed to obtain gauge.
- Buttons: 3 small buttons (approx. 0.5 inches / 1.25 cm) for the back closure.
- Embellishments: 2 small pearl beads for the flower center (optional).
- Tools: Stitch markers, a tapestry needle, and scissors.
📏 Gauge Check
Work in Double Crochet (DC): 16 DC and 8 rows = 4 inches (10 cm).
- Tip: Getting the yoke gauge right is essential for proper fit!
📝 Key Abbreviations
| Abbreviation | Meaning | Abbreviation | Meaning | |
| Ch | Chain | Dc | Double Crochet | |
| Sl St | Slip Stitch | Tr | Treble Crochet | |
| Sc | Single Crochet | Sk | Skip | |
| Hdc | Half Double Crochet | Sp | Space | |
| Dc Shell | 5 Dc in the same stitch/space | Beg | Beginning |
Export to Sheets
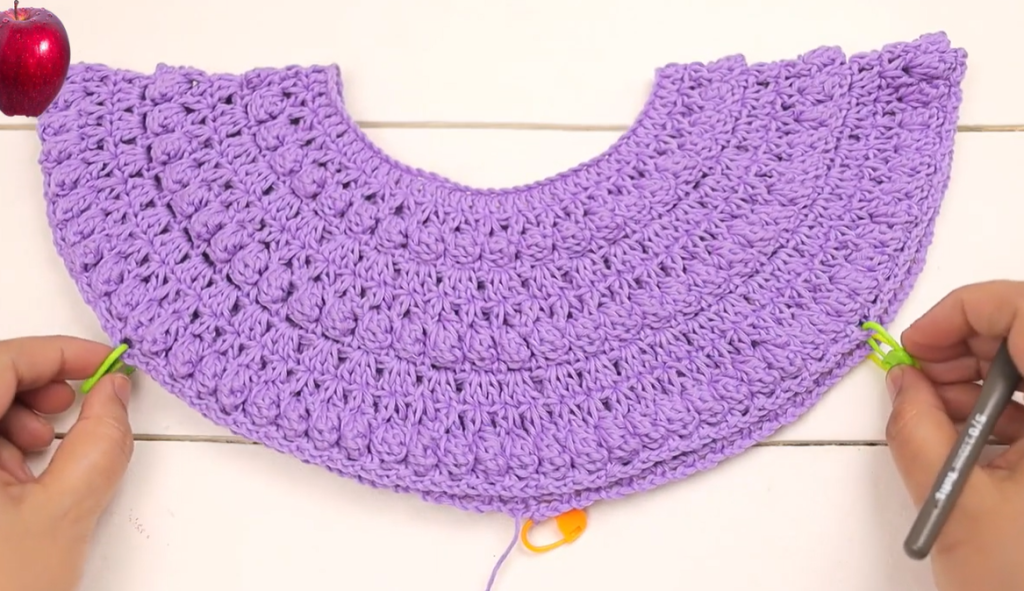
🌸 Section 2: The Yoke (Top & Sleeves)
The yoke is worked flat in rows using Yarn A (Lilac). This size is designed for 6-12 months.
Foundation & Initial Rows
Row 1 (Foundation): With Yarn A, Ch 72. Dc in the 4th Ch from the hook and in each Ch across. (70 Dc). Ch 3 (counts as 1st Dc throughout), turn.
Yoke Shaping & Increases
We divide the 70 stitches into: Back (2), Sleeves (2), and Front (1). Use stitch markers in the corner stitches/spaces to keep track of increases.
- Row 2: Dc in the first 11 sts. (Dc, Ch 2, Dc) in the next st (corner). Dc in the next 12 sts. (Dc, Ch 2, Dc) in the next st (corner). Dc in the next 22 sts. (Dc, Ch 2, Dc) in the next st (corner). Dc in the next 12 sts. (Dc, Ch 2, Dc) in the next st (corner). Dc in the last 11 sts. Ch 3, turn. (78 Dc + 4 Ch-2 sps).
- Row 3: Dc in each Dc to the first Ch-2 sp. (Dc, Ch 2, Dc) in the Ch-2 sp. Rep this pattern around. Ch 3, turn. (86 Dc + 4 Ch-2 sps).
- Row 4 (Lace Yoke Start): Dc in the first st. (Ch 1, Sk 1 st, Dc in the next st) until the Ch-2 sp. (Dc, Ch 2, Dc) in the Ch-2 sp. Continue the (Ch 1, Sk 1 st, Dc) pattern across all panels, putting (Dc, Ch 2, Dc) in each corner Ch-2 sp. Ch 3, turn. (94 Dc + 4 Ch-2 sps).
- Row 5: Dc in each Dc and Ch-1 sp across all panels. Put (Dc, Ch 2, Dc) in each corner Ch-2 sp. Ch 3, turn. (102 Dc + 4 Ch-2 sps).
- Rows 6-8:Rep Rows 4 and 5 (alternating lace and solid rows).
- You should have 126 Dc + 4 Ch-2 sps after Row 8.
Joining for Armholes
- Row 9 (Armhole Row): Dc in each Dc/Ch sp up to the first Ch-2 sp. Dc in the Ch-2 sp. Ch 2 (underarm chain). Sk all stitches across the first sleeve up to the next Ch-2 sp. Dc in the next Ch-2 sp. Dc in all stitches across the Front panel up to the next Ch-2 sp. Dc in the Ch-2 sp. Ch 2 (underarm chain). Sk all stitches across the second sleeve up to the last Ch-2 sp. Dc in the last Ch-2 sp and in all remaining Back panel stitches. (78 sts).
- Row 10 (Join): Dc in the first st and in each Dc and each Ch of the Ch-2 sps across. Join with a Sl St to the beg Ch 3 to form a circle. (82 Dc). Do not turn. FO Yarn A.

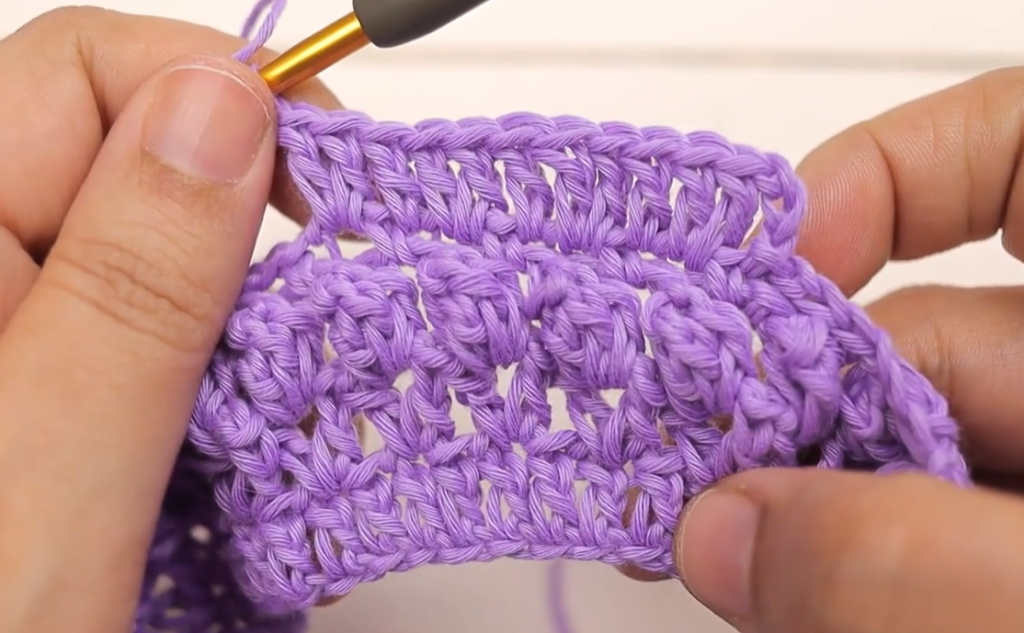
🌼 Section 3: The Skirt (Shell Stitch)
The skirt is worked in the round using Yarn B (Lemon). The skirt uses a scallop or “shell stitch” pattern, which creates the beautiful texture seen in the photo. Our starting count of 82 needs a small increase to work with the 5-stitch shell repeat.
Shell Stitch Setup
- Round 1 (Increase): Join Yarn B in any st. Ch 3 (counts as 1st Dc). Work 1 Dc in the same st. Dc in the next 3 sts. (2 Dc in the next st, Dc in the next 3 sts). Rep from the parentheses 19 times. Work 2 Dc in the last st. Join with Sl St to top of Ch 3. (102 Dc). (This count is close to a multiple of 5 for the shells.)
- Round 2 (Shell Setup): Ch 1, Sc in the same st. Ch 2, Sk 2 sts. Dc Shell (5 Dc) in the next st. Ch 2, Sk 2 sts. Sc in the next st. Rep from the parentheses around. To end, work the final Dc Shell, Ch 2, Sk 2 sts. Join with Sl St to the beg Sc. (17 complete shells).
Shell Stitch Repeats
- Round 3: Sl St into the Ch-2 sp. Ch 3 (counts as 1st Dc), 2 Dc in the same Ch-2 sp. Sc in the center (3rd) Dc of the next Dc Shell. 5 Dc Shell in the next Ch-2 sp. Rep from the parentheses around. Sc in the center Dc of the last shell. Work 2 Dc in the beg Ch-2 sp (where you started). Join with Sl St to top of Ch 3. (17 complete shells).
- Round 4: Sl St into the first Dc (to center your work). Ch 1, Sc in the same st. Ch 2. Dc Shell (5 Dc) in the next Sc. Ch 2. Sc in the center (3rd) Dc of the next Dc Shell. Rep from the parentheses around. Join with Sl St to the beg Sc. (17 complete shells).
- Round 5: Sl St into the Ch-2 sp. Ch 3 (counts as 1st Dc), 2 Dc in the same Ch-2 sp. Sc in the center (3rd) Dc of the next Dc Shell. 5 Dc Shell in the next Ch-2 sp. Rep from the parentheses around. Sc in the center Dc of the last shell. Work 2 Dc in the beg Ch-2 sp. Join with Sl St to top of Ch 3.
- Continue repeating Rounds 4 and 5 until your skirt reaches the desired length. For a 6-12 month size, stop when the skirt is approximately 5.5 – 6 inches (14 – 15 cm) long from the waistline.
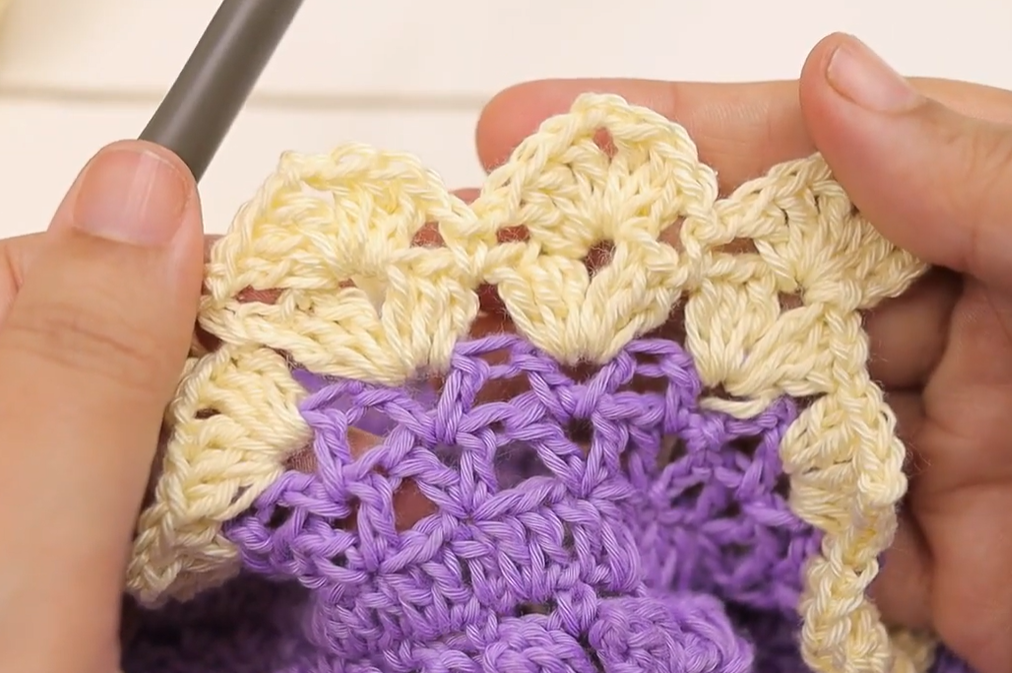
Color Change & Border
- Round 1 (Change to Yarn A): After finishing the final Round 5 repeat in Yarn B, FO Yarn B. Join Yarn A (Lilac) in the first st. Ch 3, Dc in each st around (working 1 Dc in Scs and Ch-2 sps, and 1 Dc in each Dc of the shells). (102 Dc). Join with Sl St to top of Ch 3.
- Round 2 (Final Border – Shells): Ch 1, Sc in the same st. Sk 2 sts, Dc Shell (5 Dc) in the next st. Sk 2 sts, Sc in the next st. Rep from the parentheses around. Join with Sl St to the beg Sc. FO Yarn A.
Video Tutorial:
🎀 Section 4: Finishing Touches
🌸 Decorative Flower
The image shows a simple, stacked petal flower with two leaves and beads. Use Yarn B (Lemon).
- Flower Base: Ch 4, Sl St to the first Ch to form a ring.
- Rnd 1 (Petals): Ch 2. (3 Tr, Sl St) in the ring. Rep 4 more times to create 5 petals. (5 petals total). FO.
- Leaves (Make 2): Ch 6. Sl St in the 2nd Ch from hook, Sc in the next Ch, Hdc in the next 2 Chs, Sl St in the last Ch. FO, leaving a long tail for sewing.
✂️ Edging & Closure
- Neckline: Join Yarn A at the top corner of the back opening. Ch 1, Sc evenly around the neckline. FO.
- Sleeve Edging: Join Yarn A at the underarm. Ch 1, Sc evenly around the armhole opening. FO. Repeat for the second sleeve.
- Back Closure Edging (Using Yarn A):
- Button Band: Join yarn at the bottom of the right back opening edge. Ch 1, Sc evenly up the edge. FO.
- Buttonhole Band: Join yarn at the bottom of the left back opening edge. Work 2 rows of Sc evenly up the edge. In the 3rd Row, create the buttonholes (Ch 1, Sk 1 st) where the buttons will align. FO.
✨ Assembly
- Sew Buttons: Sew the 3 buttons onto the solid button band.
- Attach Flower: Position the flower and leaves at the waistline where the two colors meet. Sew them securely in place.
- Add Beads: Stitch the two pearl beads to the center of the flower for an elegant finish.
- Weave Ends: Weave in all remaining yarn tails neatly.
Your stunning Lilac & Lemon Blossom Dress is now ready! Enjoy your beautiful handmade creation!


