
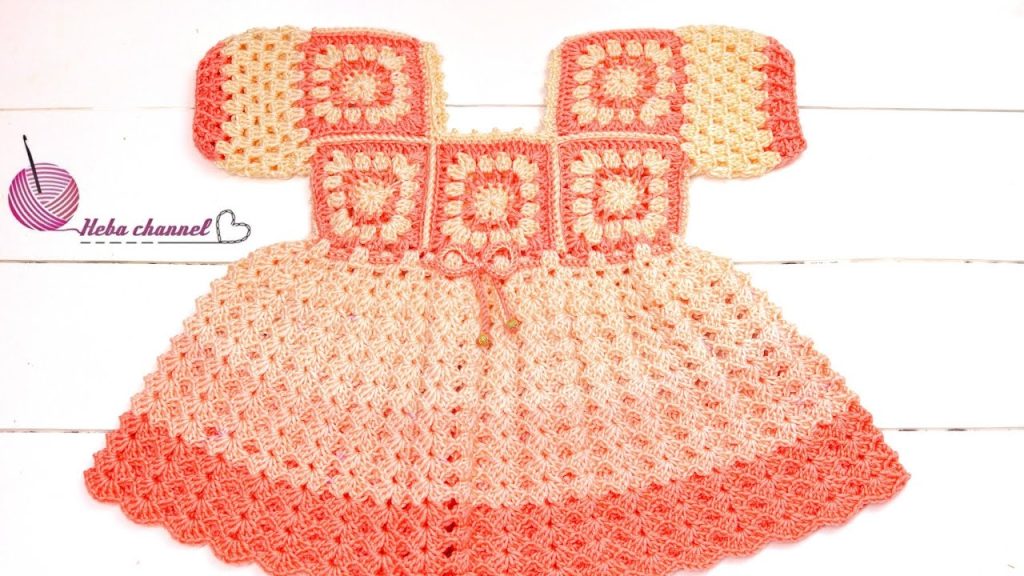
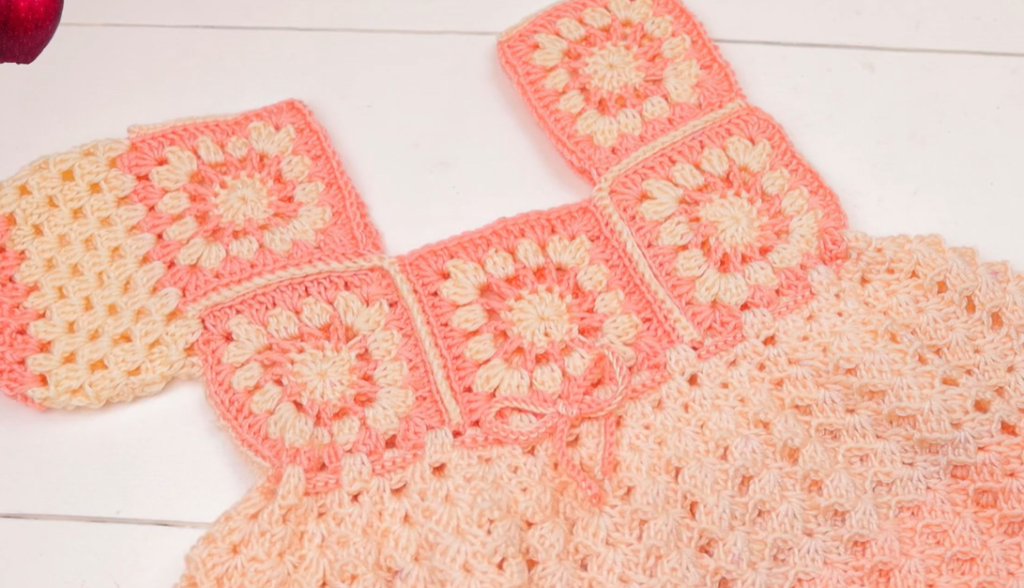
Hello, creative crafters! Get ready for a truly special project: the Sunset Square Yoke Dress. This design stands out with its eye-catching construction—a yoke built entirely from classic Granny Squares, giving it a beautiful structured top and sleeves. The lower body flows out in a gorgeous shell stitch pattern, perfect for showcasing an ombré or variegated yarn like the one in the photo!
This is a detailed pattern, best suited for an Intermediate crocheter who enjoys working with separate motifs before joining.
🛍️ Section 1: Materials & Gauge
🧶 Supplies You’ll Need
- Yarn: Approximately 350 – 400 yards of DK weight (Category 3) yarn.
- For the ombré look: Use a multi-colored yarn that gradually shifts from light to dark (e.g., peach to coral), or purchase two shades and plan your color changes.
- Hook: 4.0 mm (G/6) crochet hook, or size needed to obtain gauge.
- Buttons: 1 small button (approx. 0.5 inches / 1.25 cm) for the back neck closure (optional, or use a slip knot tie).
- Cord: A small amount of coordinating yarn for the waist tie.
- Tools: Stitch markers, a tapestry needle, and scissors.
📏 Granny Square Gauge
The fit of the yoke depends on the size of your squares.
- A finished Granny Square (4 Rounds) should measure approximately 4 x 4 inches (10 x 10 cm).
- Tip: If your square is too large, drop down a hook size. If too small, go up a size.
📝 Key Abbreviations
| Abbreviation | Meaning | Abbreviation | Meaning | |
| Ch | Chain | Dc | Double Crochet | |
| Sl St | Slip Stitch | Tr | Treble Crochet | |
| Sc | Single Crochet | Sp | Space | |
| Hdc | Half Double Crochet | Dc Cl | Dc Cluster (3 Dc in space) | |
| Beg | Beginning | Sk | Skip |
Export to Sheets
🔲 Section 2: The Granny Squares
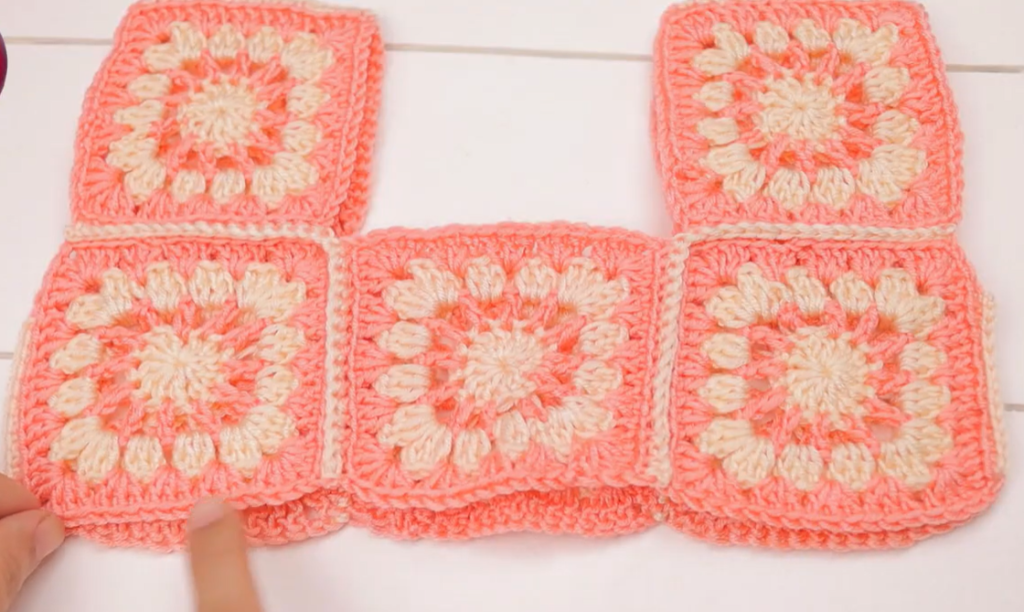
The yoke is constructed from 5 identical Granny Squares for the front and back, and 2 half-squares for the sleeves. We will start with the full squares.
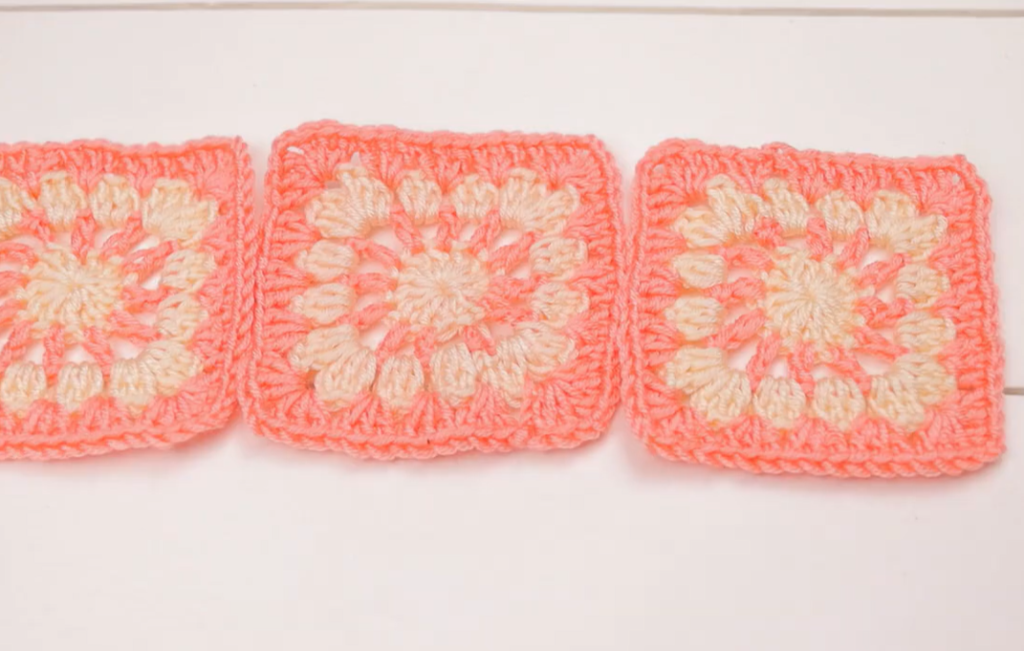
The Full Granny Square (Make 5)
Use your yarn of choice, working from the lightest shade outwards if using multiple colors.

Rnd 1: Ch 4, Sl St into the 1st Ch to form a ring. Ch 3 (counts as 1st Dc), 2 Dc into the ring. (Ch 2, 3 Dc into the ring) 3 times. Ch 2, Sl St to the top of the beg Ch 3. (4 Dc clusters, 4 Ch-2 sps).
Rnd 2: Sl St into the next 2 Dc and into the first Ch-2 sp. Ch 3, (2 Dc, Ch 2, 3 Dc) into the same Ch-2 sp (first corner). Ch 1, (3 Dc, Ch 2, 3 Dc) into the next Ch-2 sp (corner). Rep from * to * 2 more times. Ch 1, Sl St to the top of the beg Ch 3. (8 Dc clusters, 4 Ch-2 corner sps, 4 Ch-1 side sps).
Rnd 3: Sl St into the next 2 Dc and into the Ch-2 sp. Ch 3, (2 Dc, Ch 2, 3 Dc) into the same Ch-2 sp (corner). Ch 1, 3 Dc into the next Ch-1 sp (side). Ch 1, (3 Dc, Ch 2, 3 Dc) into the next Ch-2 sp (corner). Rep from * to * 2 more times. Ch 1, 3 Dc into the last Ch-1 sp. Ch 1, Sl St to the top of the beg Ch 3. (12 Dc clusters, 4 Ch-2 corner sps).
Rnd 4: Sl St into the next 2 Dc and into the Ch-2 sp. Ch 3, (2 Dc, Ch 2, 3 Dc) into the same Ch-2 sp (corner). Ch 1, (3 Dc in the next Ch-1 sp, Ch 1) twice (sides). (3 Dc, Ch 2, 3 Dc) into the next Ch-2 sp (corner). Rep from * to * 2 more times. Complete the last side, Ch 1, Sl St to the top of the beg Ch 3. FO, leaving a long tail for joining.
The Half Granny Square (Make 2)
These form the tops of the shoulders/sleeves.
Row 1: Ch 5, Dc in the 4th Ch from the hook and in the next Ch (counts as 2 Dc). (3 Dc, Ch 2, 3 Dc) into the last Ch (corner). Ch 2, 3 Dc into the same Ch (half-corner). Ch 3, turn. (3 Dc clusters, 2 Ch-2 sps).
Row 2: 2 Dc into the first st. Ch 1, 3 Dc into the next Ch-2 sp. Ch 1, (3 Dc, Ch 2, 3 Dc) into the corner Ch-2 sp. Ch 1, 3 Dc into the next Ch-2 sp. Ch 1, 3 Dc into the top of the turning Ch. Ch 3, turn. (6 Dc clusters).
Row 3: 2 Dc into the first st. Ch 1, (3 Dc in next Ch-1 sp, Ch 1) twice. (3 Dc, Ch 2, 3 Dc) into the corner Ch-2 sp. Ch 1, (3 Dc in next Ch-1 sp, Ch 1) twice. 3 Dc into the top of the turning Ch. FO.
🧵 Section 3: Yoke Assembly
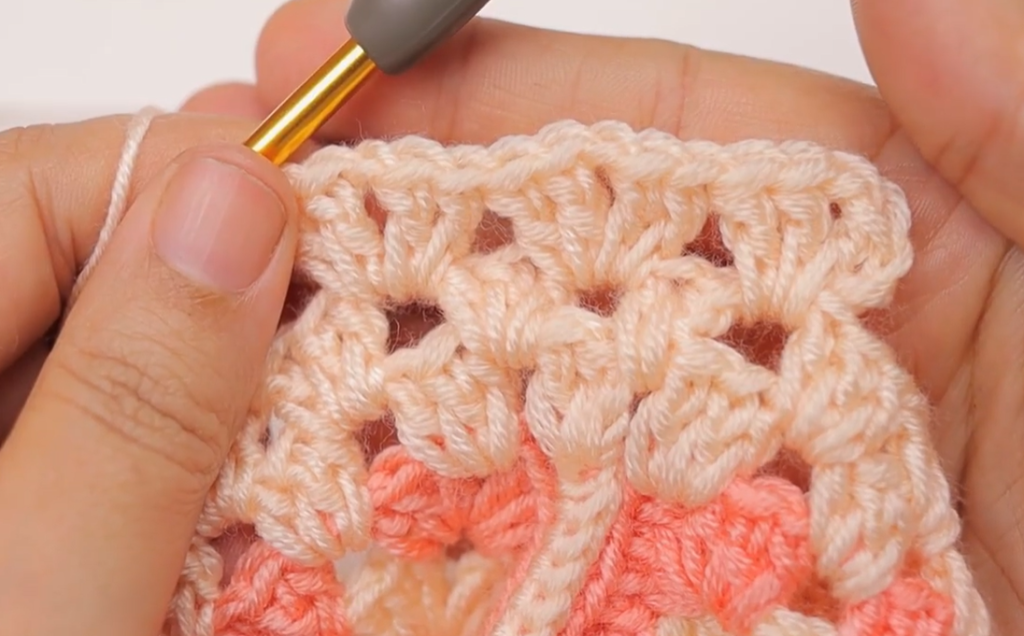
Now we assemble the squares using a simple Sl St seam (or Sc seam, if preferred) along the joining edges.
- Front Panel: Lay three full squares side-by-side. Join them along the center edges only. (3 squares, 2 seams).
- Back Panels: The remaining two full squares will form the back, separated by the neck opening. Do not join these two squares.
- Join Front to Back: Join the side edges of the three-square Front Panel to the side edges of the two separate Back Squares.
- You now have a tube of 5 squares.
- Add Shoulders/Sleeves: Join the straight edge of one Half Granny Square to the top edge of the Front-Left Square and the Back-Left Square. The curved edge of the Half Square is the sleeve opening. Repeat for the right side.
Your yoke is now a solid circle of squares with openings for the neck, armholes, and a slit down the center back.
🌼 Section 4: The Skirt (Fan/Shell Stitch)
The skirt is worked in the round starting from the bottom edge of the assembled yoke.
Base & Increase Round
- Join yarn (continue with the same yarn color or change to a lighter shade for the transition) into any corner Ch-2 sp on the bottom edge of the yoke.
- Round 1 (DC Setup): Ch 3 (counts as 1st Dc). Work 2 Dc in the same corner sp. Dc in each Dc and Ch-1 sp around the bottom edge of the yoke. Work 3 Dc in each corner Ch-2 sp and 3 Dc in the spaces between the squares to ensure a flat, smooth transition. Join with Sl St to top of Ch 3.
- Total Stitch Count: This should be approximately 140-160 stitches. Adjust to be a multiple of 6 (or 5, depending on the shell size you choose). Let’s aim for a multiple of 6.
- Round 2 (Shell Start): Ch 1, Sc in the same st. Sk 2 sts, Dc Shell (5 Dc) in the next st. Sk 2 sts, Sc in the next st. Rep from the parentheses around. To end, Sk 2 sts, Dc Shell. Sl St to the beg Sc.
Shell Stitch Repeats
- Round 3: Sl St into the next 2 Dc (to center over the shell). Ch 1, Sc in the center (3rd) Dc of the shell. Dc Shell (5 Dc) in the next Sc. Sc in the center (3rd) Dc of the next Dc Shell. Rep from the parentheses around. Join with Sl St to the beg Sc.
- Round 4: Sl St into the Sc. Ch 3 (counts as 1st Dc), 2 Dc in the same Sc. Sc in the center (3rd) Dc of the next Dc Shell. 5 Dc Shell in the next Sc. Rep from the parentheses around. Sc in the center Dc of the last shell. Work 2 Dc in the beg Sc. Join with Sl St to top of Ch 3.
- Continue repeating Rounds 3 and 4 until the skirt reaches the desired length. The skirt in the image looks quite long, giving the finished item a nice drape. Stop when the skirt measures approximately 9-10 inches (23-25 cm) from the joining row for a 6-12 month size.
The Final Border
To create the thick, dark band at the bottom, switch to your darkest yarn shade (or simply continue if using a single variegated yarn).
- Final Round (Scallop Edge): Rep Round 4, but substitute Tr (Treble Crochet) for Dc to make the final shells larger and bolder. Sl St to the top of the beg Ch 3. FO.
Video Tutorial:
✨ Section 5: Finishing Touches
🎀 Edging & Cord
- Neckline: Join yarn at the top of the back opening. Ch 1, Sc evenly around the entire neckline opening and down both sides of the back slit. FO.
- Sleeves: Join yarn at the center bottom of the armhole. Ch 1, Sc evenly around the armhole opening. FO. Repeat for the second sleeve.
- Waist Cord: Make a simple Ch cord about 30 inches (75 cm) long. Weave the cord through the spaces of Round 1 of the Skirt (the first DC row below the squares). Tie it into a neat bow in the front.
✂️ Back Closure
- Sew one small button to the top of one back square edge, and create a small Ch 3 loop on the opposite edge to serve as the buttonhole. This secures the top of the neck opening.
💖 Final Assembly
- Weave in all remaining yarn tails securely using your tapestry needle.
Your stunning, one-of-a-kind Sunset Square Yoke Dress is now complete! It’s an absolutely beautiful piece that captures the warmth of a setting sun.


