✨ Introduction: The Classic Solid Hexagon Granny
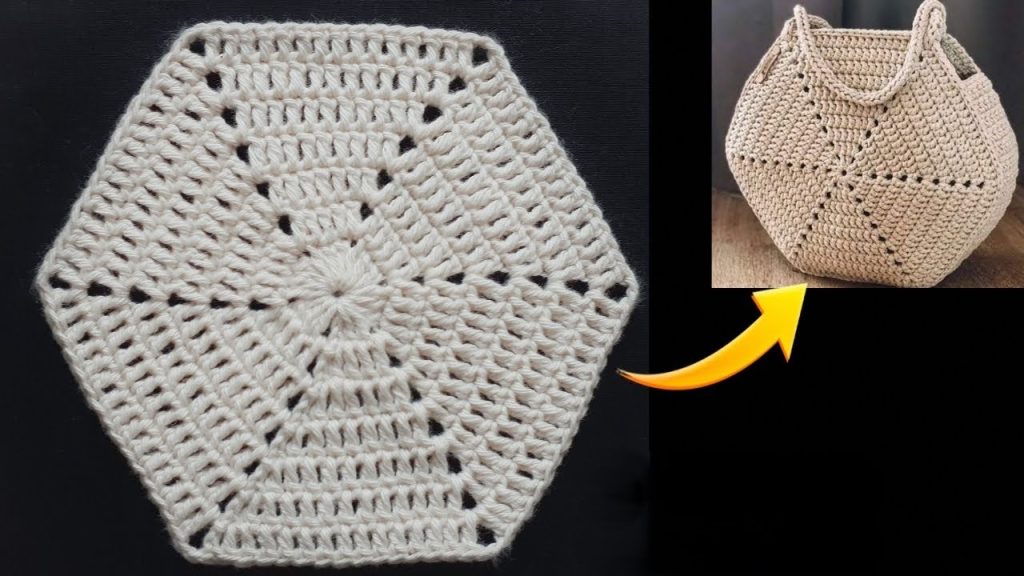
Welcome to the ultimate guide for crocheting the beautiful and versatile Solid Granny Hexagon! Featured in the video tutorial, this motif is a foundational piece that every crocheter should have in their arsenal. Unlike the traditional square, the six-sided shape offers unique possibilities for garments, bags, and home décor, and it comes together surprisingly quickly using simple Double Crochet stitches.
This pattern creates a dense, sturdy fabric that is perfect for projects requiring a bit more substance than airy lace. Because the pattern is worked in the round, the increases are strategically placed at the six corners, allowing the sides to grow symmetrically and indefinitely. Whether you’re making coasters, a colorful blanket, or planning a structured garment, this solid hexagon is your perfect starting block!
Why Choose the Solid Hexagon?
- Versatile Joining: Hexagons tile together seamlessly to create complex, beautiful large fabrics.
- Dense Fabric: Uses solid DC stitches for warmth and sturdiness—perfect for bags or winter throws.
- Easy to Memorize: The pattern is a single, repeating increase formula, making it a wonderful project for working on while listening to a podcast or watching TV.
- Customizable Size: You can stop at any round to create small coasters, or continue increasing until you have a large rug or blanket.
Suggested Projects
| Project Type | Idea | Notes |
| Blankets & Throws | Hexie Pop, Tessellating Hexagons | Join multiple motifs for a modern, geometric look. |
| Accessories | Handbags, Backpacks | The solid fabric provides structure for a sturdy bag. |
| Home Décor | Coasters, Placemats, Rugs | Use a heavy yarn or two strands for a firm, durable finish. |
| Garments | Cardigans, Ponchos | The natural drape of a large hexagon works well for shoulder wraps. |
📌 Pattern Notes & Gauge
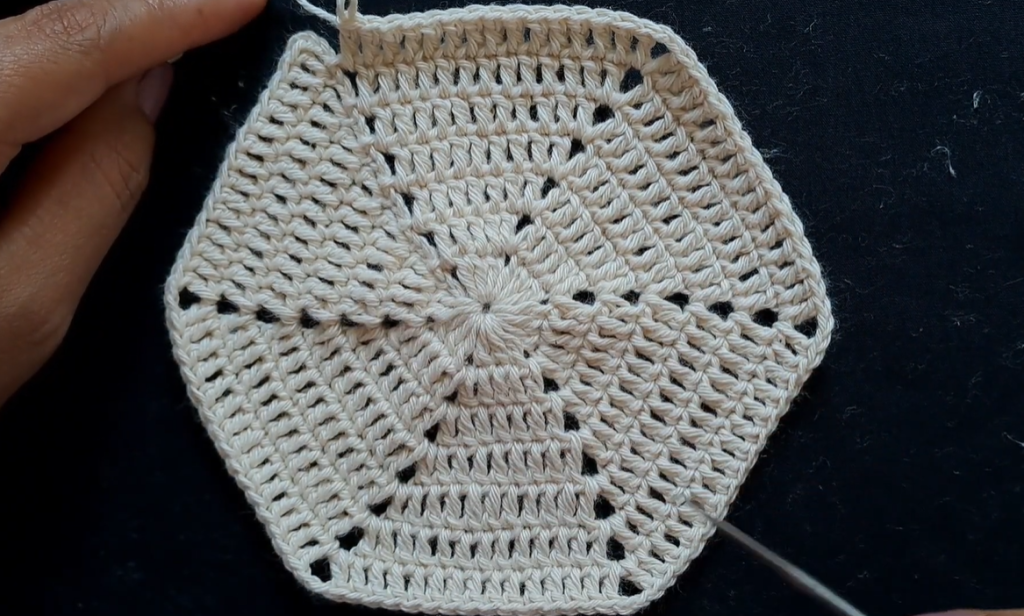
Understanding the structure is key to this pattern. The hexagon is composed of six sides and six corner spaces. Each round, you will increase the number of stitches on the six sides by two, while always working a (DC, Ch 2, DC) into the corner space.
Stitch Multiple
Since this is worked in the round, there is no starting chain multiple. The pattern simply builds upon the previous round’s stitch count.
Gauge (Approximate)
Gauge is not critical unless you are joining it to another specific size of motif. For the sample size shown in the video (7 rounds using a 2.0 mm hook and fine cotton yarn):
- The finished hexagon should measure approximately 5 to 6 inches from side to side.
- The final side length (Round 7) will contain 15 Double Crochet stitches.
Working the Center
The pattern begins in the round. You can choose one of two methods for starting:
- Magic Ring (Recommended): Creates a tight center hole.
- Chain Circle: Chain 4, and slip stitch (sl st) into the first chain to form a ring.
📚 Abbreviations & Materials
All instructions use US crochet terms.
| Abbreviation | Meaning |
| ch | Chain |
| st(s) | Stitch(es) |
| sl st | Slip Stitch |
| dc | Double Crochet |
| Corner | Corner space from the previous round (always Ch 2) |
| Rep | Repeat |
| beg | Beginning |
| DC Group | The side of solid Double Crochet stitches |
Materials
- Yarn: Any weight yarn can be used. The video uses a 4-ply cotton yarn.
- Hook: A hook size appropriate for your yarn. For the cotton yarn shown, a 2.0 mm hook is used. Adjust your hook size based on your yarn choice.
- Tools: Scissors and a tapestry needle for weaving in ends.
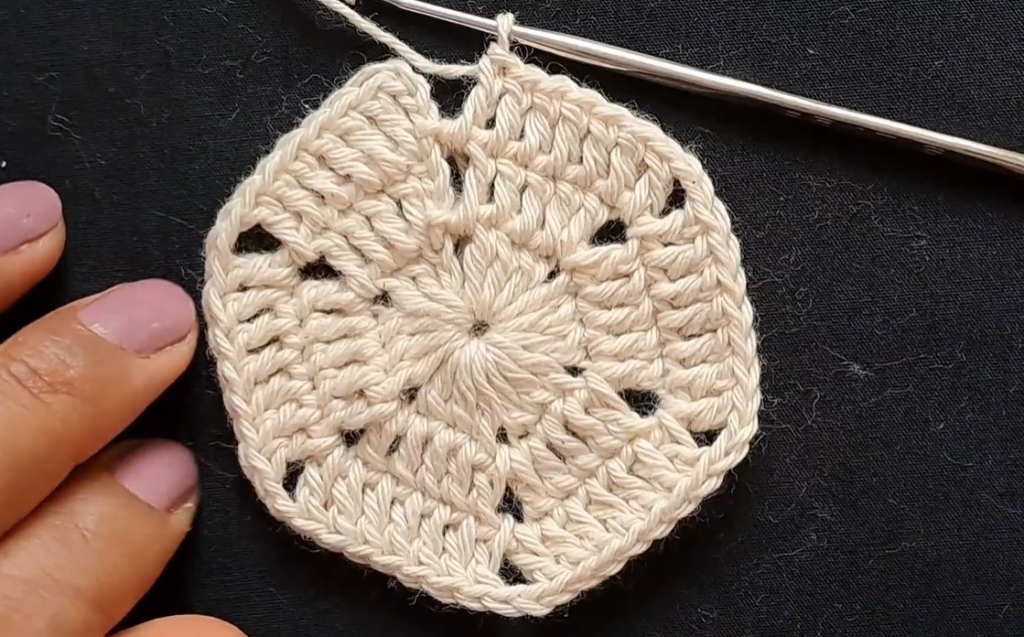
⭐ The Hexagon Core (Round 1)
This round establishes the six sides and six corners.
Start: Make a magic ring (or Ch 4 and join with sl st to form a circle).
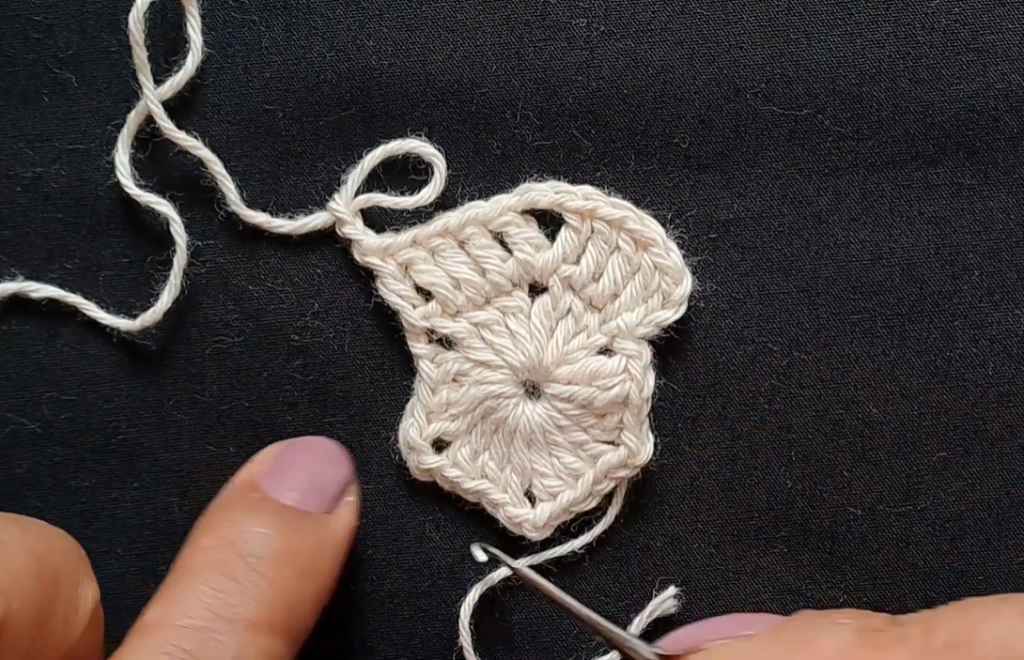
Round 1:
- Side 1: Ch 3 (counts as first DC). Work 2 DC into the ring. (3 DC total)
- Corner 1: Ch 2.
- Repeat: [Work 3 DC into the ring. Ch 2.] Rep from * 5 more times. (You will have 6 DC groups and 6 Ch-2 corner spaces.)
- Join: Sl st to the top of the beg Ch 3 to join the round.
- (Stitch Count: 18 DC and 6 Ch-2 spaces)
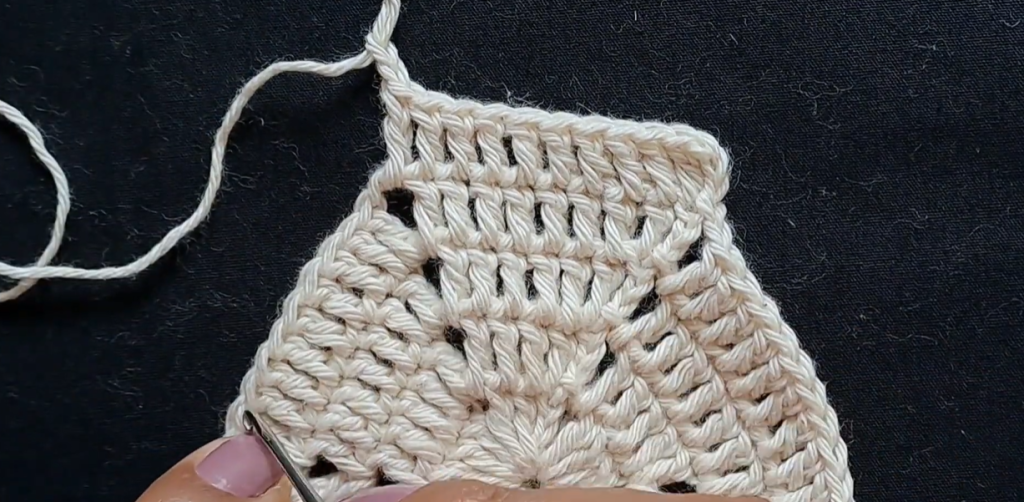
📐 The Increasing Sides (Rounds 2-7+)
In every subsequent round, the number of DC stitches on each side increases by 2 (one at the beginning of the side, one at the end of the side, both worked into the corner space).
Round 2: Side of 5 DC
- Start: Ch 3 (counts as 1 DC). Work 1 DC into the next 2 stitches.
- First Corner: Work (1 DC, Ch 2, 1 DC) into the first Ch-2 corner space.
- Next Side: Work 1 DC into the next 3 stitches (the side DC group).
- Repeat: [Work (1 DC, Ch 2, 1 DC) into the next Ch-2 corner space. Work 1 DC into the next 3 stitches.] Rep from * 4 more times.
- Final Join: Sl st to the top of the beg Ch 3 to join.
- (Stitch Count: 30 DC and 6 Ch-2 spaces. Each side has 5 DC.)
Round 3: Side of 7 DC
- Start: Ch 3 (counts as 1 DC). Work 1 DC into the next 4 stitches.
- First Corner: Work (1 DC, Ch 2, 1 DC) into the Ch-2 corner space.
- Next Side: Work 1 DC into the next 5 stitches (the side DC group).
- Repeat: [Work (1 DC, Ch 2, 1 DC) into the next Ch-2 corner space. Work 1 DC into the next 5 stitches.] Rep from * 4 more times.
- Final Join: Sl st to the top of the beg Ch 3 to join.
- (Stitch Count: 42 DC and 6 Ch-2 spaces. Each side has 7 DC.)
Round 4: Side of 9 DC
- Start: Ch 3 (counts as 1 DC). Work 1 DC into the next 6 stitches.
- First Corner: Work (1 DC, Ch 2, 1 DC) into the Ch-2 corner space.
- Next Side: Work 1 DC into the next 7 stitches.
- Repeat: [Work (1 DC, Ch 2, 1 DC) into the next Ch-2 corner space. Work 1 DC into the next 7 stitches.] Rep from * 4 more times.
- Final Join: Sl st to the top of the beg Ch 3 to join.
- (Stitch Count: 54 DC and 6 Ch-2 spaces. Each side has 9 DC.)
Round 5: Side of 11 DC
- Start: Ch 3 (counts as 1 DC). Work 1 DC into the next 8 stitches.
- First Corner: Work (1 DC, Ch 2, 1 DC) into the Ch-2 corner space.
- Next Side: Work 1 DC into the next 9 stitches.
- Repeat: [Work (1 DC, Ch 2, 1 DC) into the next Ch-2 corner space. Work 1 DC into the next 9 stitches.] Rep from * 4 more times.
- Final Join: Sl st to the top of the beg Ch 3 to join.
- (Stitch Count: 66 DC and 6 Ch-2 spaces. Each side has 11 DC.)
Round 6: Side of 13 DC
- Start: Ch 3 (counts as 1 DC). Work 1 DC into the next 10 stitches.
- First Corner: Work (1 DC, Ch 2, 1 DC) into the Ch-2 corner space.
- Next Side: Work 1 DC into the next 11 stitches.
- Repeat: [Work (1 DC, Ch 2, 1 DC) into the next Ch-2 corner space. Work 1 DC into the next 11 stitches.] Rep from * 4 more times.
- Final Join: Sl st to the top of the beg Ch 3 to join.
- (Stitch Count: 78 DC and 6 Ch-2 spaces. Each side has 13 DC.)
Round 7: Side of 15 DC
- Start: Ch 3 (counts as 1 DC). Work 1 DC into the next 12 stitches.
- First Corner: Work (1 DC, Ch 2, 1 DC) into the Ch-2 corner space.
- Next Side: Work 1 DC into the next 13 stitches.
- Repeat: [Work (1 DC, Ch 2, 1 DC) into the next Ch-2 corner space. Work 1 DC into the next 13 stitches.] Rep from * 4 more times.
- Final Join: Sl st to the top of the beg Ch 3 to join.
- (Stitch Count: 90 DC and 6 Ch-2 spaces. Each side has 15 DC.)
💡 Troubleshooting & Customization
Continuing to Grow
To make your hexagon larger, continue the pattern using the formula:
- Next Round: Ch 3, DC across the side to the corner. The number of DCs will be the Previous DC Count + 2. Work (DC, Ch 2, DC) in the corner.
Changing Color
This pattern is fantastic for using multiple colors. To change color:
- When joining the round, pull the new color through on the final sl st.
- Cut the old yarn and weave in the ends immediately, or carry the yarn up the side if you plan to use it again soon.
- Begin the next round with the new color’s Ch 3.
Identifying Your Stitches
- Corner Stitches: Always look for the Ch-2 space. The DC stitches on either side of that space are your corner increases from the previous round.
- Side Stitches: All the stitches between the increases are your solid side stitches.
✂️ Finishing & Joining
Once you have completed your final desired round, the process for finishing is simple:
- Fasten Off: After completing the final sl st, cut the yarn, leaving a 6-inch tail. Pull the tail through the last loop on your hook to secure the knot.
- Weave in Ends: Use a tapestry needle to carefully weave the starting tail (especially if using a magic ring, pull tight to close the center) and the finishing tail into the body of the stitches. Ensure the ends are secure and hidden within the dense fabric.
Video Tutorial:
Joining Motifs
Hexagons are most commonly joined using a Whipstitch or Slip Stitch Seam on the wrong side.
- Place two finished hexagons together, wrong sides facing out.
- Using a tapestry needle and yarn (or a crochet hook for a slip stitch seam), stitch or slip stitch through the back loops of the matching DCs along the six sides you wish to connect.
- Repeat this process to add more hexagons until your blanket or garment is complete!