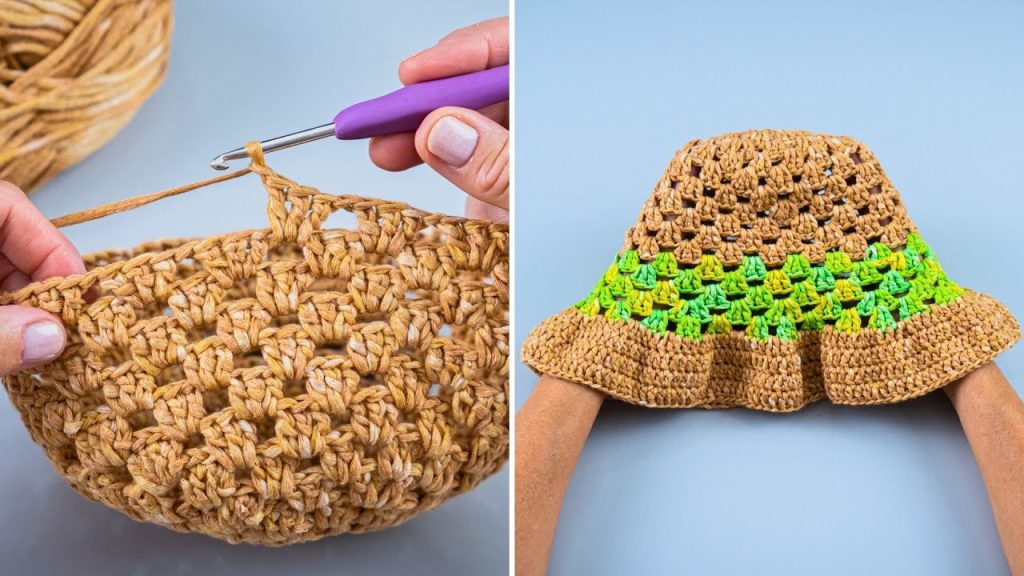
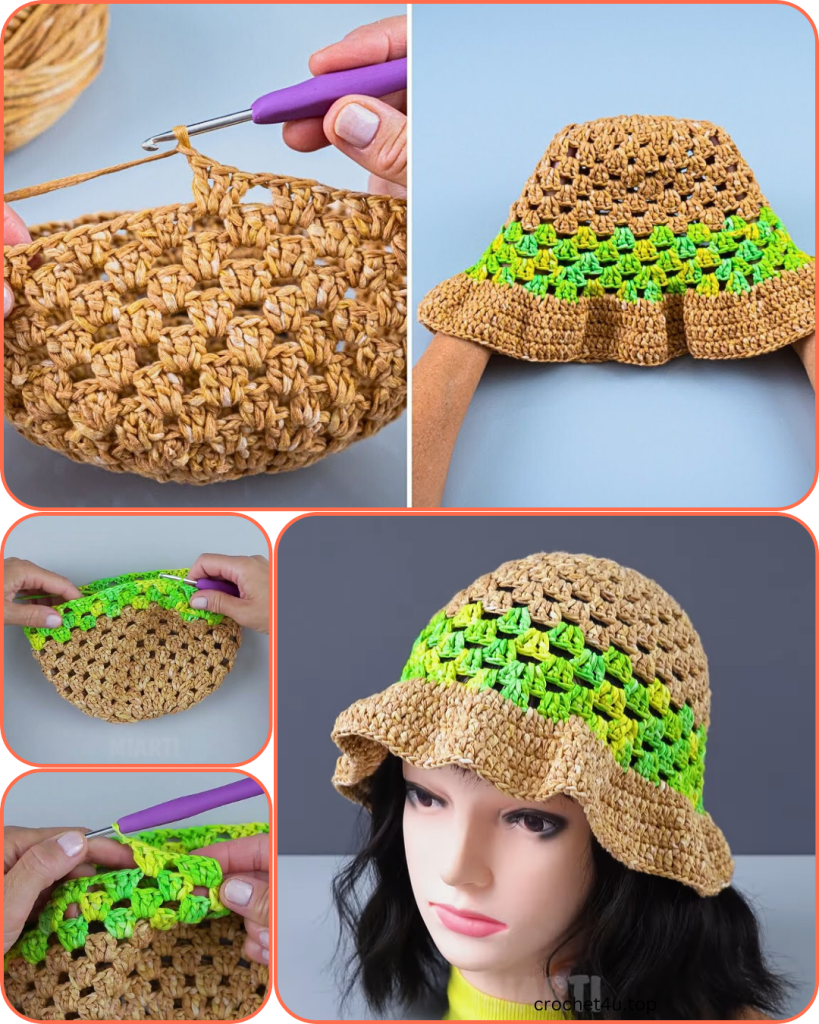
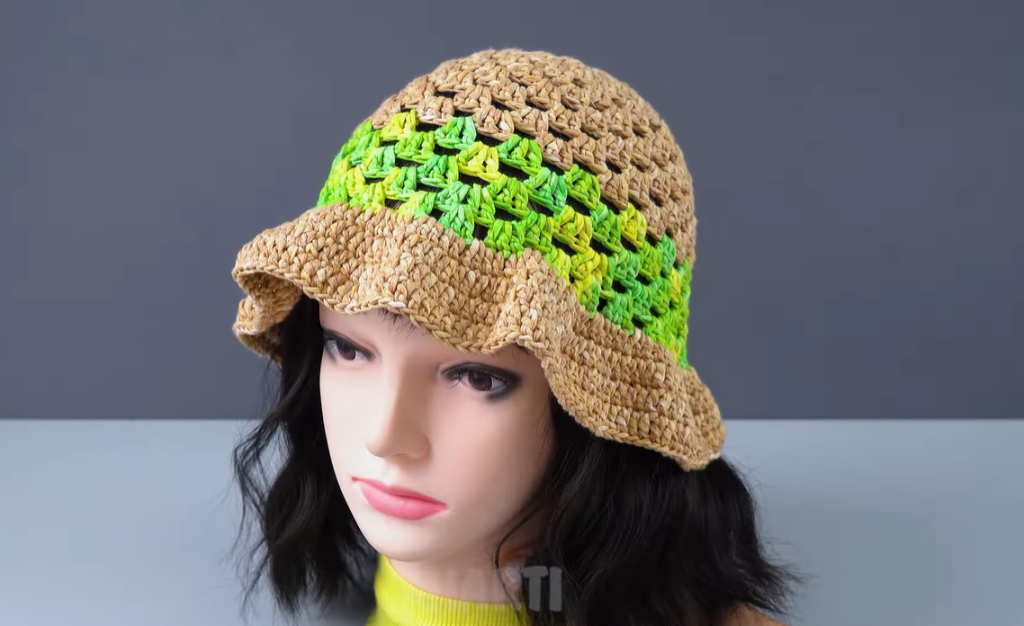
Summer adventures call for stylish accessories, and nothing says sunshine quite like a handmade sun hat! Today, we’re diving into creating a chic and breathable “Sunny Days Bucket Hat,” inspired by the gorgeous raffia hat with its vibrant stripe that you saw. This pattern uses a delightful shell-like stitch that creates an open, airy fabric—perfect for keeping you cool—and features an optional pop of color to make it truly unique.
Working with raffia or paper yarn might be a new experience for some, but the results are incredibly rewarding: a hat with great structure, a lovely texture, and that classic summer vibe. Even if you’ve never crocheted a hat before, this detailed pattern will guide you through each step, from the crown to the brim.
Let’s grab our hooks and some sunny yarn, and get ready to create your new favorite accessory!
Materials You’ll Need:
The right yarn is crucial for this hat’s structure and feel.
- Yarn: Approximately 150-200 yards (137-183 meters) of a worsted weight (Aran/10 ply) Raffia Yarn, Paper Yarn, or a sturdy Cotton Blend for the main color. Raffia/paper yarn gives the best structure, but a stiff cotton blend will also work.
- Main Color (MC): Approx. 120-150 yards (e.g., the natural/tan color in the image).
- Accent Color (AC): Approx. 30-50 yards (e.g., the green/yellow variegated stripe in the image).
- Crochet Hook: 4.0 mm (G/6) or size needed to obtain gauge. A hook that creates a slightly dense fabric with your chosen yarn will help the hat maintain its shape.
- Stitch Marker: Essential for working in continuous rounds.
- Yarn Needle: For weaving in ends. (A sturdy metal one is best for raffia).
- Scissors
- (Optional): Fabric stiffener if using a softer cotton yarn and desire more brim stiffness.
Gauge:
Gauge is important for ensuring your hat fits well!
- Using the stitch pattern (sc + dc into same st) as described below: 14 stitches (measured as 7 sets of sc/dc) and 9 rounds = 4 inches (10 cm).
Take a moment to make a small swatch to check your gauge. If your swatch is too large, try a smaller hook. If it’s too small, try a larger hook.
Abbreviations:
- ch: chain
- st(s): stitch(es)
- sl st: slip stitch
- sc: single crochet
- dc: double crochet
- inc: increase (e.g., working 2 sets of [sc+dc] into one stitch)
- PM: place marker
- MC: Main Color
- AC: Accent Color
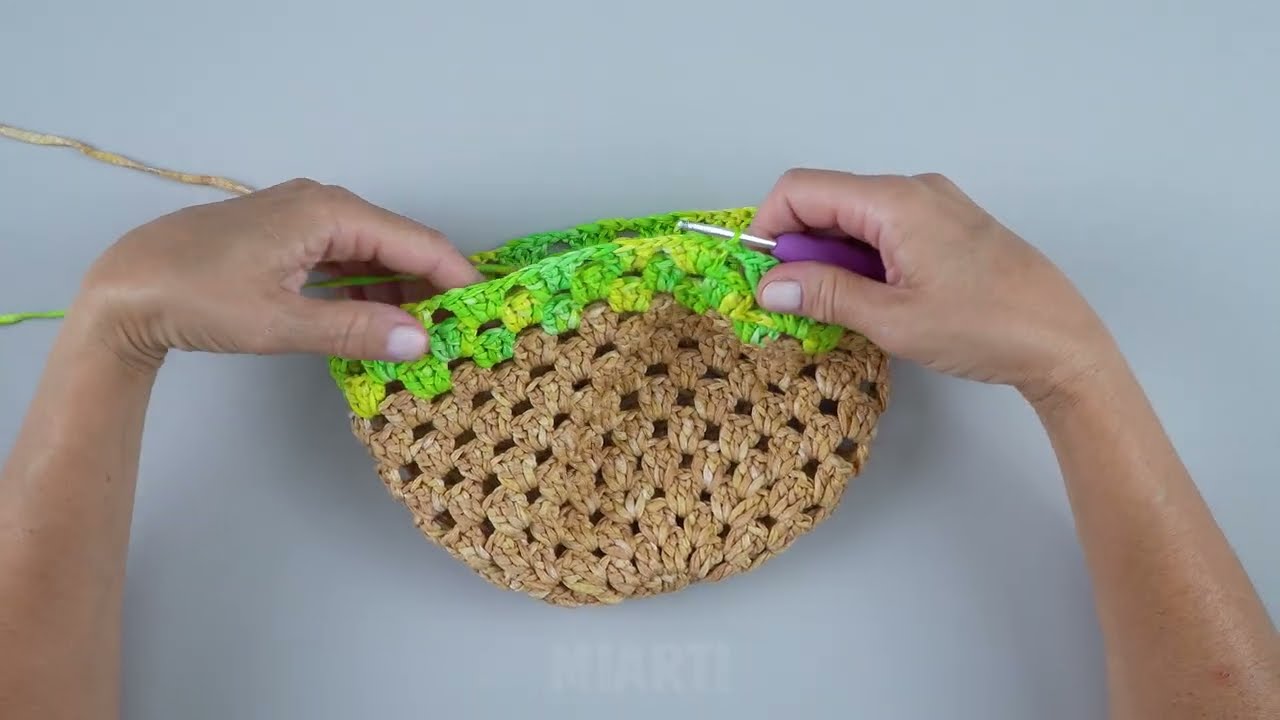
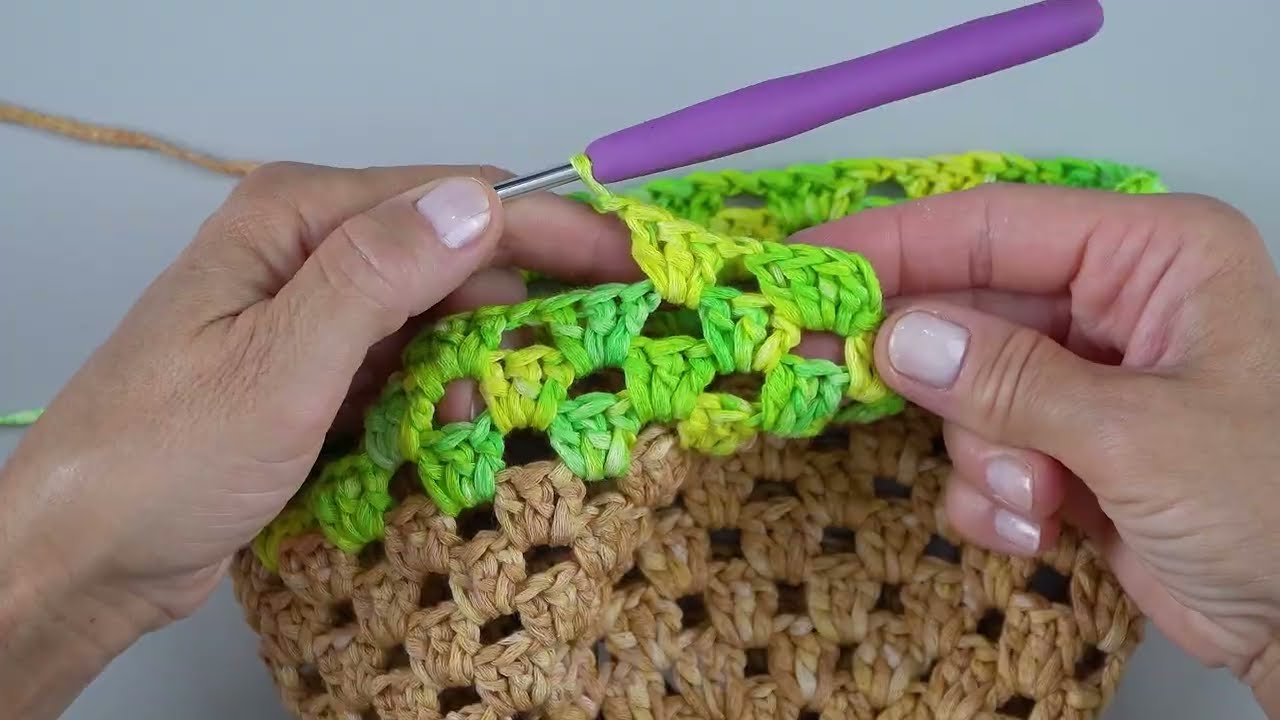
Special Stitch: Sc + Dc Set
This is the main stitch used throughout the hat, creating that lovely open, textured fabric.
- To make a Sc + Dc Set: Work 1 single crochet stitch and 1 double crochet stitch into the same stitch or space.
Pattern Notes:
- This hat is worked in continuous rounds from the top down. Do not join rounds unless specified. Use a stitch marker to keep track of the beginning of your rounds.
- Ch 1 at the beginning of a round does not count as a stitch.
- The pattern is written for an average adult head size (approx. 22-23 inches circumference). Adjustments for size are noted.
- When changing colors, complete the last yarn over of the last stitch of the previous round with the new color.
Part 1: The Crown of the Hat
We’ll begin by creating a flat circle that will form the top of your hat.
With Main Color (MC):
Round 1: Make a magic ring (or ch 2, and work all sts into the 2nd ch from hook). Work (sc, dc) into the ring. Repeat (sc, dc) 5 more times into the ring. Pull ring tight. Do not join. PM in the first sc. (6 sc + 6 dc sets = 12 sts total, 6 “sets”)
Round 2: (Sc, dc) into the first sc. (Sc, dc) into the first dc. Repeat (sc, dc) into each sc and dc around. (12 sc + 12 dc sets = 24 sts total, 12 “sets”)
- Alternatively, you can just work 2 sets of (sc, dc) into each of the 6 original (sc, dc) sets. This makes 12 sets total.
Round 3: (Sc, dc) into the first sc. (Sc, dc) into the next dc. [(Sc, dc) into the next sc, (sc, dc) into the next dc], (sc, dc) into the next sc, (sc, dc) into the next dc. Repeat … around.
- This round can be a bit tricky to describe with increases. Think of it as: (Sc, dc) in next sc, 2 sets of (sc, dc) in next dc. Repeat 6 times.
- Simpler way: (Sc, dc) in first st, (sc, dc) in next st, 2 sets of (sc, dc) in next st. Repeat around. This gives 18 sets total.
- (Sc, dc) in next st, 2 sets of (sc, dc) in next st. Repeat 12 times. (18 sc + 18 dc sets = 36 sts total, 18 “sets”)
- Let’s try: (Sc, dc) into the first sc, (sc, dc) into the next dc, 2 sets of (sc, dc) into the next sc. Repeat this 6 times around.
- Let’s try this: (Sc, dc) into first st. 2 sets of (sc, dc) into next st. Repeat around. (18 sets)
- Let’s simplify with the “sets” from the previous round.
- Round 3 (Using 12 sets from Round 2): 1 set of (sc, dc) into the next ‘sc’ of the previous round’s set, 2 sets of (sc, dc) into the next ‘dc’ of the previous round’s set. Repeat … 6 times around. (18 sc + 18 dc sets = 36 sts total, 18 “sets”)
Round 4: (Sc, dc) into the next ‘sc’ of the previous round’s set, (sc, dc) into the next ‘dc’ of the previous round’s set, 2 sets of (sc, dc) into the next ‘sc’ of the previous round’s set. Repeat … 6 times around. (24 sc + 24 dc sets = 48 sts total, 24 “sets”)
Round 5: (Sc, dc) into the next ‘sc’ of the previous round’s set, (sc, dc) into the next ‘dc’ of the previous round’s set, (sc, dc) into the next ‘sc’ of the previous round’s set, 2 sets of (sc, dc) into the next ‘dc’ of the previous round’s set. Repeat … 6 times around. (30 sc + 30 dc sets = 60 sts total, 30 “sets”)
Round 6: (Sc, dc) into the next 4 stitches (meaning 2 sets of (sc,dc) into 2 consecutive ‘sc+dc’ sets of previous round), 2 sets of (sc, dc) into the next stitch (meaning in either the sc or dc of the next set). Repeat … around. (36 sets, 72 sts total).
- Let’s use a standard circle increase:
- Round 1: 6 (sc, dc) sets (6 sets)
- Round 2: 2 (sc, dc) sets in each set (12 sets)
- Round 3: (1 set, 2 sets in next) x 6 (18 sets)
- Round 4: (1 set, 1 set, 2 sets in next) x 6 (24 sets)
- Round 5: (1 set, 1 set, 1 set, 2 sets in next) x 6 (30 sets)
- Round 6: (1 set, 1 set, 1 set, 1 set, 2 sets in next) x 6 (36 sets)
- Round 7: (1 set, 1 set, 1 set, 1 set, 1 set, 2 sets in next) x 6 (42 sets)
- Round 8: (1 set, 1 set, 1 set, 1 set, 1 set, 1 set, 2 sets in next) x 6 (48 sets)
- Round 9: (1 set, 1 set, 1 set, 1 set, 1 set, 1 set, 1 set, 2 sets in next) x 6 (54 sets)
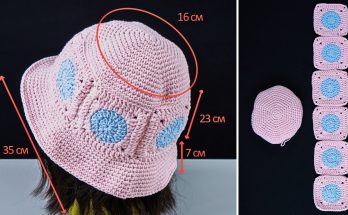
Continue increasing in this manner until your crown measures approximately 6-7 inches (15-18 cm) in diameter. For an adult hat, you’ll likely need to reach 54-60 sets (108-120 stitches total). The image shows a fairly large crown. Let’s aim for 60 sets.
Round X (Final Increase Round – e.g., Round 10 if you followed above to 54 sets): (1 set in each of the next 8 stitches, 2 sets in next stitch) 6 times. (60 sets total, 120 sts).
- Crown Diameter Check: Your crown should now measure about 6.5 – 7 inches (16.5 – 18 cm) in diameter, which usually fits an average adult head (22-23 inch circumference). Place it on a flat surface; it should lie flat. If it ripples, you have too many stitches; if it cups, you don’t have enough. Adjust your last increase round as needed.
Part 2: The Sides of the Hat (Body)
Now we’ll work straight rounds to form the body of the hat, with no more increases.
With Main Color (MC):
Rounds 11-15 (or desired length for MC body): (Sc, dc) into the first sc of the previous round’s set. Then (sc, dc) into the sc of each set around. (60 sets, 120 sts per round).
- Work in continuous rounds, moving your stitch marker up with each round.
- For the image, about 5 rounds of MC before the accent color seems appropriate.
Part 3: The Accent Stripe
Time for that beautiful pop of color!
Change to Accent Color (AC):
- Remember to complete the last yarn over of the last dc of Round 15 with your new accent color.
Rounds 16-18 (or desired stripe width): (Sc, dc) into the first sc of the previous round’s set. Then (sc, dc) into the sc of each set around. (60 sets, 120 sts per round).
- For the image, 3 rounds of AC create a nice, chunky stripe.
Part 4: Finishing the Body and Starting the Brim
We’ll switch back to the main color and work a few more rounds before transitioning to the brim.
Change back to Main Color (MC):
Rounds 19-21 (or desired length after stripe): (Sc, dc) into the first sc of the previous round’s set. Then (sc, dc) into the sc of each set around. (60 sets, 120 sts per round).
- For the image, 3 rounds of MC after the stripe looks right before the brim begins.
Part 5: The Brim
Now we’ll start increasing again to create the classic bucket hat brim.
Round 22: (Sc, dc) into the next 9 stitches (meaning 9 sets from previous round), 2 sets of (sc, dc) into the next stitch (meaning in either the sc or dc of the next set). Repeat … 6 times around. (66 sets, 132 sts total).
Round 23: (Sc, dc) into each sc of the previous round’s set around. (66 sets, 132 sts total).
Round 24: (Sc, dc) into the next 10 stitches (meaning 10 sets from previous round), 2 sets of (sc, dc) into the next stitch (meaning in either the sc or dc of the next set). Repeat … 6 times around. (72 sets, 144 sts total).
Round 25: (Sc, dc) into each sc of the previous round’s set around. (72 sets, 144 sts total).
Round 26: (Sc, dc) into the next 11 stitches (meaning 11 sets from previous round), 2 sets of (sc, dc) into the next stitch (meaning in either the sc or dc of the next set). Repeat … 6 times around. (78 sets, 156 sts total).
Round 27: (Sc, dc) into each sc of the previous round’s set around. (78 sets, 156 sts total).
Round 28 (Last Round of Brim – creating a clean edge): Sl st into the first sc of the previous round. Ch 1. Sc into the same sc. Sc in each st around (working only into the sc of each set). Join with a sl st to the first sc.
- This round of single crochet creates a neat, sturdy edge for the brim and helps it maintain its shape.
FO, leaving a long tail for weaving. Weave in all your ends securely. If using a softer yarn and desired, you can apply fabric stiffener to the brim according to product instructions.
Video Tutorial:
Congratulations!
You’ve just crocheted your very own “Sunny Days Bucket Hat”!
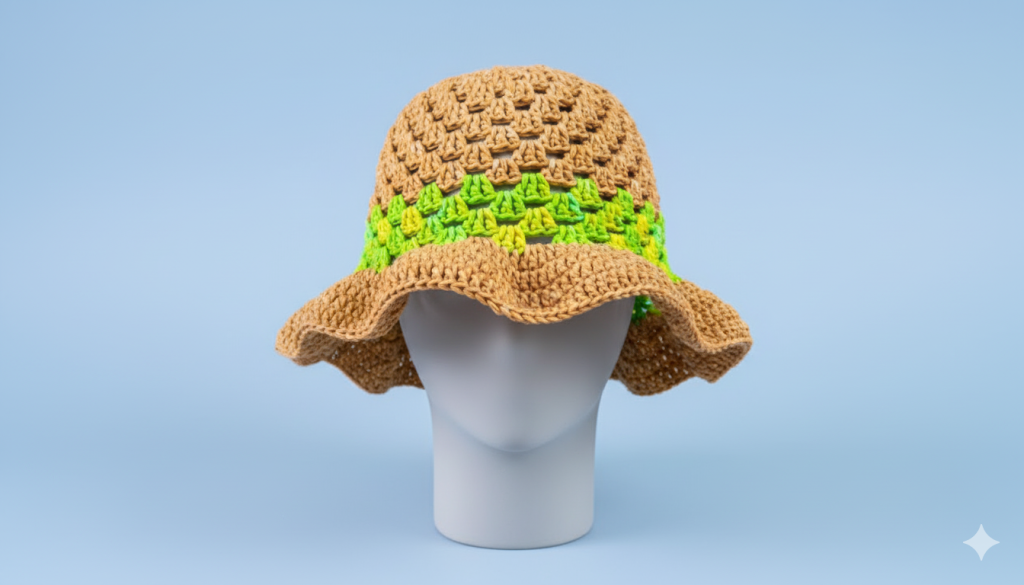
It’s stylish, breathable, and perfect for adding a handmade touch to any outfit. Whether you’re headed to the beach, a picnic, or just enjoying a stroll, this hat will keep you looking fabulous and feeling cool.
Enjoy your new, beautifully crafted hat!