
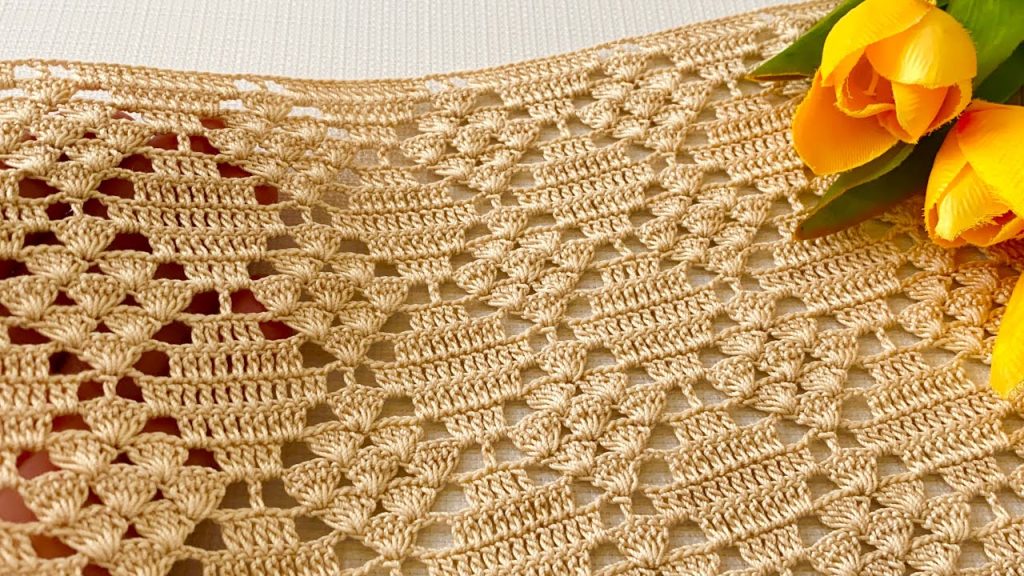
Embrace the beautiful texture of the Golden Ripple Weave, a fabric that combines dense, horizontal ridges with delicate, open lattice work. This unique blend of structure and airiness is perfect for creating lightweight throws, scarves, or elegant table runners. The rich, golden-tan color beautifully showcases the rhythmic 4-row pattern repeat, which looks complex but is deceptively simple once you master the placement.
⭐️ Project Blueprint and Technique Check
| Feature | Detail |
| Skill Level | Intermediate. Requires careful stitch counting, working into chain spaces, and consistent stitch height. |
| Stitches Used | Chain (ch), Slip Stitch (sl st), Single Crochet (sc), Double Crochet (dc), Treble Crochet (tr). |
| Construction | Worked flat in rows. The pattern is built upon two types of groups: solid dc blocks and open ch arches. |
| Yarn Type | Sport or DK Weight cotton blend is recommended for a balanced drape and stitch definition. |
| Pattern Repeat | A 4-row vertical repeat creates the full texture cycle. |
Export to Sheets
🧵 Materials Selection & Precision Gauge
Yarn: Choosing for Texture
- Weight: Sport Weight (Category 2) or DK Weight (Category 3) yarn. Using a yarn with good body will help the solid dc rows stand up to form the dense horizontal ridges.
- Fiber: 100% Cotton or a durable Cotton/Acrylic blend is recommended for excellent structure and washability.
- Color: A warm Golden Tan or Ecru (like the sample), or a solid, medium tone to highlight the dense texture.
- Yardage: Approximately 300−400 yards for a large scarf or small runner.
Hook: The Right Tool for Definition
- Size: 3.5 mm to 4.0 mm (US E/4 or G/6). The hook size should be chosen to give a comfortable tension that keeps the dc rows dense but allows the lattice work to open.
Notions & Blocking
- Tapestry Needle: For weaving in ends.
- T-pins and Blocking Mat: Recommended for squaring up the fabric and opening the lattice segments.

Precision Gauge
Gauge is measured across one full pattern repeat, which consists of one solid ridge and one open lattice segment.
- One Vertical Pattern Repeat (Rows 1-4): Approximately 1.5 inches tall.
- Horizontal Repeat (Solid block to Solid block): Approximately 1 inch wide.
- Starting Chain Calculation: The pattern repeats every 8 stitches. Use the formula: 8×(number of repeats)+3 ch
- Example: For 15 repeats across: 8×15+3=ch 123
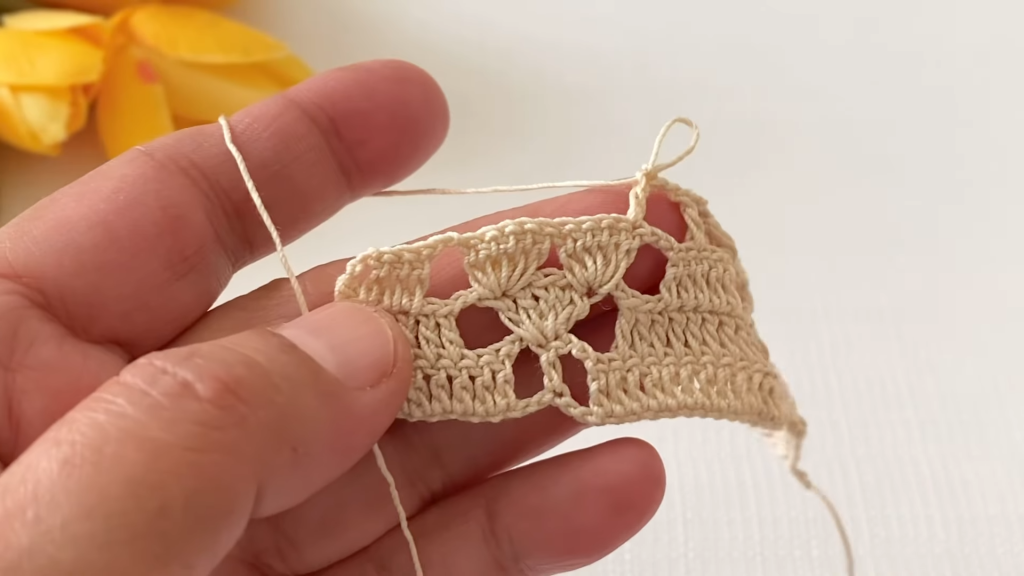
📝 Pattern Instructions: The Foundation
This row establishes the first line of openwork, ready to accept the first solid dc row.
Row 1 (Foundation Net – RS): Chain the required amount (e.g., ch 123). dc in the 4th ch from the hook (counts as dc).
- ch 1, sk 1 ch, dc in the next 3 ch.
- ch 1, sk 1 ch, dc in the next 3 ch. Repeat the sequence ch 1,sk 1 ch,dc in next 3 ch across the row. You will end with dc in the last 2 ch (including the final ch).
- Turn.
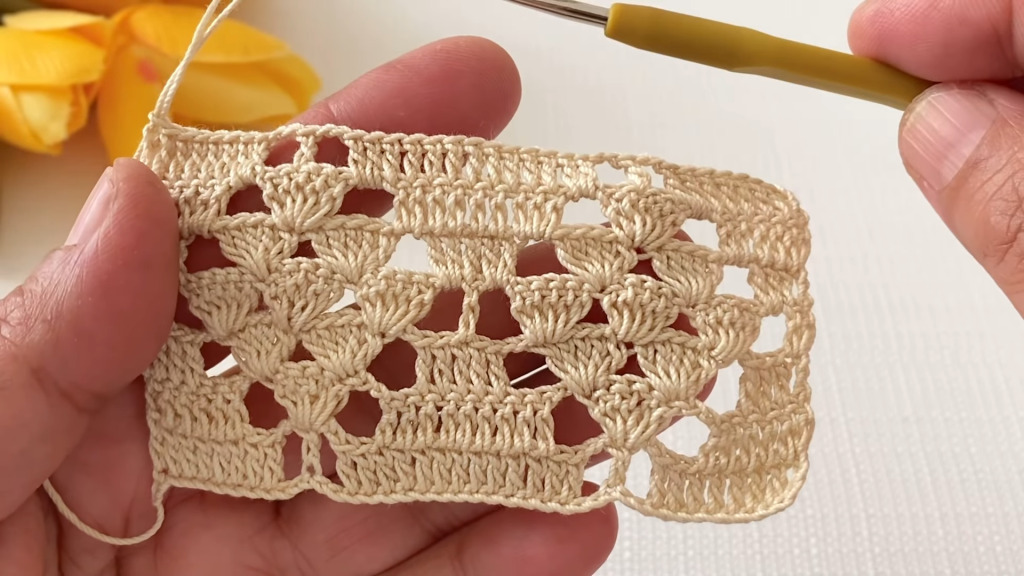
🧶 The 4-Row Textured Repeat
This sequence of four rows creates the distinctive density and openness of the fabric.

Row 2 (Solid Ridge 1 – WS): ch 3 (counts as dc). dc in the next dc.
- dc in the ch 1 space. dc in the next 3 dc. Repeat the sequence dc in ch 1 space, dc in next 3 dc across the row.
- End by placing dc in the ch 1 space and dc in the top of the turning ch 3 from Row 1.
- Turn.
- Note: This row should be almost all dc stitches, closing the gaps from the net.
Row 3 (Solid Ridge 2 – RS): ch 3 (counts as dc). dc in the next 3 dc.
- dc in the next 4 dc. Repeat dc in the next 4 dc across the row.
- End by placing dc in the top of the turning ch 3 from Row 2.
- Turn.
- Note: This row is 100% dc stitches, creating the height and density of the horizontal ridge.
Row 4 (Creating Arch Bases – WS): ch 3 (counts as dc). dc in the next 2 dc.
- ch 4, sk 3 dc, dc in the next 5 dc. Repeat the sequence ch 4,sk 3 dc,dc in next 5 dc across the row.
- End by placing dc in the last 3 dc.
- Turn.
- Note: This row creates large ch 4 loops that will form the open segments of the pattern.
Row 5 (Lattice V-Stitches – RS): ch 5 (counts as dc and ch 2). dc in the center 3rd dc of the group below. ch 2.
- dc in the next ch 4 space. ch 2.
- dc in the center 3rd dc of the group below. ch 2. Repeat the sequence dc in ch 4 space, ch 2,dc in center dc,ch 2 across the row.
- End with ch 2, dc in the top of the turning ch 3 from Row 4.
- Turn.
- Note: This row is the most open, creating the lattice-like diamond effect.
Continue repeating Rows 2 through 5 until your piece reaches the desired length.
Video Tutorial:
💡 Troubleshooting and Pattern Mastery
| Issue | Cause | Solution |
| Fabric pulls/tightens | ch loops (Row 4 & 5) are too short compared to the dc groups. | Increase the chain counts in Rows 4 and 5 by one (ch 5 instead of ch 4, and ch 3 instead of ch 2) until the fabric lies flat. |
| Ribs are floppy/soft | Tension is too loose or yarn is too soft. | Go down 0.5 mm in hook size for Rows 2 and 3 only, or switch to a stiffer cotton yarn. |
| Uneven edges | Inconsistent counting of the turning chain. | Always count the turning chain (ch 3 for dc, ch 5 for dc,ch 2) as a real stitch and stitch into its top loop precisely. |
| Want more/less openness | The lattice is too open or too closed. | More Open: Use tr instead of dc in Rows 4 and 5 for taller stitches. Less Open: Use sc instead of dc in the openwork rows. |
Export to Sheets
🔨 Finishing and Textile Blocking
Blocking is important for the Golden Ripple Weave to flatten the solid sections and evenly stretch the lattice work.
- Preparation: Weave in all loose ends securely.
- Soak: Submerge the piece in cool water. Gently press out excess water without twisting or wringing.
- Tension Pinning: Lay the damp fabric on a blocking mat. Using rust-proof T-pins:
- Pin the top and bottom edges straight.
- Pin out the corners of the open diamond sections in Row 5 to ensure they are crisp and uniform.
- Pin the center of the solid dc ridge rows (Rows 2 & 3) to prevent curling.
- Dry: Allow the piece to dry completely flat for 12−24 hours.
Your stunning Golden Ripple Weave fabric is now complete! What beautiful, textured item will you create with this intricate pattern?


