
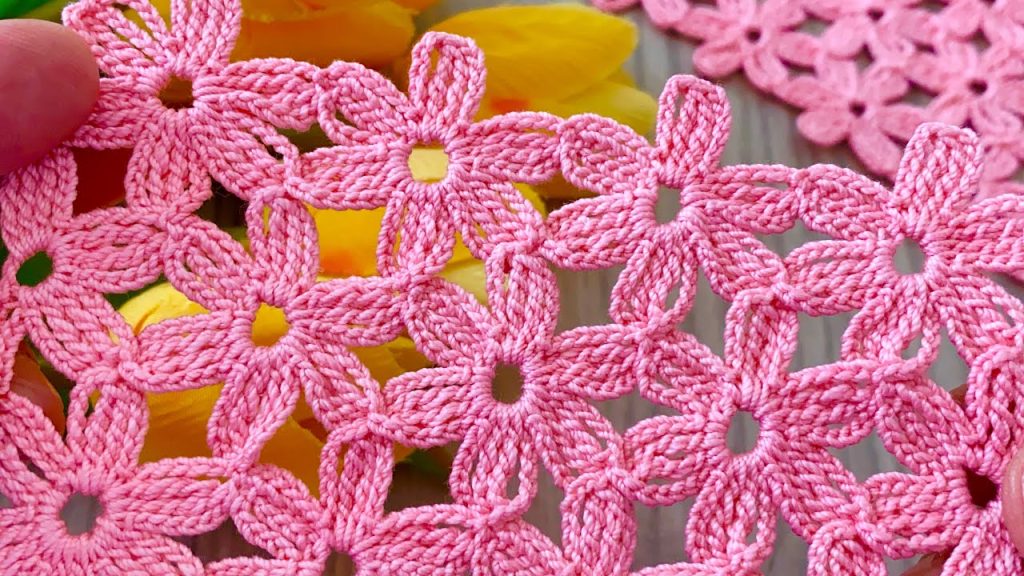
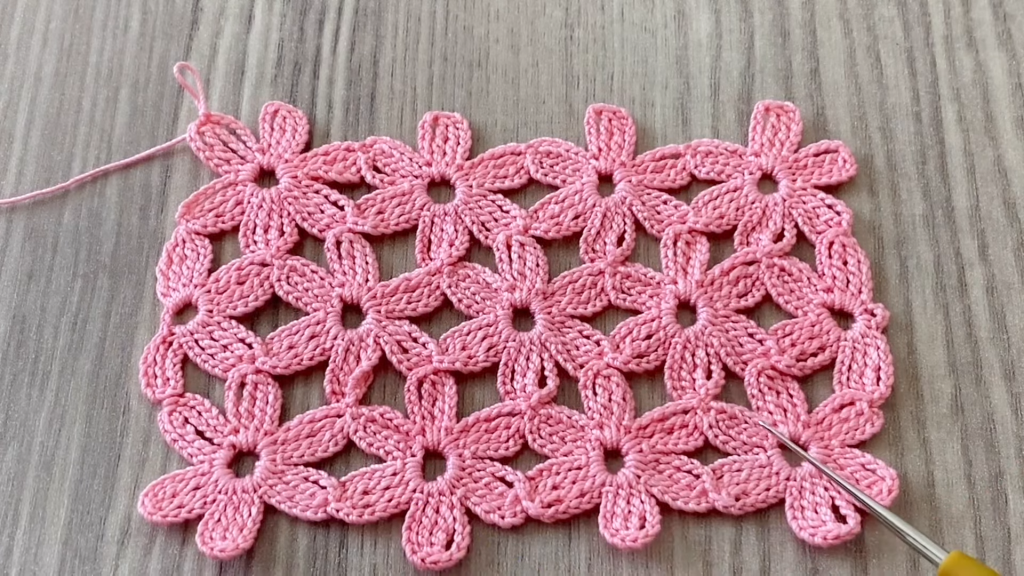
Breathe life into your projects with the charming Sweetheart Bloom Chain! This pattern creates a continuous, airy textile made up of five-petal floral motifs that interlock seamlessly at the petals. The design is perfect for creating delicate scarves, elegant garment edging, or stunning, lacy overlays. The bright pink yarn emphasizes the feminine, spring-like feel of the continuous chain.
⭐️ Project Blueprint and Advanced Techniques
| Feature | Detail |
| Skill Level | Intermediate. Requires proficiency in working in the round and the Join-As-You-Go (JAYG) technique. |
| Stitches Used | Chain (ch), Slip Stitch (sl st), Single Crochet (sc), Double Crochet (dc). |
| Construction | Each flower is worked in the round, and subsequent flowers are joined to the previous one on the final round. |
| Yarn Type | Fine cotton thread is mandatory for the crisp floral definition. |
| Repeatable | The pattern is repeatable to create fabric of any length or width. |
Export to Sheets
🧵 Materials Selection & Precision Gauge
Yarn: The Essence of Lace
- Weight: Crochet Thread Size 10 or a fine Lace Weight (Category 0) yarn. Using a fine, stable thread is crucial for achieving the neat, open look of the petals and joins.
- Fiber: 100% Mercerized Cotton thread is highly recommended. It provides excellent stitch definition, prevents sagging, and blocks beautifully.
- Color: A bright, saturated Pink or Magenta (like the sample), or a delicate pastel.
- Yardage: Approximately 15 to 20 yards per motif, depending on the thread size.
Hook: The Detailer
- Size: 1.5 mm to 1.75 mm (Steel Hook US 8 or 7). The hook must be small enough to create tight, firm stitches that hold the petal shape.

Notions & Blocking
- Tapestry Needle: Fine needle for weaving in ends.
- T-pins and Blocking Board: Highly recommended to ensure all petals are uniform and the chain lies flat.
Precision Gauge
Gauge is measured across one finished motif.
- One Finished Flower Motif: Approximately 1.5 inches in diameter from tip to tip of two opposite petals.
- Consistency in the height of the dc stitches is key to forming uniform petals.
📝 Pattern Instructions: The First Flower
The very first flower is worked entirely without joins. All subsequent flowers will join on Round 3.
Flower Motif (Make 1)

Round 1 (Center Ring): ch 5, sl st to the first ch to form a ring. ch 1 (sc in ring). ch 3. sc in ring. Repeat the sequence ch 3,sc in ring 4 times more. sl st to the starting sc to join. (5 ch 3 loops)
Round 2 (Petal Foundation): sl st into the first ch 3 loop. ch 1 (sc in loop). ch 5. sc in the next ch 3 loop. Repeat the sequence ch 5,sc in next loop 3 times more. ch 5, sl st to the starting sc to join. (5 ch 5 loops)
Round 3 (Petals – No Joins): sl st into the first 2 ch of the ch 5 loop. ch 3 (counts as dc). Work 4 dc,ch 2,5 dc in the same ch 5 loop.
- sc in the sc between loops.
- Work 5 dc,ch 2,5 dc in the next ch 5 loop. sc in the sc between loops. Repeat the sequence 5 dc,ch 2,5 dc in loop, sc in sc 3 times more. sl st to the top of the starting ch 3 to join.
Fasten off and weave in the ends. This is your foundation flower.
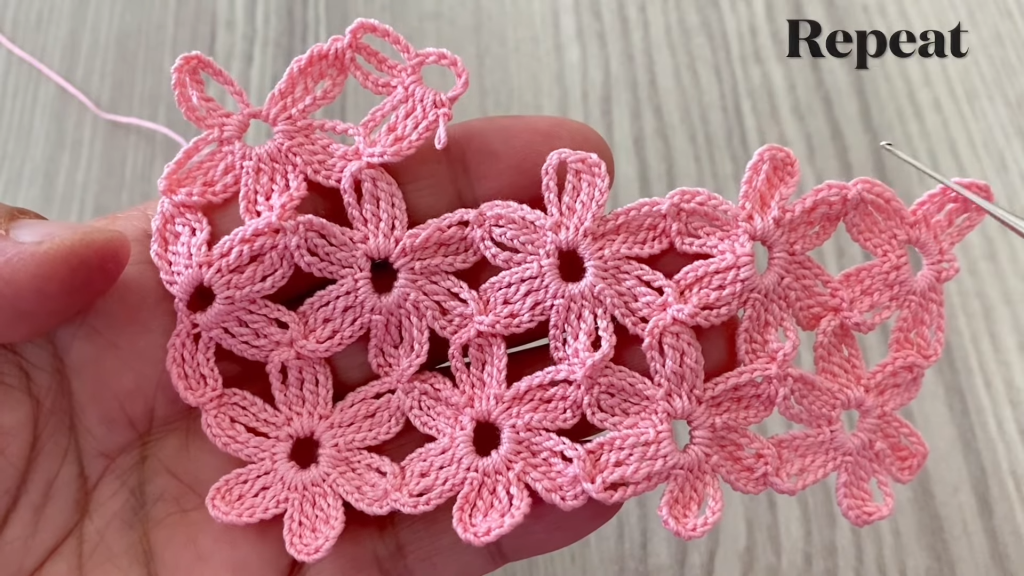
🔗 Pattern Instructions: Join-As-You-Go (JAYG)
For the remaining flowers, you will repeat Rounds 1 and 2 exactly. The joining happens on Round 3.
Flower Motif (All Subsequent Flowers)
Rounds 1 & 2: Work exactly as written for the first flower.
Round 3 (Petals with Joins): sl st into the first 2 ch of the ch 5 loop. ch 3 (dc). 4 dc in the same loop.
Joining Petal 1 (The first join):
- ch 1, sl st into the ch 2 space of a petal on the completed flower. ch 1. Work 5 dc in the current ch 5 loop.
- sc in the sc between loops.
Joining Petal 2 (The second join):
- Work 5 dc in the next ch 5 loop.
- ch 1, sl st into the next ch 2 space of the completed flower. ch 1. Work 5 dc in the current ch 5 loop.
- sc in the sc between loops.
Remaining Petals (3, 4, and 5): Work the remaining petals as a standard 5 dc,ch 2,5 dc shell, separated by sc in the sc below.
- sl st to the top of the starting ch 3 to join.
Fasten off. You have now connected two flowers along two petals, forming the straight chain as seen in the sample.
To form a wider sheet of fabric (connecting 3 or 4 petals): Simply use the ch 1,sl st,ch 1 join on more petals as needed.
Video Tutorial:
💡 Troubleshooting and Advanced Notes
| Issue | Cause | Solution |
| Petals curl/flop | Too many dc stitches in the petal, or tension is too loose. | Try reducing the petal to 4 dc,ch 2,4 dc or use a smaller hook. |
| Flowers pull/don’t lie flat | The ch 5 loop on Round 2 is too small. | Increase the loop to ch 6 or ch 7 on Round 2 to allow for the bulk of the final petal round. |
| Uneven Center Hole | Inconsistent ch for the center ring. | Use the Magic Ring technique instead of ch 5 and sl st for a perfectly adjustable center. |
| JAYG is too bulky | Using sc instead of sl st for the join. | Ensure the join is a ch 1,sl st,ch 1 sequence to keep the seam flat and unobtrusive. |
Export to Sheets
🔨 Final Shaping and Heirloom Blocking
Blocking is necessary to ensure the petals are symmetrical and the entire chain lies perfectly flat.
- Preparation: Weave in all loose ends on the back of the work.
- Soak: Submerge the lace in cool water. For a very formal, stiff finish, add liquid starch. Gently squeeze out excess water.
- Tension Pinning: Lay the damp fabric on a blocking mat. Using rust-proof T-pins:
- Pin the center of each flower to align the chain.
- Pin the tip (the ch 2 space) of every single petal, pulling gently until the petals form a sharp, rounded shape.
- Dry: Allow the piece to dry completely flat for 12−24 hours.
Your beautiful Sweetheart Bloom Chain is complete! What project will be the perfect canvas for this delicate, lacy trim?


