
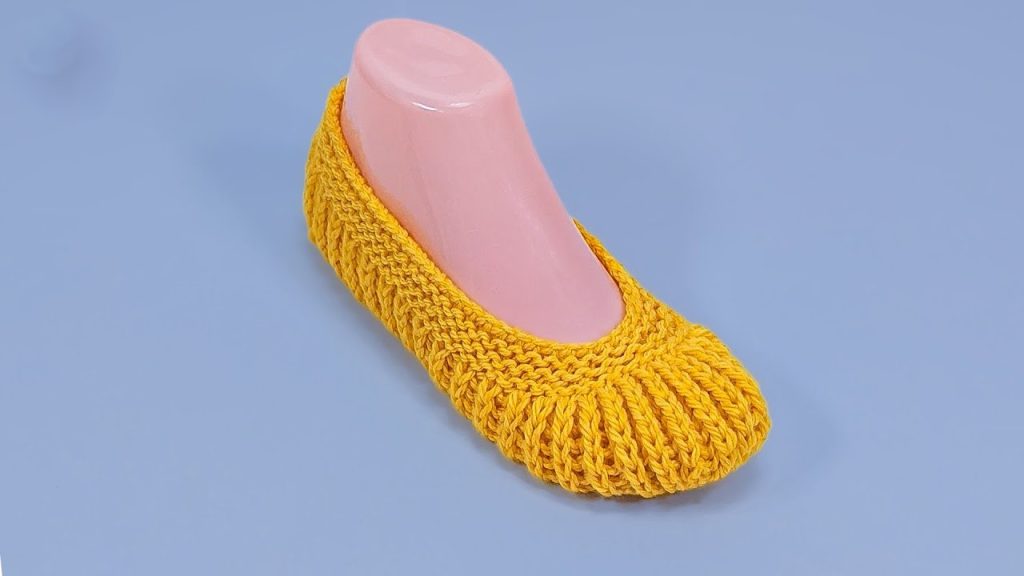
Hello, fiber friends! Welcome to the pattern for what I call the Sunlight Ballet Slipper. This project results in an elegant, incredibly cozy ballet flat that hugs the foot perfectly. The distinctive feature—the gathered ribbed toe—creates a beautiful, polished look, transitioning seamlessly into a comfortable Garter Stitch sole and heel. This is a satisfying project that knits up quickly, making it a wonderful gift or a fast treat for your own feet!
This detailed pattern is written for two sizes and includes comprehensive instructions for seaming, which is the key to achieving the slipper’s iconic shape.
📐 Sizing and Fit Guide
This pattern provides instructions for two popular adult sizes. The slipper is designed to have a snug fit, and the garter stitch provides excellent stretch.
| Size | Women’s US | EU Size | Foot Length (approx.) |
| S/M (Instructions in Parentheses) | 6 – 8 | 36 – 39 | 9 – 9.5 inches (23 – 24 cm) |
| M/L (Instructions Without Parentheses) | 9 – 11 | 40 – 43 | 10 – 10.5 inches (25.5 – 26.5 cm) |
Export to Sheets
🛠️ Materials Needed
- Yarn: Approximately 120 – 150 yards (110 – 140 meters) of a soft Worsted weight (Aran/10-ply) yarn. Choose a yarn with good elasticity for the best fit.
- Needles: A pair of US size 7 (4.5 mm) straight knitting needles. If you knit tightly, you might size up to a US 8 (5.0 mm).
- Notions:
- Tapestry Needle with a large eye for seaming and weaving in ends.
- Sharp Scissors.
- Stitch Holder or a generous scrap piece of smooth waste yarn (essential for the toe stitches).
📏 Gauge (The Golden Rule of Footwear)
- Gauge: 18 stitches and 36 rows (18 garter ridges) equals 4 inches (10 cm) in Garter Stitch, measured after blocking.
- Why Swatch? Slipper sizing is unforgiving. If your gauge is off, the slipper will be too loose and fall off, or too tight and uncomfortable. Knit at least a 6×6 inch swatch to check your tension!
ℹ️ Key Techniques & Abbreviations
This slipper is constructed flat and shaped through simple ribbing, strategic increases, and decreases.
- K = Knit
- P = Purl
- st(s) = Stitch(es)
- RS = Right Side
- WS = Wrong Side
- K2tog = Knit two stitches together (a decrease, leans right).
- ssk = Slip, Slip, Knit (a decrease, leans left).
- P2tog = Purl two stitches together (a decrease).
- Garter Stitch: Knit every row.
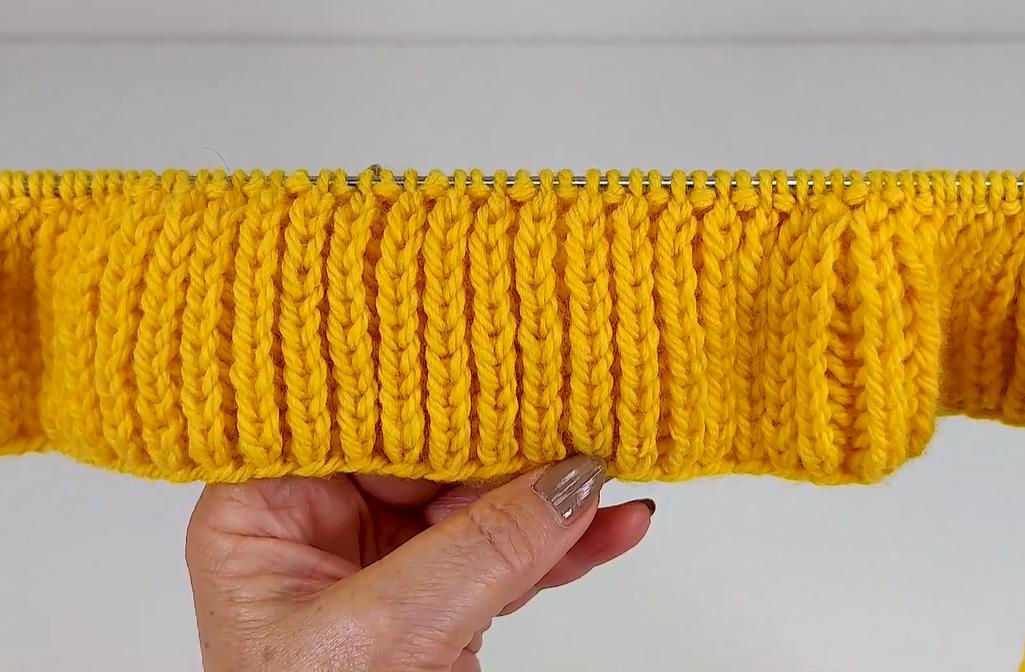
- 2×2 Rib: Alternating K2, P2.
🩰 The Pattern: Sunlight Ballet Slipper
Work all instructions for Size M/L (US 9-11). Use the numbers in the (parentheses) for Size S/M (US 6-8).
1️⃣ The Instep and Toe (The Gathering Point)
This is the most critical section. The 2×2 ribbing creates vertical lines that will be cinched together to form the beautifully rounded toe seen in the image.
| Step | Instructions | Stitch Count |
| Cast On | Cast on 42 (34) stitches. | 42 (34) sts |
| Row 1 (RS) | Work in 2×2 Rib across: *K2, P2*, repeat to the last 2 sts, K2. | 42 (34) sts |
| Row 2 (WS) | Work in 2×2 Rib across: *P2, K2*, repeat to the last 2 sts, P2. | 42 (34) sts |
| Rows 3–18 (14) | Repeat Rows 1 and 2 for a total of 18 (14) rows. The length of this section determines the depth of the toe. | 42 (34) sts |
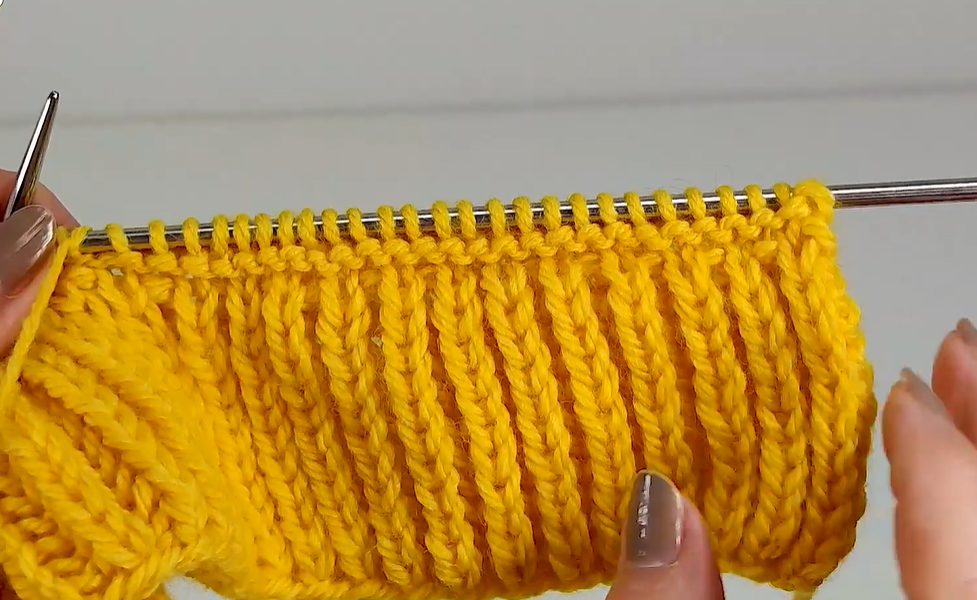
| Row 19 (15) (RS) | Decrease Row: K1, *K2tog, P2tog*. Repeat from * to * across to the last st, K1. This reduces the ribbing to half its width. | 22 (18) sts |
| Row 20 (16) (WS) | Purl across all stitches. | 22 (18) sts |
- Prepare to Hold: Cut yarn, leaving a short tail. Place these 22 (18) stitches onto your stitch holder. This section will become the toe.
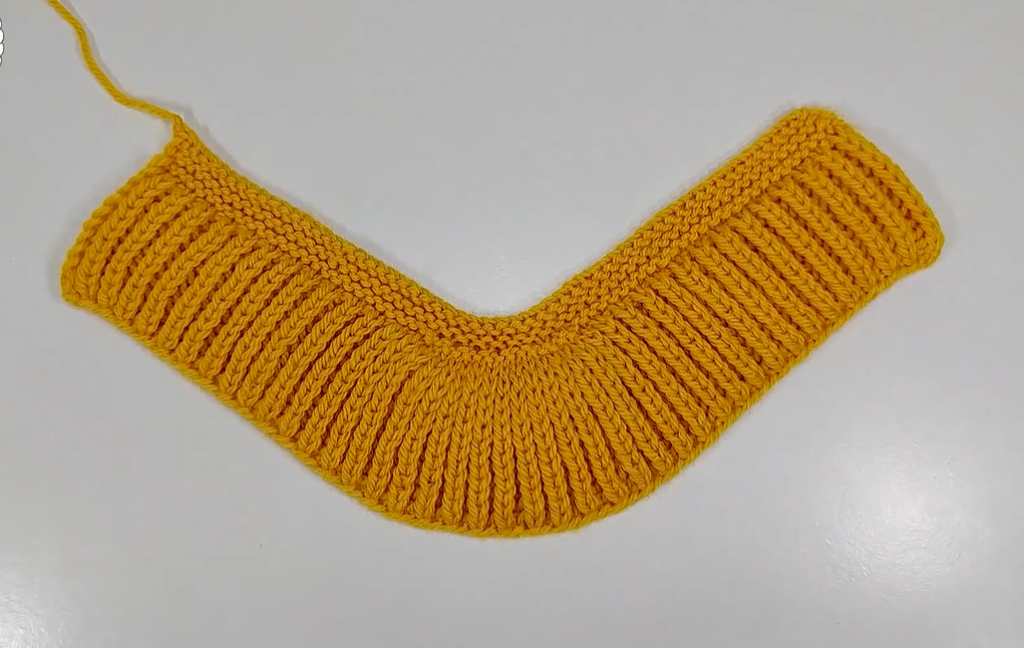
2️⃣ The Main Body (The Sole and Heel)
We now create the wide, flat body that will wrap around the rest of the foot.
| Step | Instructions | Stitch Count |
| Row 21 (17) (RS) | Initial Cast-On: Cast on 28 (20) stitches onto your left needle. Knit across these new sts. Then, knit across the 22 (18) stitches from the holder. Then, cast on 28 (20) stitches onto your right needle (using the cable or long-tail cast-on method). This should look like a long, thin, flat piece with the toe section in the middle. | 78 (58) sts |
| Rows 22–75 (60) | Garter Stitch: Knit every row for 54 (39) rows. This is the full length of the sole from the toe to the heel. Add or subtract rows here to fine-tune the overall foot length. | 78 (58) sts |
3️⃣ Heel Shaping (The Final Curve)
These decreases shape the back edge, ensuring the finished heel is curved rather than sharply pointed.
| Row | Instructions | Stitch Count |
| Row 76 (61) (RS) | K1, ssk, K to the last 3 sts, K2tog, K1. | 76 (56) sts |
| Row 77 (62) (WS) | Knit all stitches. | 76 (56) sts |
| Row 78 (63) (RS) | K1, ssk, K to the last 3 sts, K2tog, K1. | 74 (54) sts |
| Row 79 (64) (WS) | Knit all stitches. | 74 (54) sts |
- Final Bind Off: Cut your yarn, leaving a very long tail (at least 40 inches / 1 meter) for seaming. Bind off all 74 (54) stitches loosely.
🧵 Finishing and Assembly (The Transformation)
This is where your flat piece becomes a perfectly shaped slipper. Take your time with the seaming for the best result.
- Closing the Gathered Toe:
- Thread the short yarn tail from Row 20 (16) onto your tapestry needle.
- Carefully run the needle through the edge loops of the 22 (18) held stitches.
- Gently pull the yarn tail to cinch the ribbing closed, gathering it tightly into a small circle to form the tip of the toe.
- Secure the cinched end firmly on the inside with several small stitches.
- Seaming the Sole and Heel:
- Fold the long piece in half lengthwise, lining up the decreases of the heel and the edges of the garter stitch section.
- Using the long tail from the final bind-off, begin seaming the back of the heel and sole edges together. Use the mattress stitch for a sturdy, virtually invisible seam. The garter bumps line up perfectly for this seam.
- Continue seaming along the entire sole edge until you reach the center of the toe (the cinched point). Secure the seam firmly and weave in the end.
- Finishing: Dampen the slipper slightly and gently block it over your foot or a form to set the shape.
- The Second Slipper: Repeat the entire process for a matching pair!
Video Tutorial:
💡 Advanced Tips & Customization
Adding a Decorative Edge
To give the slipper opening a little more polish and ensure it doesn’t stretch out over time, you can add a simple crochet or knit border:
- Crochet Single Crochet Edge: After seaming, use a small crochet hook (e.g., US G/4.0 mm) and work a single row of Single Crochet evenly around the entire slipper opening. This adds a neat, sturdy trim.
- Knitted I-Cord Edging: Pick up stitches around the opening and knit a three-stitch I-Cord for 2–3 rows before binding off. This creates a beautifully rounded, ropelike edge.
Enhancing Durability
- Non-Slip Solution: For safety on hard floors, apply liquid latex or non-slip fabric paint to the sole in dots, lines, or a crosshatch pattern. Let this dry completely before wearing.
- Double Stranding: If you use a thinner yarn (like sport or DK weight), use two strands held together to match the worsted weight gauge. This creates a denser, more durable fabric ideal for wear.
This expanded pattern should give you everything you need to create your own gorgeous pair of Sunlight Ballet Slippers! Happy knitting!


