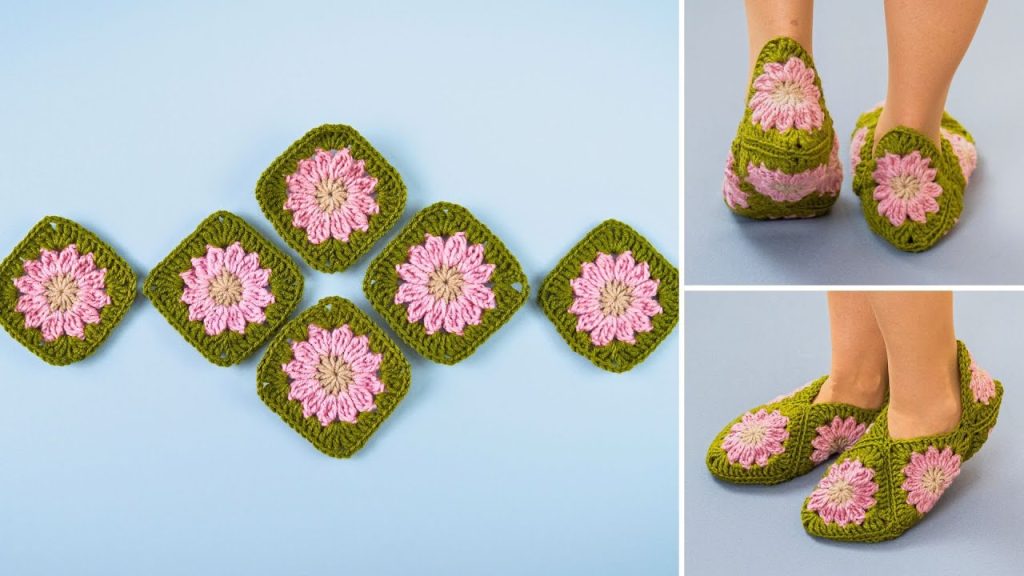
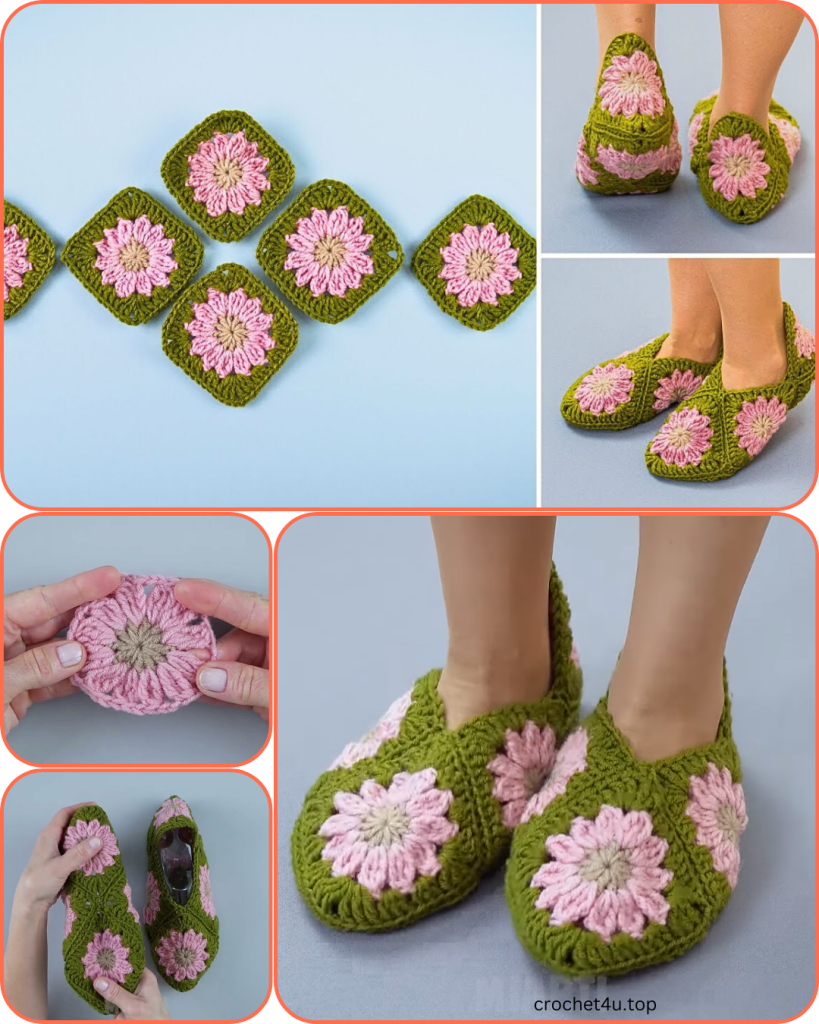
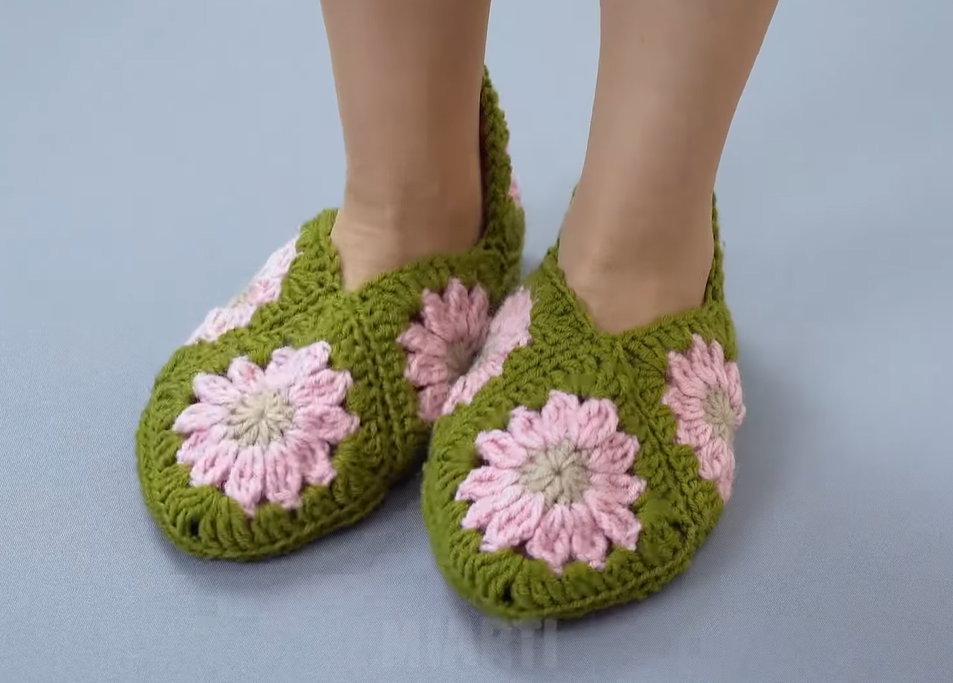
There’s a special kind of joy that comes from making something beautiful and practical with classic techniques. Today, we’re going to dive into creating a delightful pair of “Floral Granny Square Slippers,” inspired by the lovely design you saw. These slippers combine the timeless appeal of the granny square with a clever construction method that results in super cozy, personalized footwear.
If you love working with granny squares, or if you’re looking for a project to hone your join-as-you-go or seaming skills, this pattern is perfect! We’ll start by crafting individual squares featuring a sweet floral center, and then we’ll assemble them to form a comfortable slipper that’s bursting with handmade charm.
Gather your favorite colors and let’s get ready to crochet some flowery warmth for your feet!
Materials You’ll Need:
The right yarn can make all the difference for comfortable slippers!
- Yarn: Approximately 150-200 yards (137-183 meters) total of a Worsted Weight (Aran/10 ply) yarn. A wool or acrylic blend will provide warmth and durability.
- Color A (Center): Approx. 30-40 yards (e.g., beige in the image).
- Color B (Petals): Approx. 50-60 yards (e.g., pink in the image).
- Color C (Outer Square/Joining): Approx. 70-100 yards (e.g., olive green in the image).
- Crochet Hook: 5.0 mm (H/8) or size needed to obtain gauge.
- Stitch Markers: A few are helpful for marking corners and assembly.
- Yarn Needle: For weaving in ends and seaming.
- Scissors
Gauge:
While granny squares don’t always demand precise gauge, for slippers, it’s good to aim for consistency to ensure a good fit.
- One finished granny square (after all 4 rounds) should measure approximately 3.5 – 4 inches (9 – 10 cm) across.
Adjust your hook size if your squares are significantly larger or smaller.
Abbreviations:
- ch: chain
- st(s): stitch(es)
- sl st: slip stitch
- sc: single crochet
- hdc: half double crochet
- dc: double crochet
- tr: treble crochet
- sk: skip
- sp: space
- FO: fasten off
- CA: Color A (Center)
- CB: Color B (Petals)
- CC: Color C (Outer Square/Joining)
Pattern Notes:
- This pattern is written for a women’s US size 7-8. You can adjust the size by making your squares slightly larger (using a bigger hook) or slightly smaller (smaller hook), or by adding/removing a final round to the granny squares if desired.
- We will be making 6 granny squares for each slipper (12 squares total for a pair).
- Each round of the granny square is joined with a sl st and chained up for the next round.
- When changing colors, complete the last yarn over of the last stitch of the round with the new color.
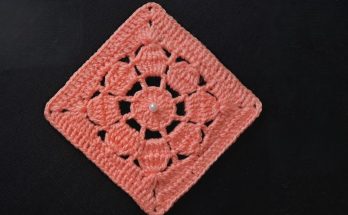
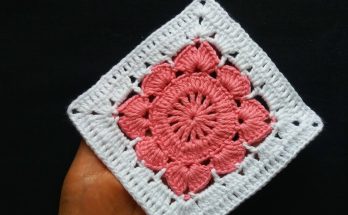
Part 1: The Floral Granny Square (Make 12)
Each slipper uses 6 squares. We’ll make all 12 first.
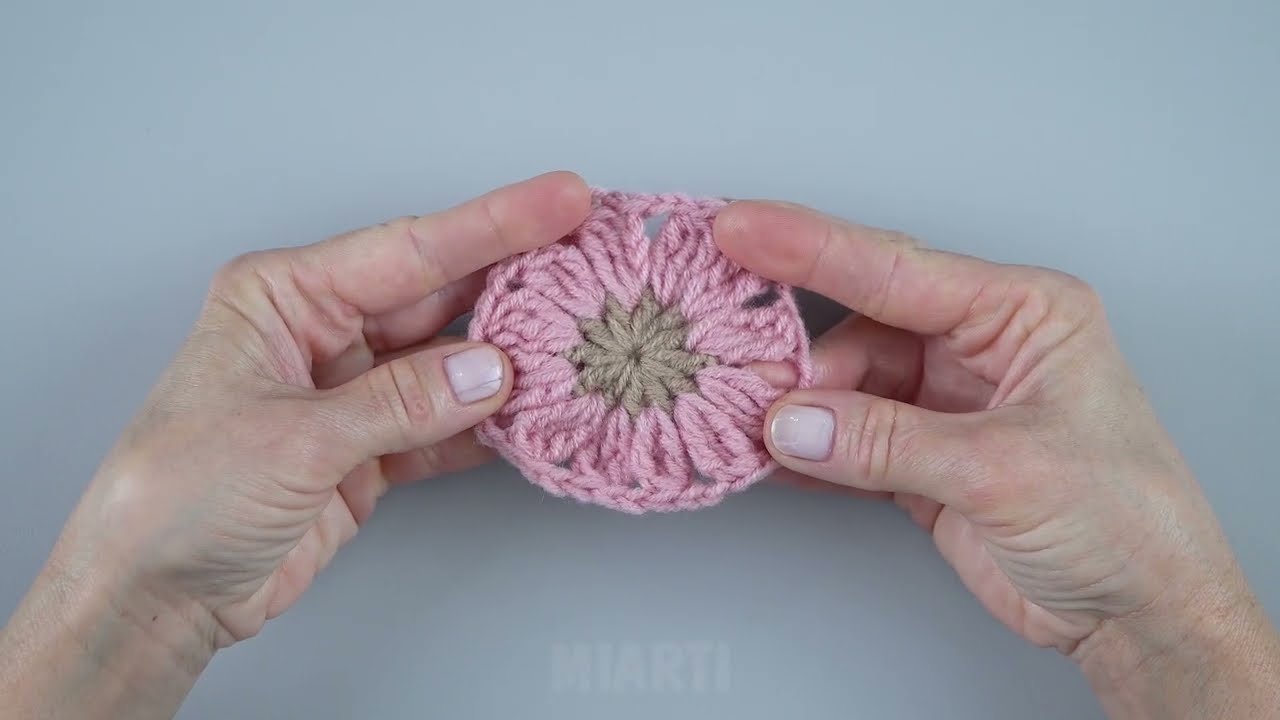
Starting with Color A (CA) – Center:
Round 1: Make a magic ring. Ch 2 (counts as first hdc). Work 9 hdc into the ring. Join with a sl st to the top of the beginning ch 2. Pull ring tight. (10 hdc)
- Alternatively, ch 3, join with sl st to form ring. Ch 2, 9 hdc into ring. Join with sl st. FO CA.
Joining Color B (CB) – Petals:
Round 2: Join CB with a sl st into any hdc from Round 1. Ch 3 (counts as first dc). Work 2 dc into the same st. Ch 1. (3 dc into next hdc, ch 1) 9 times. Join with a sl st to the top of the beginning ch 3. (10 3-dc clusters, 10 ch-1 spaces) FO CB.
Joining Color C (CC) – Outer Square:
Round 3: Join CC with a sl st into any ch-1 space. Ch 3 (counts as first dc). (2 dc, ch 2, 3 dc) into the same ch-1 space (this is your first corner). Ch 1. Sk next 3-dc cluster. (3 dc, ch 2, 3 dc) into next ch-1 space (corner). Ch 1. Repeat … around until you have 4 corners. Join with a sl st to the top of the beginning ch 3. (4 corners, 4 ch-1 spaces between corners)
Round 4: Ch 3 (counts as first dc). Work 1 dc in each of the next 2 dc. (3 dc, ch 2, 3 dc) into the ch-2 corner space (this makes a new corner). Work 1 dc in each of the next 3 dc. Work 1 dc in the ch-1 space between corners. Work 1 dc in each of the next 3 dc. (3 dc, ch 2, 3 dc) into the next ch-2 corner space. Work 1 dc in each of the next 3 dc. Work 1 dc in the ch-1 space between corners. Work 1 dc in each of the next 3 dc. Repeat … around until all 4 corners are made and sides are filled. Join with a sl st to the top of the beginning ch 3.
FO CC, leaving a tail for weaving in on most squares. For the squares you’ll be joining, leave a longer tail (about 12-18 inches) for seaming.
- Your finished square should now measure approximately 3.5 – 4 inches (9 – 10 cm) across.
- Weave in all the loose ends on all 12 squares before assembly. This makes seaming much neater!
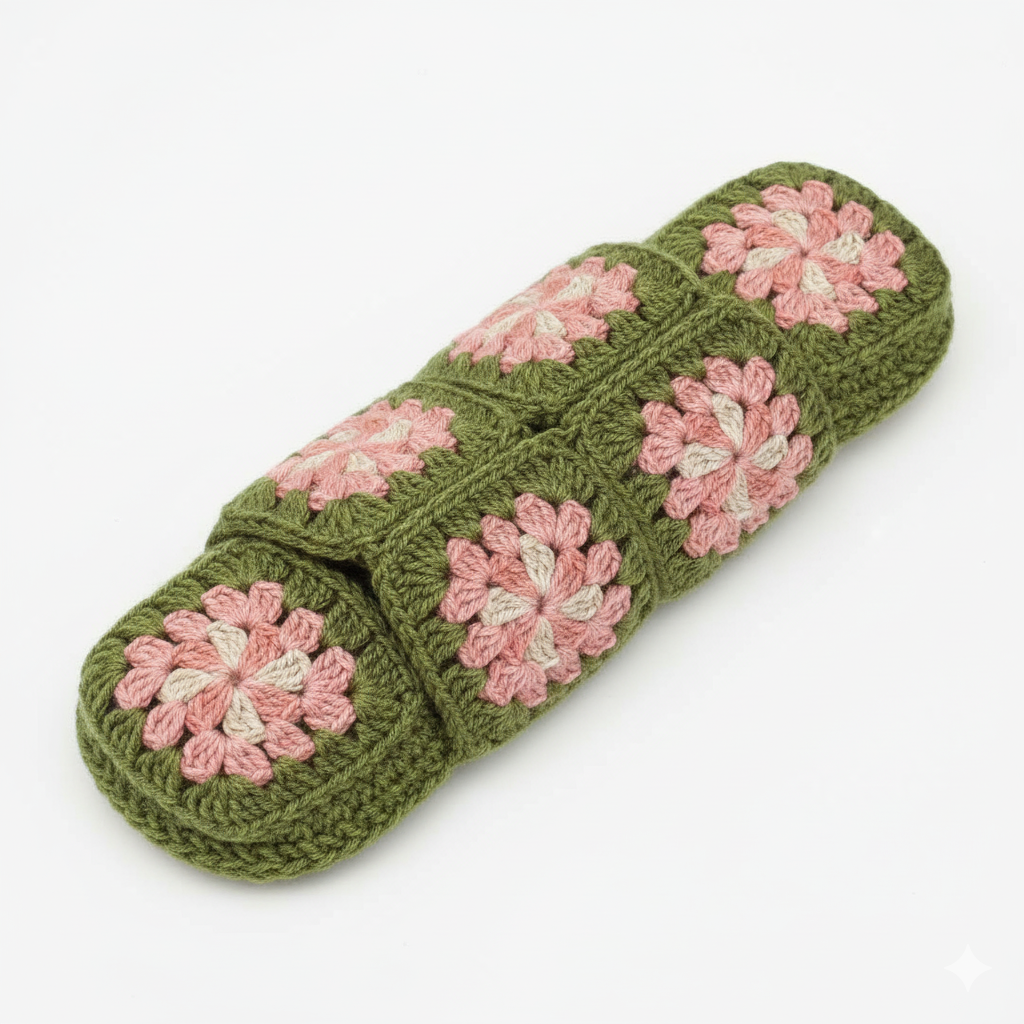
Part 2: Assembling the Slippers (Make 2)
Each slipper is made from 6 squares. We’ll lay them out in a specific configuration.

Slipper Layout (Top Down View):
Imagine your 6 squares laid out like this:
      [Square 1]  (Toe)
      [Square 2]
[Square 3] [Square 4] [Square 5]
      [Square 6]  (Heel)
- Square 1 will be the very top of your toe.
- Square 2 will sit behind Square 1, forming the arch of the foot.
- Square 3, 4, and 5 form the middle band around the sides of your foot.
- Square 6 will be the very back of your heel.
Seaming Instructions:
You can use a variety of seaming methods. A whip stitch or mattress stitch with your yarn needle works well for a sturdy, invisible seam. Alternatively, you can use a single crochet join for a more prominent, decorative seam. Use Color C (CC) for all seaming.
- Join Square 1 to Square 2:
- Place Square 1 and Square 2 side-by-side, right sides facing up.
- Seam one edge of Square 1 to one edge of Square 2. (This forms the top of the foot).
- Join Square 2 to Square 4 (Center Sole):
- Find the opposite side of Square 2 from where you just seamed.
- Seam this side of Square 2 to one edge of Square 4. (Square 4 will become the bottom/sole of your slipper).
- Join Square 4 to Square 6:
- Find the opposite side of Square 4 from where you just seamed.
- Seam this side of Square 4 to one edge of Square 6. (Square 6 will be the very back of your heel).
- You now have a long strip of 1-2-4-6, forming the top and bottom of your slipper.
- Join Square 3 to Square 2 and Square 4:
- Take Square 3. Seam one edge to the side of Square 2.
- Continue seaming Square 3 to the side of Square 4. (This forms one side of your slipper).
- Join Square 5 to Square 2 and Square 4:
- Take Square 5. Seam one edge to the other side of Square 2.
- Continue seaming Square 5 to the other side of Square 4. (This forms the other side of your slipper).
- You should now have a loose 3D shape, with Square 1 at the toe, Square 6 at the heel, and Squares 3 & 5 wrapping around the sides of Square 2 and 4.
- Close the Toe (Square 1):
- Bring the side edges of Square 1 together and seam them. This creates the rounded front of the toe.
- Close the Heel (Square 6):
- Bring the side edges of Square 6 together and seam them. This creates the rounded back of the heel.
- Join Square 3 to Square 1 and Square 6:
- The remaining unseamed edges of Square 3 will now meet the side of Square 1 (toe) and the side of Square 6 (heel). Seam these edges.
- Join Square 5 to Square 1 and Square 6:
- Similarly, seam the remaining unseamed edges of Square 5 to the side of Square 1 (toe) and the side of Square 6 (heel).
- Final Seams (Ankle Opening):
- Finally, bring the open edges of Square 3 and Square 5 together and seam them to Square 6. This closes the sides around the heel and leaves the opening for your foot.
- Effectively, you are closing up all open seams, leaving only the opening for your foot.
Once all squares are joined and all seams are closed, your slipper will be fully formed! Weave in any remaining yarn tails.
Repeat all these steps to create the second slipper.
Video Tutorial:
Congratulations!
You’ve successfully crocheted a unique and charming pair of “Floral Granny Square Slippers”!
This project is a wonderful way to combine individual elements into a fantastic, wearable item. Enjoy the comfort and the beautiful handmade touch they add to your relaxation!