
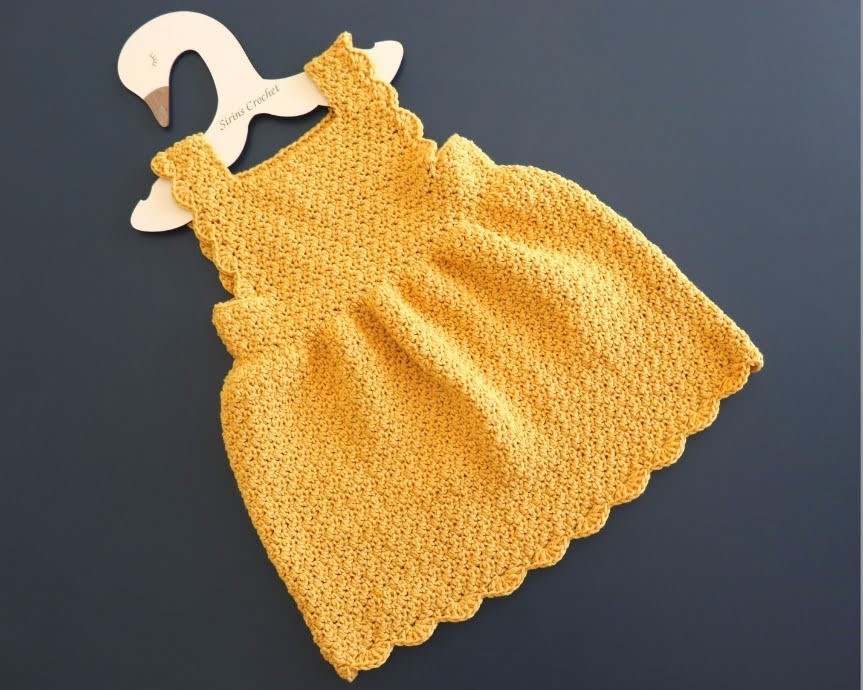
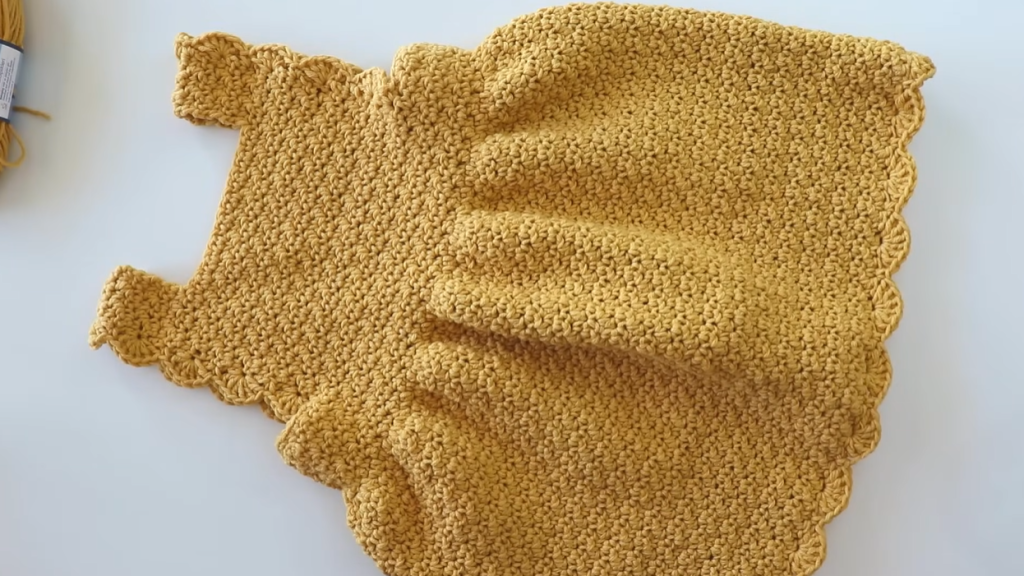
Welcome to the perfect summer crochet project! The beautiful baby dress in this image is a celebration of simple elegance and rich texture. Crafted entirely in a vibrant mustard yellow, its dense, woven look comes from an easy-to-master stitch that creates a lovely, structured drape. With its classic A-line shape, simple shoulder straps, and charming scalloped edges, this dress is sure to be an heirloom piece.
This detailed, long pattern will guide you through creating a sturdy bodice, a gently flowing skirt, and the signature scalloped finishing touches.
Materials Needed
- Yarn: Approximately 300-350 yards of DK Weight (Light Worsted / #3) yarn. A cotton or cotton blend is highly recommended for its excellent stitch definition and breathability, which is perfect for a baby dress. The color should be a rich Mustard Yellow (Main Color – MC).
- Crochet Hook: 3.5 mm (US E-4), or the size needed to obtain gauge.
- Buttons: Two small (1/2 inch) buttons for the back closure.
- Tapestry Needle: For weaving in ends and sewing buttons.
- Stitch Markers: Very helpful for marking the armholes and straps.
- Scissors
Skill Level & Notes
- Skill Level: Intermediate. You should be comfortable with working in rows, joining for the round, and basic shaping (increases and decreases).
- Size: 6-12 Months (Finished Chest Circumference: approx. 18.5 inches / 47 cm).
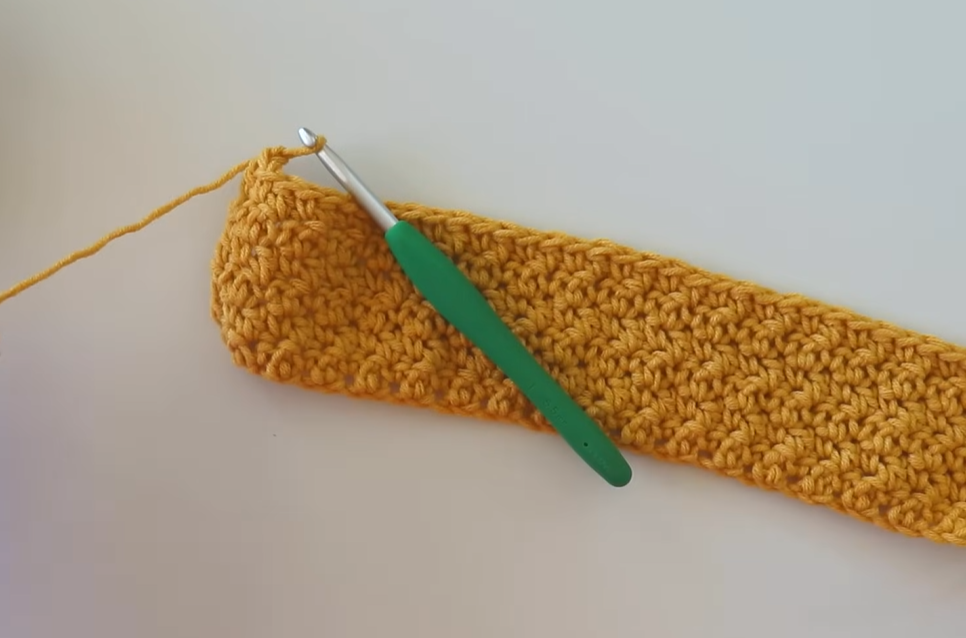
- Stitch Definition: The body of the dress uses the Lemon Peel Stitch, which is achieved by alternating a single crochet (sc) and a double crochet (dc). You will always work an sc into a previous dc, and a dc into a previous sc.
- Chains: The starting chain (e.g., ch 1 or ch 3) at the beginning of rows/rounds does not count as a stitch unless specifically stated. This helps maintain the consistent Lemon Peel texture.
Special Stitch
The Lemon Peel Stitch (LPS)
- Work an sc into the top of the previous round’s dc.
- Work a dc into the top of the previous round’s sc.
Gauge
In Lemon Peel Stitch (LPS) using a 3.5 mm hook: 8 sc/dc combinations (16 sts) and 14 rows = 4 inches (10 cm) square.
Abbreviations
| Abbreviation | Description |
| ch | chain |
| sl st | slip stitch |
| sc | single crochet |
| dc | double crochet |
| dc2tog | double crochet two stitches together (decrease) |
| st(s) | stitch(es) |
| rep | repeat |
| PM | Place Marker |
Export to Sheets
Part 1: The Bodice (Working Flat)
The bodice is worked back and forth in rows, creating a straight back opening for ease of dressing.
Row 1 (Foundation): Ch 76. Sc in the 2nd ch from hook. Dc in the next ch. [Sc in the next ch, dc in the next ch] rep across. (75 sts)
Row 2 (LPS): Ch 1, turn. Sc in the first dc. Dc in the next sc. [Sc in the next dc, dc in the next sc] rep across. Sc in the last dc. (75 sts)
Rows 3-20: Repeat Row 2. Continue working the Lemon Peel Stitch, remembering to always work an sc into a dc and a dc into an sc. (75 sts)
The bodice should measure approximately 4.5 inches (11.5 cm) high.
Part 2: Splitting for Armholes and Joining the Body
We now define the armholes and join the work into a tube for the skirt.
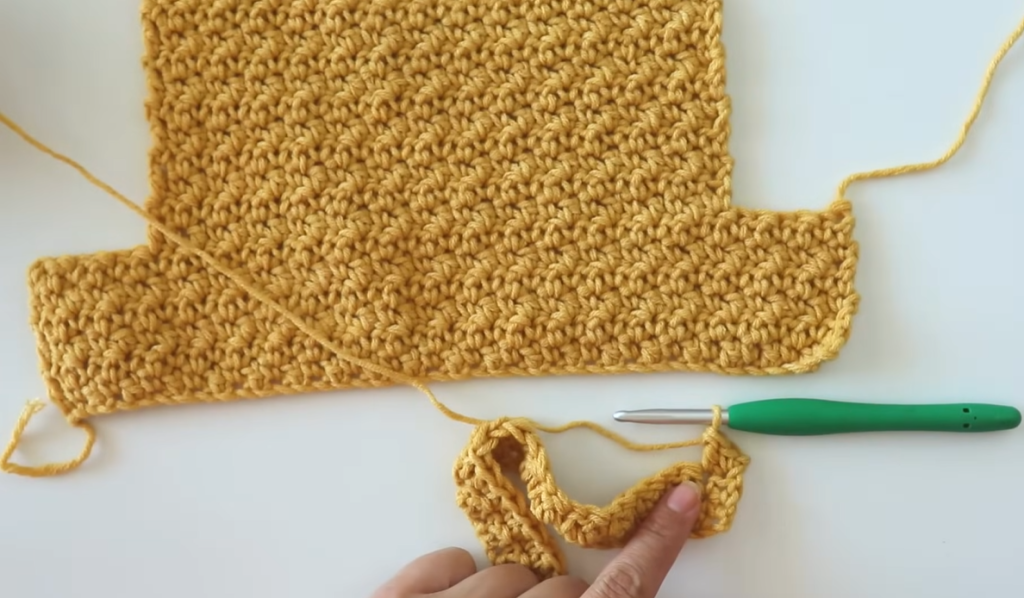
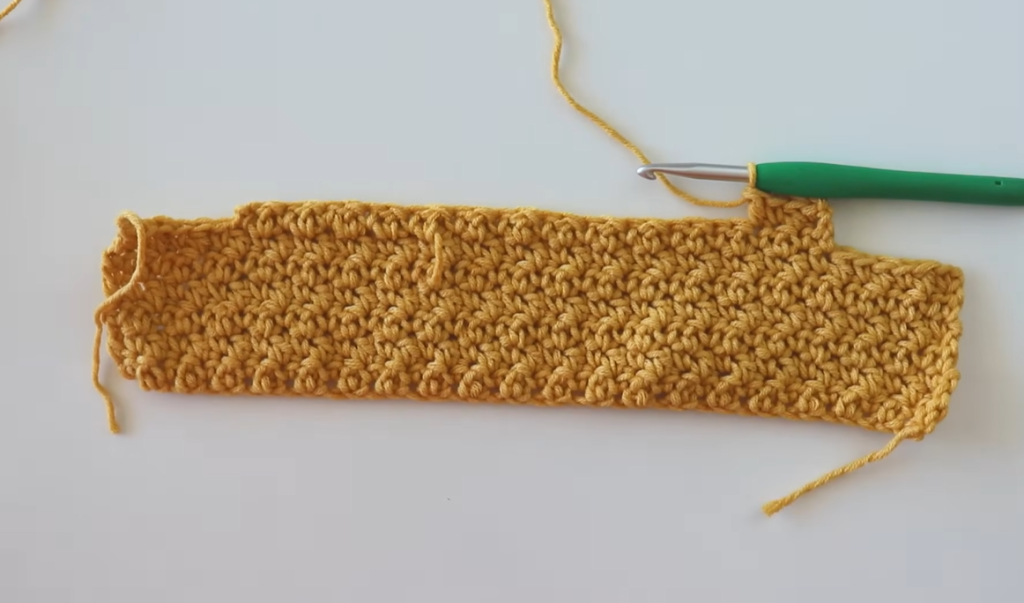
Row 21 (Right Back & Armhole): Ch 1, turn. Work LPS across the first 15 sts. Ch 1, turn. Leave remaining sts unworked. (15 sts)
Row 22 (Right Back Strap Foundation): Ch 1, turn. Work LPS across the 15 sts.
Row 23 (Joining for Body): Ch 1, turn. Work LPS across the 15 sts. Ch 2 (This is the underarm chain). Skip the next 15 sts (armhole). Continue working LPS across the next 30 sts (Front). Ch 2 (second underarm chain). Skip the next 15 sts (second armhole). Continue working LPS across the final 15 sts (Left Back). Sl st to the first sc of this row to join the work into a continuous round. (74 sts)
PM at the beginning of the round.
Part 3: The Skirt
The skirt is worked in the round, starting with a gathered row to cinch the waist slightly, creating a slight empire waistline.
Round 1 (Waist Gather): Ch 1 (does not count as st). Work sc in the first dc. Dc2tog over the next sc/dc pair. [Sc in the next dc, dc2tog over the next sc/dc pair] rep around. Work sc/dc as needed in the ch-2 underarm spaces to maintain the stitch pattern. Sl st to the first sc to join. (Approx. 50-52 sts). The exact stitch count doesn’t matter as much as the visible cinch.
Round 2 (Skirt Reset): Ch 1. Work LPS around. Ensure you alternate sc and dc all the way around, maintaining an even number of stitches. (52 sts, adjusted if needed to be an even number). Sl st to join.
Round 3-10: Ch 1. Work LPS around. Sl st to join. (52 sts)
Round 11 (Increase Round): Ch 1. Work LPS around, increasing by working 2 sts (sc, dc) into one stitch, distributing the increase evenly every 10-11 sts (approx. 5 increases total). Sl st to join. (57 sts, adjusted to be an odd number to maintain LPS)
Round 12-20: Ch 1. Work LPS around. Sl st to join.
Round 21 (Increase Round 2): Ch 1. Work LPS around, increasing by working 2 sts (sc, dc) into one stitch, distributing the increase evenly every 12-13 sts (approx. 5 increases total). Sl st to join. (62 sts, adjusted to be an even number to maintain LPS)
Round 22-30: Ch 1. Work LPS around. Sl st to join.
Fasten off. Leave the yarn attached for the final edging.
Part 4: The Straps and Edging
A. The Shoulder Straps (Make 2)
We will pick up stitches along the top edge of the front bodice to create the straps. The straps are the 15 sts that were left unworked for the armhole.
- Front Right Strap: Attach yarn at the outermost corner of the front right armhole opening. Ch 1. Work LPS across the 15 sts you skipped in Row 21. (15 sts)
- Row 1-8: Ch 1, turn. Work LPS across the 15 sts.
- Row 9 (Scallop Foundation): Ch 1, turn. Sc in each st across. (15 sc)
- Row 10 (Scallop Edge): Ch 1, turn. [Sk 1 st, 5 dc in the next st (shell made), sk 1 st, sc in the next st] rep across. Fasten off, leaving a long tail for sewing.
- Front Left Strap: Repeat the process for the second strap.
B. The Hem Scalloped Edge
Re-attach yarn to the last round of the skirt.
Round 1 (Scallop Foundation): Ch 1. Sc in each st around. Sl st to join. (62 sc)
Round 2 (Scallop Edge): Ch 1. Sc in the first st. [Sk 1 st, 5 dc in the next st (shell made), sk 1 st, sc in the next st] rep around. Adjust the last few stitches if necessary to end cleanly with a sl st to the beg sc. Fasten off and weave in the end.
Part 5: Finishing and Assembly
- Sew Straps: Try the dress on a doll or model of the appropriate size to check the strap placement. The straps should cross the shoulder and connect to the corresponding back corners of the bodice. Use the tail to securely sew the straight (non-scalloped) end of each strap to the top corner of the back bodice.
- Neckline Scallop: Attach yarn to the back left corner of the neckline. Work a round of sc evenly around the entire neckline. Sl st to join.
- Scallop Row: Ch 1. Sc in the first st. [Sk 1 st, 5 dc in the next st, sk 1 st, sc in the next st] rep around. Sl st to join and fasten off.
- Back Placket: Sew the two buttons onto the Right Back panel, positioning them near the top edge. Use the natural openings between the Lemon Peel stitches on the Left Back panel as button loops.
- Weave in all remaining ends using your tapestry needle.
The Essential Step: Blocking
Blocking is absolutely necessary for this dress! It will relax the Lemon Peel stitches, smooth out any puckering, and allow the scalloped edges and skirt flare to lay beautifully flat.
- Dampen: Gently soak the dress in lukewarm water, squeeze out excess water (do not twist or wring!), and roll in a clean towel.
- Pin: Pin the dress onto a blocking mat or foam board. Pin the skirt hem to open up the flare and define the scallop points. Pin the neckline and straps to ensure they are straight and neat.
- Dry: Allow the dress to dry completely before unpinning.
Video Tutorial:
Your gorgeous Golden Hour Dress is complete! This simple, textured design is perfect for capturing those sunny-day memories. Enjoy!


