
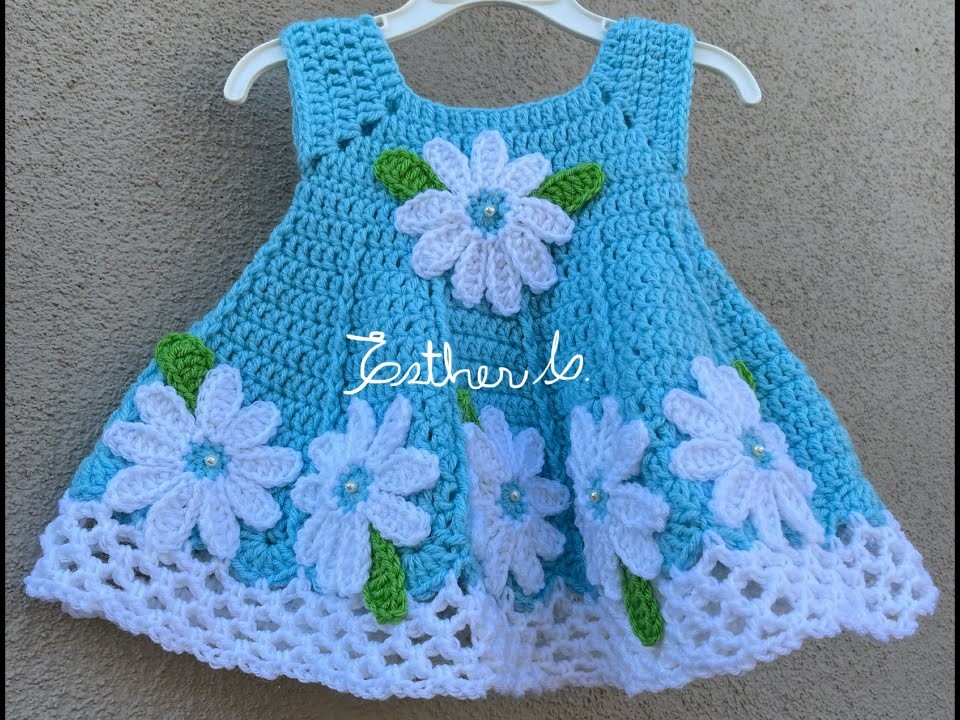
What could be sweeter than a hand-crocheted dress for a little one? This Daisy Dreams Baby Dress captures the essence of spring and summer with its beautiful sky-blue color, flared A-line skirt, and charming 3D daisy appliqués. This pattern is designed for an intermediate crocheter comfortable with basic garment construction and simple appliqué work.
The final result is a lovely, heirloom-quality dress perfect for special occasions, photoshoots, or just everyday sunshine!
Materials Needed
- Yarn:DK Weight (Light Worsted / #3) yarn is recommended for good drape and comfortable wear.
- Main Color (MC): Approx. 250-300 yards (Light Blue)
- Contrast Color 1 (CC1): Approx. 80-100 yards (White)
- Contrast Color 2 (CC2): Approx. 10-15 yards (Green for leaves)
- Crochet Hook: 4.0 mm (G/6), or size needed to obtain gauge.
- Buttons: Two small (1/2 inch) buttons for the back neck closure.
- Tapestry Needle: For weaving in ends and sewing on appliqués.
- Embellishments (Optional): Small white pearl beads or small buttons for the flower centers.
- Scissors
Size & Gauge
- Size: 12-18 Months (Finished Chest Circumference: approx. 20 inches / 51 cm)
- Gauge: 4 rows of 8 double crochet (dc) stitches = 2 inches square (5 cm x 5 cm) using the 4.0 mm hook. Achieving gauge is important for the yoke to fit correctly.
Abbreviations
| Abbreviation | Description |
| ch | chain |
| sl st | slip stitch |
| sc | single crochet |
| hdc | half double crochet |
| dc | double crochet |
| tr | treble crochet (yarn over 2 times) |
| sk | skip |
| st(s) | stitch(es) |
| sp | space |
| rep | repeat |
| BLO | back loop only |
| dc2tog | double crochet two stitches together (decrease) |
| PM | Place Marker |
Export to Sheets
Part 1: The Yoke (Working Flat)
The yoke is worked back and forth in rows, leaving an opening at the back for the neck. (Use MC – Blue)
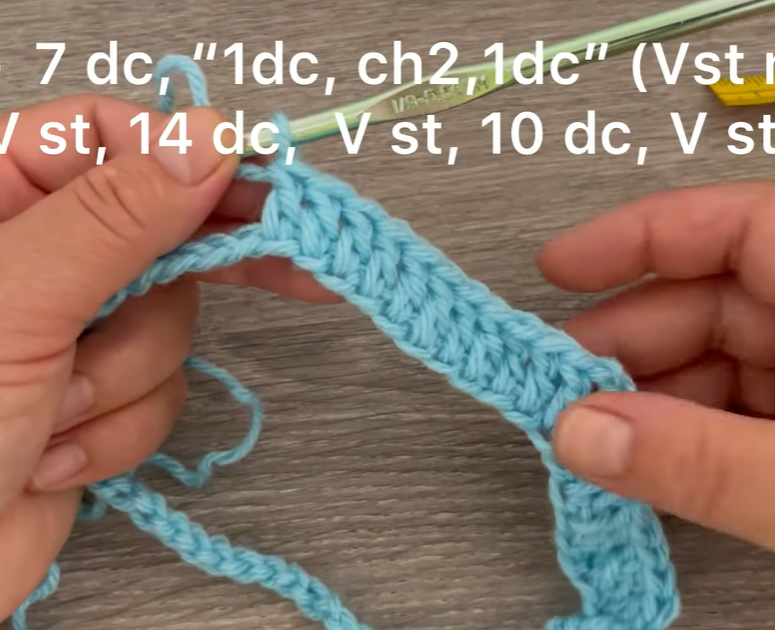
Row 1: Ch 50 (foundation chain). Dc in the 4th ch from hook (counts as 2 dc). Dc in the next 4 ch (6 dc for Right Back). [2 dc in next ch, ch 1, 2 dc in next ch (Corner V-Stitch)]. Dc in the next 10 ch (Shoulder). [2 dc in next ch, ch 1, 2 dc in next ch]. Dc in the next 18 ch (Front). [2 dc in next ch, ch 1, 2 dc in next ch]. Dc in the next 10 ch (Shoulder). [2 dc in next ch, ch 1, 2 dc in next ch]. Dc in the last 6 ch (Left Back). (58 dc, 4 ch-1 sps)
Row 2: Ch 3 (counts as dc), turn. Dc in each st to the first ch-1 sp. [2 dc, ch 1, 2 dc] in the ch-1 sp. Dc in each st to the next ch-1 sp. [2 dc, ch 1, 2 dc] in the ch-1 sp. Dc in each st to the next ch-1 sp. [2 dc, ch 1, 2 dc] in the ch-1 sp. Dc in each st to the last ch-1 sp. [2 dc, ch 1, 2 dc] in the ch-1 sp. Dc in each remaining st. (74 dc, 4 ch-1 sps)
Rows 3-7: Repeat Row 2. Continue the pattern of increasing by 4 dc in each of the 4 corner ch-1 spaces every row. The yoke will take on a square/trapezoid shape.
- End of Row 7 stitch count should be 154 dc.
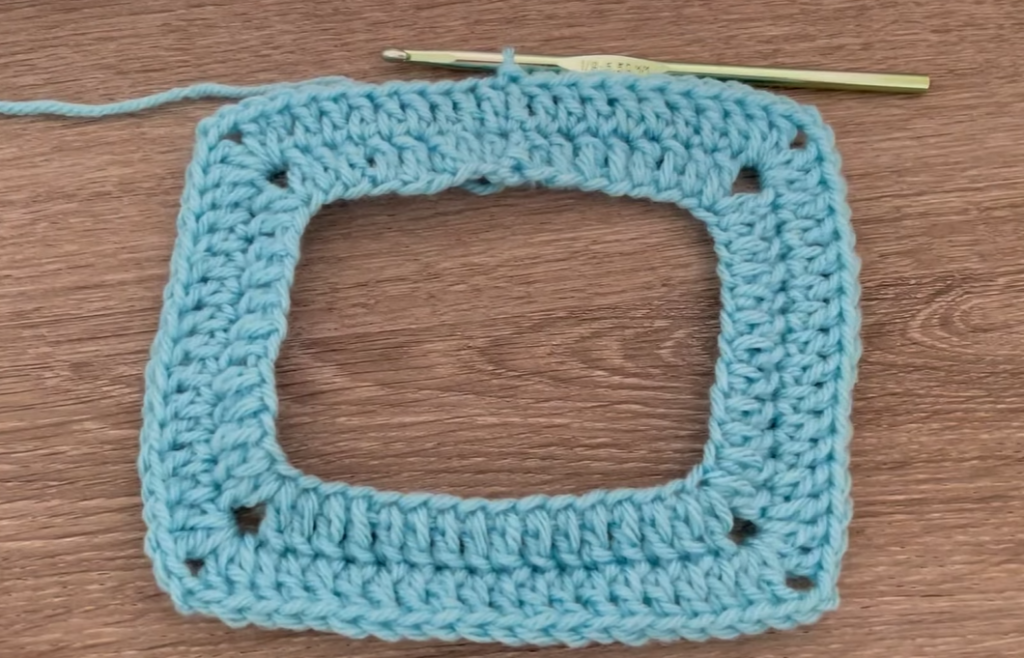
Part 2: Joining the Yoke and Starting the Skirt
Now, we join to work in the round, creating the armholes.

Round 8 (Joining Round): Ch 3 (counts as dc), turn. Dc in each st until you reach the center ch-1 sp of the first corner. Dc in the ch-1 sp. Ch 4 (skips the first sleeve/shoulder stitches). Dc in the center ch-1 sp of the second corner. Dc in each st until you reach the center ch-1 sp of the third corner. Dc in the ch-1 sp. Ch 4 (skips the second sleeve/shoulder stitches). Dc in the center ch-1 sp of the last corner. Dc in each remaining st. Sl st to the top of the beg ch-3 to join. (86 dc + 8 ch = 94 sts/sps)
Round 9: Ch 3, dc in each dc and work 4 dc into each ch-4 sp. Sl st to join. (102 dc)
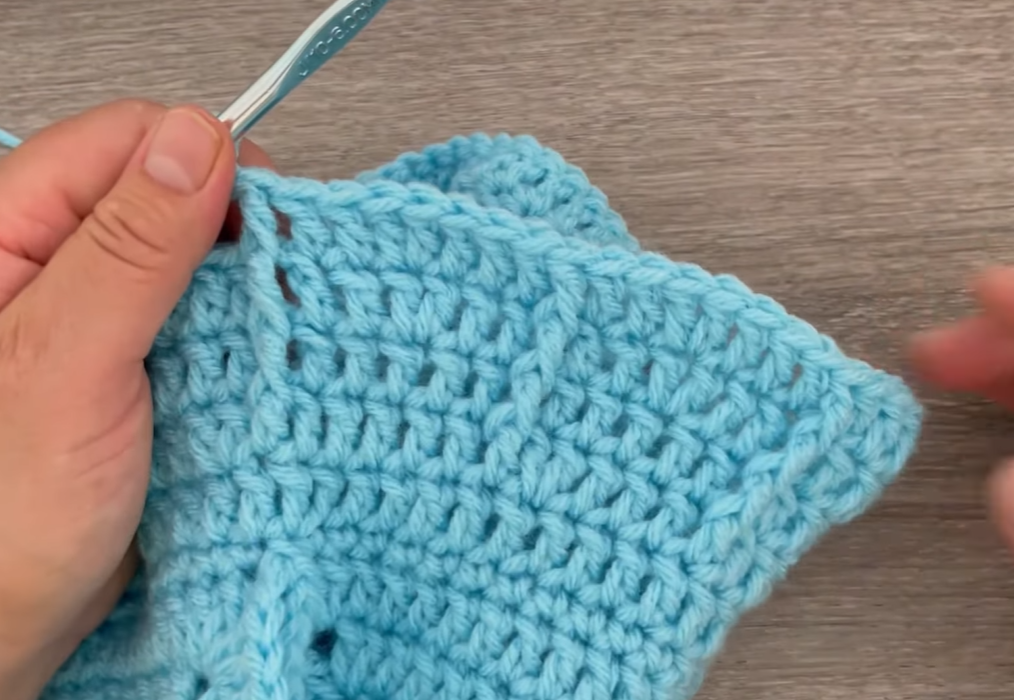
The Skirt (Blue Body)
Round 10-14: Ch 3, dc in each st around. Sl st to join. (102 dc)
Round 15 (Increase Round): Ch 3. [Dc in the next 16 sts, 2 dc in the next st] 6 times. Sl st to join. (108 dc)
Round 16-19: Ch 3, dc in each st around. Sl st to join. (108 dc)
Round 20 (Increase Round): Ch 3. [Dc in the next 17 sts, 2 dc in the next st] 6 times. Sl st to join. (114 dc)
Round 21-23: Ch 3, dc in each st around. Sl st to join. (114 dc)
Fasten off MC. Attach CC1 (White).
The Lace Bottom Border (White)
Round 24: Ch 3 (counts as dc). [Sk 2 sts, 5 dc in the next st (shell made), sk 2 sts, dc in the next st] 19 times. Sk 2 sts, 5 dc in the next st, sk 2 sts. Sl st to the top of the beg ch-3 to join. (20 dc and 20 shells)
Round 25: Ch 3. Work 1 dc into the top of the ch-3. Ch 1. [Dc in the center (3rd) dc of the shell, ch 1. 2 dc in the next dc (between the shells), ch 1] 19 times. Dc in the center dc of the last shell, ch 1. Sl st to the top of the beg ch-3 to join.
Round 26: Ch 3. Dc in the next dc. Ch 3. [Dc in the next 2 dc (over the 2-dc cluster from R25), ch 3] 39 times. Sl st to the top of the beg ch-3 to join.
Round 27: Ch 1, sc in the same st. 5 dc in the next ch-3 sp. [Sc in the center of the next 2-dc cluster, 5 dc in the next ch-3 sp] around. Sl st to the beg sc.
Fasten off CC1. Weave in ends.
Part 3: Edging and Back Closure
(Use MC – Blue)
Back Edging (Button Placket)
- Attach yarn at the bottom right corner of the back opening. Sc evenly up the entire right side of the opening. At the top of the neckline, ch 1, turn.
- Sc back down the same edge. Fasten off.
- Attach yarn at the bottom left corner. Sc evenly up the entire left side of the opening.
- Button Loop Row: Ch 1, turn. Sc in the first 2 sts. [Ch 3, sk 1 st, sc in the next 4 sts] 2 times (creates 2 loops for your buttons). Sc in remaining sts. Fasten off.
Neckline and Armhole Edging
Attach MC at the back neckline. Work 1 round of sc evenly around the entire neckline. Sl st to join and fasten off.
Attach MC at the underarm. Work 1 round of sc evenly around the armhole opening. Sl st to join and fasten off. Repeat for the second armhole.
Part 4: The Daisy Appliqués (Make 5)
(Use CC1 – White and CC2 – Green)
A. The Daisy Flower (Make 5 – White)
Center: (Use MC – Blue or a small amount of yellow/white yarn if preferred) Rnd 1: Make a magic ring. Ch 1, 8 sc into the ring. Sl st to beg sc. (8 sc) Fasten off Center Yarn.
Petals: (Attach CC1 – White) Rnd 2: Sl st into any sc. [Ch 3, 2 tr, ch 3, sl st] all into the same st. [Sl st into the next sc, ch 3, 2 tr, ch 3, sl st] all into the same sc. Repeat 7 times more to create 8 petals. Sl st to the first sl st. (8 petals) Fasten off White Yarn, leaving a long tail for sewing.
B. The Leaf (Make 5-7 – Green)
Row 1: Ch 7. Sc in the 2nd ch from hook. Hdc in the next ch. Dc in the next 2 ch. Hdc in the next ch. Sc in the last ch. (6 sts) Row 2: Ch 1, turn. Sl st in the first st. Sc in the next st. Hdc in the next 2 sts. Sc in the next st. Sl st in the last st. Fasten off, leaving a long tail for sewing.
Video Tutorial:
Assembly and Final Touches
- Sew on Buttons: Sew the two small buttons onto the side of the back placket that does not have the button loops, matching them up to the loops on the opposite side.
- Arrange and Sew Appliqués:
- Lay the dress flat and arrange the daisies and leaves as desired, mimicking the photo’s arrangement (one in the upper center, four/five around the skirt).
- Use the long tails to stitch the flowers securely to the dress body, making sure they are flat but the petals retain their 3D pop.
- Stitch the leaves under the flowers, slightly tucked to give depth.
- Embellish Centers: Using a fine needle and thread, sew a small pearl bead or button directly onto the center of each daisy to complete the look.
The Magic of Blocking
As with any crocheted garment, a quick block will set your stitches and help the skirt flare perfectly. Lightly spray the dress with water or steam, pin the hem to shape the flare, and allow it to dry completely before use.


