🌟 Introduction
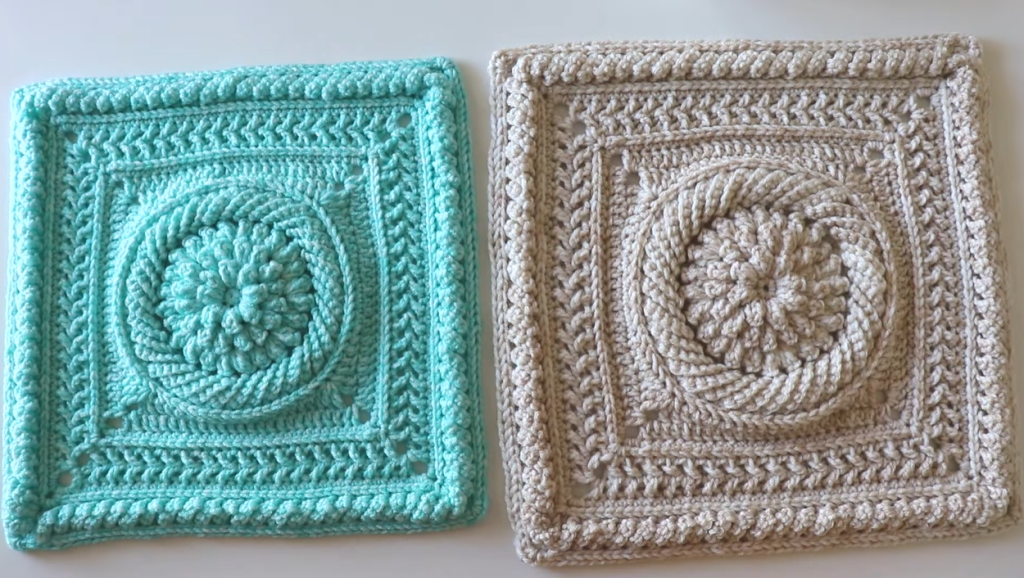
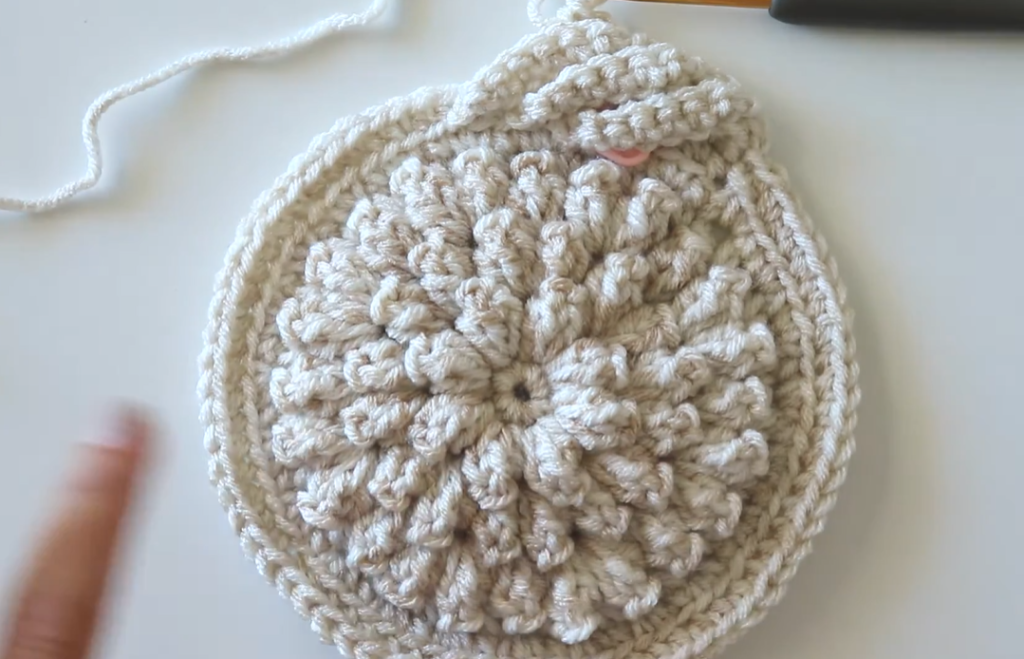
Welcome to a project that is a true labor of love! The Ethereal Blossom Square is a luxurious, highly textured motif that combines circular and linear elements into one stunning design. This square features a dramatic central Puff Stitch flower, encircled by Front Post Double Crochet (FPDC) stitches that create a beautiful spiral, and framed by a rich, braided texture. It’s the perfect statement piece for blankets, cushion covers, or bags.
Skill Level: Advanced Intermediate (Requires confidence with post stitches and specialty stitches.)
Finished Size (approximate): 8 inches x 8 inches (20 cm x 20 cm) using worsted weight yarn.
🧵 Materials & Gauge
✨ Materials Needed
- Yarn: Approximately 60-75 yards of Worsted Weight (Aran/10-ply) yarn. A sturdy yarn like cotton or acrylic blend is best for defining the texture. (The sample image suggests a vibrant aqua/teal color.)
- Hook: Size H/8 (5.0 mm) crochet hook, or size needed to obtain gauge.
- Notions: Stitch marker, yarn needle for weaving in ends, and scissors.
📏 Gauge (Check Your Tension!)
- Rounds 1-4 should measure approximately 2.5 inches (6.5 cm) in diameter.
- The texture of this square means the gauge can be tight. If your work is bowing, you may need to go up a hook size.
💡 Special Stitches & Abbreviations
📝 Pattern Abbreviations (US Terms)
| Abbreviation | Meaning | | Abbreviation | Meaning | | :—: | :— | :—: | :— | | ch | chain | | st(s) | stitch(es) | | sl st | slip stitch | | rep | repeat | | sc | single crochet | | inc | increase (work 2 sts into 1 st) | | dc | double crochet | | FPDC | Front Post Double Crochet | | BPDC | Back Post Double Crochet | | PS | Puff Stitch | | MR | Magic Ring | | sk | skip |
⭐ Special Stitches (Written Instructions)
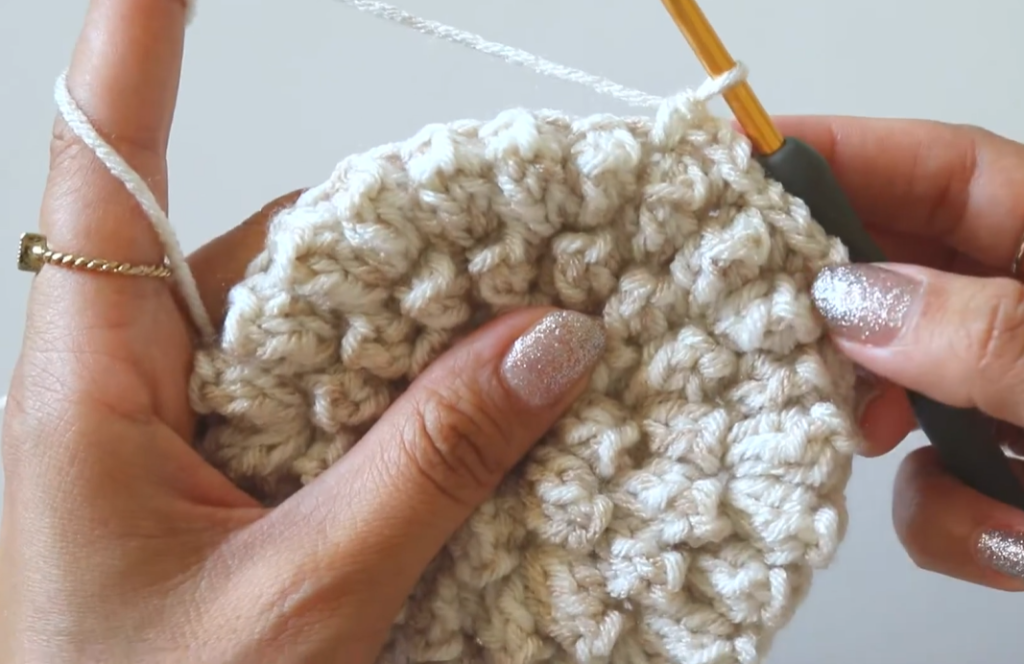
- Puff Stitch (PS): (Yo, insert hook into st, yo, pull up loop to height of dc) rep 4 times in the same st (9 loops on hook). Yo, pull through all 9 loops. Ch 1 to secure (securing chain DOES NOT count as a stitch).
- FPDC (Front Post Double Crochet): Yo, insert hook from front to back around the post of the indicated stitch, yo, pull up loop, yo, pull through 2 loops, yo, pull through last 2 loops.
- BPDC (Back Post Double Crochet): Yo, insert hook from back to front around the post of the indicated stitch, yo, pull up loop, yo, pull through 2 loops, yo, pull through last 2 loops.
🌸 The Pattern: Ethereal Blossom Square
Part 1: The Central Blossom
Foundation: Start with a Magic Ring (MR).
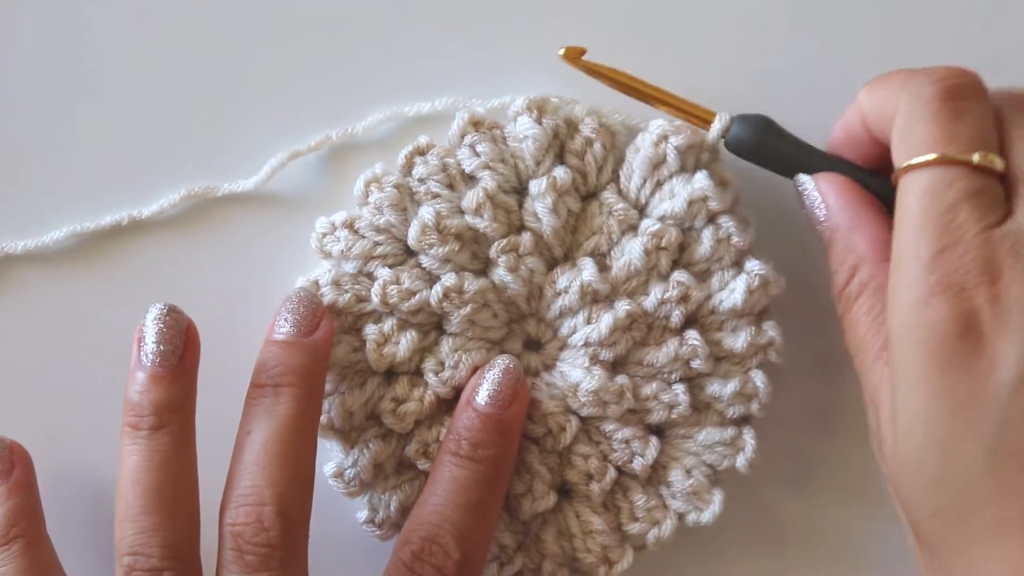
Round 1: Ch 1 (does not count as st), 8 sc into MR. Sl st to the first sc to join. (8 sc)
Round 2: Ch 3 (counts as 1 dc). PS in the same st (This creates a slight offset for texture). Sk 1 st, (dc, PS) in the next st. Rep from * 3 more times. Sk 1 st, dc in the next st, PS in the same st. Sl st to the top of the starting ch-3 to join. (8 dc, 8 PS)
Round 3: Ch 1, sc in the first dc. Sc in the top of the PS. Sc in the next dc, sc in the top of the next PS. Rep from * 6 more times. Sl st to the first sc to join. (16 sc)
Round 4 (The Spiral Base): Ch 3 (counts as 1 dc). FPDC around the post of the dc directly below this st (from Rnd 2). Dc in the next 2 sc, FPDC around the post of the next dc below (from Rnd 2). Rep from * 7 more times. Sl st to the top of the starting ch-3 to join. (8 FPDC, 16 dc, 24 sts total)
Part 2: Defining the Spiral Texture
Round 5: Ch 3 (counts as 1 dc). FPDC around the post of the FPDC from the previous round. Dc in the next 2 dc, FPDC around the post of the next FPDC. Rep from * 7 more times. Sl st to the top of the starting ch-3 to join. (8 FPDC, 16 dc, 24 sts total)
Round 6 (Increase): Ch 3 (counts as 1 dc). FPDC around the post of the FPDC. 2 dc in the next dc, dc in the next dc, FPDC around the post of the next FPDC. Rep from * 7 more times. Sl st to the top of the starting ch-3 to join. (8 FPDC, 24 dc, 32 sts total)
Round 7 (Squaring Setup): Ch 3 (counts as 1 dc). FPDC around the post of the FPDC. Dc in the next 3 dc, FPDC around the post of the next FPDC. Rep from * 7 more times. Sl st to the top of the starting ch-3 to join. (8 FPDC, 24 dc, 32 sts total)
Part 3: Cornering and Braided Texture
Round 8 (First Corner Round): Ch 1, sc in the same st. Sc in the next 4 sts. [Corner 1] (ch 3, sk 1 st, sc in next st). Sc in the next 4 sts, BPDC around the post of the next FPDC. Sc in the next 4 sts, [Corner] (ch 3, sk 1 st, sc in next st). Rep from * 3 more times, omitting the last sc on the final rep. Sl st to the first sc to join. (32 sc, 4 BPDC, 4 ch-3 sps)
Round 9 (Texture Build): Ch 3 (counts as 1 dc). Dc in the next 5 sc. In the ch-3 sp: (2 dc, ch 2, 2 dc) (Corner made). Dc in the next 5 sc. BPDC around the post of the BPDC. Rep from * 3 more times. Sl st to the top of the starting ch-3 to join. (4 BPDC, 44 dc, 4 ch-2 sps)
Round 10 (Texture Continuation): Ch 3, BPDC around the post of the next 2 dc. FPDC around the next BPDC. BPDC around the next 6 dc. In the corner ch-2 sp: (2 dc, ch 2, 2 dc). BPDC around the next 6 dc. Rep from * 3 more times, omitting the last 3 sts on the final rep. BPDC around the last 3 dc. Sl st to the top of the starting ch-3 to join. (4 FPDC, 64 BPDC, 16 dc, 4 ch-2 sps)
Round 11 (Final Braided Edge): Ch 3 (counts as 1 dc). Dc in the next 7 sts. In the corner ch-2 sp: (2 dc, ch 2, 2 dc). Dc in each st across the side (18 sts). Dc in the next 11 sts. Rep from * 3 more times, omitting the last 11 sts on the final rep. Sl st to the top of the starting ch-3 to join. (88 dc, 4 ch-2 sps)
Round 12 (Border Definition): Ch 1, sc in the same st and in each st across the first side. In the corner ch-2 sp: (sc, ch 1, sc). Sc in each dc across the next side. Rep from * 3 more times, omitting the last side on the final rep. Sl st to the first sc to join. (96 sc, 4 ch-1 sps)
Fasten off and weave in the ends.
Video Tutorial:
✂️ Finishing & Blocking
🚿 Blocking is Essential!
- Wet Blocking: Due to the dense texture and combination of shapes, blocking is non-negotiable to make the square lie flat and define the beautiful spiral and braided edges.
- Wet the square thoroughly (using the wet block method for natural fibers or a steam block for acrylic).
- Pin the square out to the finished 8-inch x 8-inch dimensions, ensuring the corners are sharp and the edges are straight.
- Allow the square to dry completely before unpinning.
✨ Conclusion
Congratulations! You have created the intricate Ethereal Blossom Square. This detailed motif is a showstopper. What stunning project—a blanket, pillow, or bag—will you use it for?