
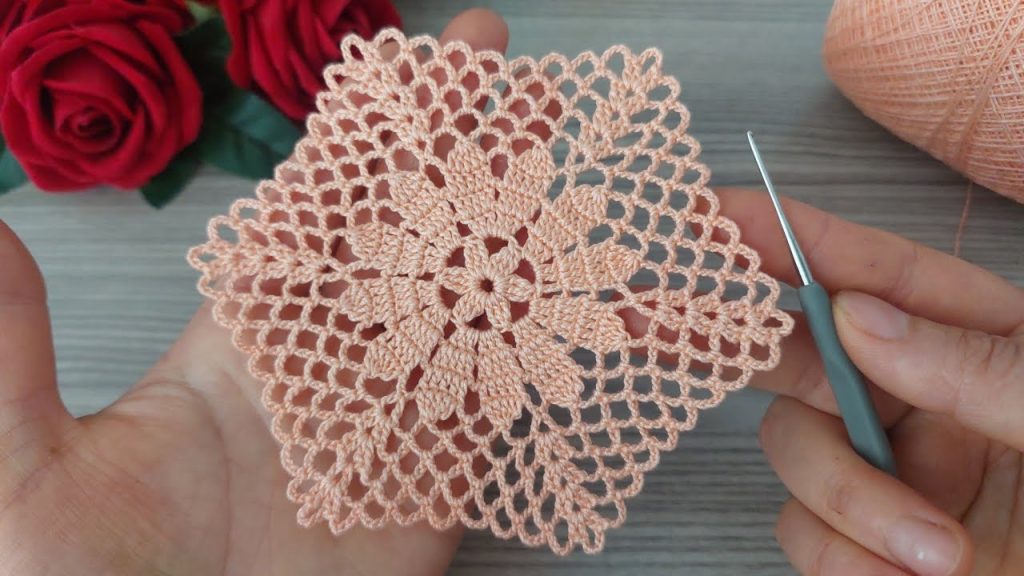
Welcome, fine thread fans! Today’s pattern is an exercise in elegance, creating a gorgeous circular (or subtly hexagonal) motif that is deceptively simple. We’ll start with a solid, textural bloom and then expand into a mesmerizing web of chains and double crochets. This piece is ideal for adding a touch of vintage romance to any space or project.
This pattern is written using U.S. Crochet Terminology.
✨ Materials You’ll Need
| Icon | Item | Notes |
| 🧶 | Yarn | Approx. 30–50 yards of a fine thread yarn (Size 10 or similar cotton thread). The soft peach/coral in the photo is lovely, but white or cream will be stunning as well. |
| 鉤 | Crochet Hook | A very small steel hook appropriate for your thread. I recommend a 1.5 mm to 2.0 mm hook to achieve the delicate, fine gauge. |
| ✂️ | Tools | Tapestry needle for weaving in ends, and sharp scissors. |
| 📏 | Gauge | Gauge isn’t critical, but the finished motif should measure approx. 4′′ to 4.5′′ across after blocking. |
📚 Stitches & Techniques
To successfully complete this pattern, you’ll need the following standard stitches:
| Stitch | Abbreviation | Description |
| Chain | ch | Yarn over, pull through loop on hook. |
| Slip Stitch | sl st | Insert hook, yarn over, pull through work and loop on hook. |
| Single Crochet | sc | Standard single crochet. |
| Double Crochet | dc | Standard double crochet. |
| Treble Crochet | tr | Standard treble crochet (yarn over twice). |
| Picot | P | ch 3, sl st into the first ch made. |
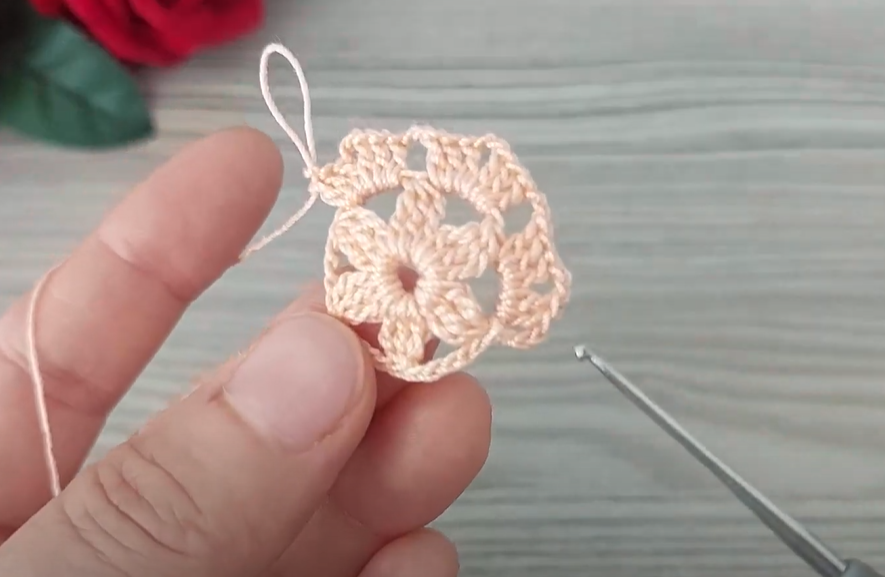
🌸 Part 1: The Layered Star Center (Rounds 1–4)
We work in the round to create the tight, textured flower core with six main points.
Foundation:
- ch 5, sl st into the first ch to form a ring.
Round 1:
- ch 3 (counts as first dc).
- Work 17 dc into the ring.
- sl st to the top of the starting ch-3 to join. (18 dc)
Round 2 (Defining Petal Tips):
- ch 1 (does not count as a stitch).
- sc in the first st.
- ch 5.
- Skip 2 sts.
- sc in the next st.
- Repeat from ** around.
- End with ch 5. sl st to the first sc to join. (6 ch-5 loops)
Round 3 (Creating the Starburst Points):
- sl st into the first ch-5 space until you reach the center (3rd ch).
- ch 4 (counts as first tr).
- In the center of the ch-5 space, work (tr, ch 2, 2 tr). (This is a 4-tr Shell).
- sc in the sc of Round 2.
- Work (2 tr, ch 2, 2 tr) in the center of the next ch-5 space.
- sc in the sc of Round 2.
- Repeat from ** around.
- sl st to the top of the starting ch-4 to join. (6 Shells, 6 sc)
Round 4 (Creating Anchor Loops):
- ch 1 (does not count as a stitch).
- sc in the first tr.
- ch 3.
- sc in the ch-2 space of the shell.
- ch 5.
- sc in the ch-2 space of the shell.
- ch 3.
- sc in the last tr of the shell.
- sc in the sc between shells.
- Repeat from ** around.
- sl st to the first sc to join. (12 ch-3 loops, 6 ch-5 loops, 18 sc)
🕸️ Part 2: The Lacy Webbing (Rounds 5–7)
This section begins the open, repetitive mesh structure that defines the motif’s outer look.
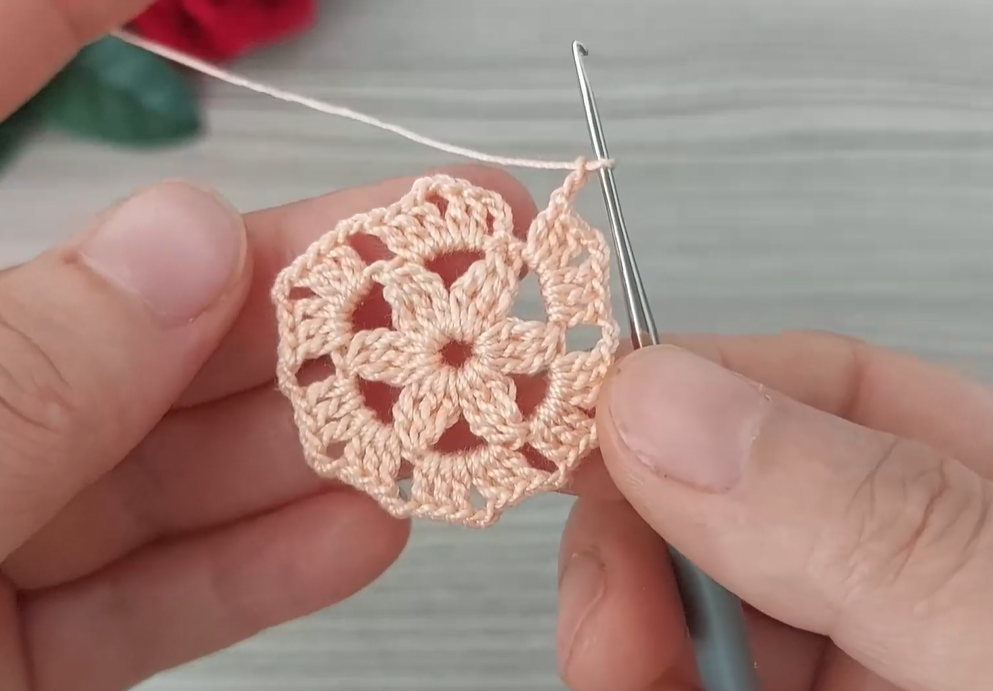
Round 5:
- sl st into the ch-3 space.
- ch 4 (counts as dc + ch 1).
- dc in the sc.
- ch 1.
- In the ch-5 space, work (dc, ch 2, dc, ch 2, dc).
- ch 1.
- dc in the next sc.
- ch 1.
- dc in the ch-3 space.
- ch 1.
- dc in the next sc.
- Repeat from ** around.
- sl st to the 3rd ch of the starting ch-4 to join.
Round 6:
- ch 4 (counts as dc + ch 1).
- dc in the next ch-1 space.
- ch 1.
- dc in the next ch-1 space.
- ch 1.
- dc in the next dc.
- ch 2.
- In the ch-2 space, work (dc, ch 2, dc).
- ch 2.
- dc in the next dc.
- Continue the ch 1, dc pattern around the motif, placing ch 2 loops in the corner areas to maintain the subtle hexagonal shape.
- sl st to the 3rd ch of the starting ch-4 to join.
Round 7:
- ch 5 (counts as dc + ch 2).
- dc in the next dc.
- Continue the ch 2, dc pattern, working dc into every dc of the previous round and ch 2 over every space.
- sl st to the 3rd ch of the starting ch-5 to join.
💎 Part 3: The Final Edge (Rounds 8–9)
These final rounds define the perimeter and add the delicate shell/picot edging.

Round 8:
- sl st into the ch-2 space.
- ch 1.
- Work 3 sc in the ch-2 space.
- sc in the dc.
- Repeat (3 sc in ch-2 space, sc in dc) around the entire motif.
- sl st to the first sc to join.
Round 9 (Picot Scallop):
- ch 1 (does not count as a stitch).
- sc in the first 2 sts.
- P (Picot).
- sc in the next 4 sts.
- P.
- sc in the next 4 sts.
- Repeat the (sc in 4, P) pattern around the entire motif.
- sl st to the first sc to join.
Video Tutorial:
📌 Finishing and Blocking
- Secure Ends: Fasten off your thread and use your tapestry needle to carefully weave in all loose ends on the back side of your motif.
- Blocking (Crucial!): This is essential for opening up the lace and defining the star points and the uniform mesh structure.
- Dampen your motif thoroughly (submerging in cool water is ideal for thread).
- Gently squeeze out excess water.
- Pin the motif to a flat, padded surface (like a foam board or thick towel). Pin out the six main star points and then the final picot points to ensure the motif is flat and the lace is open.
- Allow the piece to dry completely before unpinning.
Your gorgeous Peach Bloom Lace Mandala is now ready! Will you use it as a coaster, an ornament, or join it with others for a larger project?


