
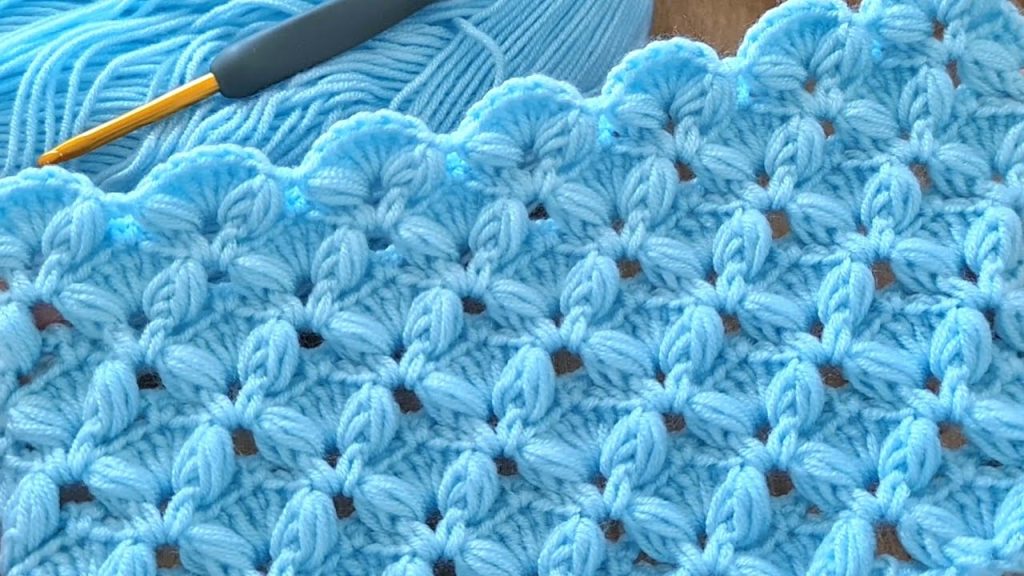
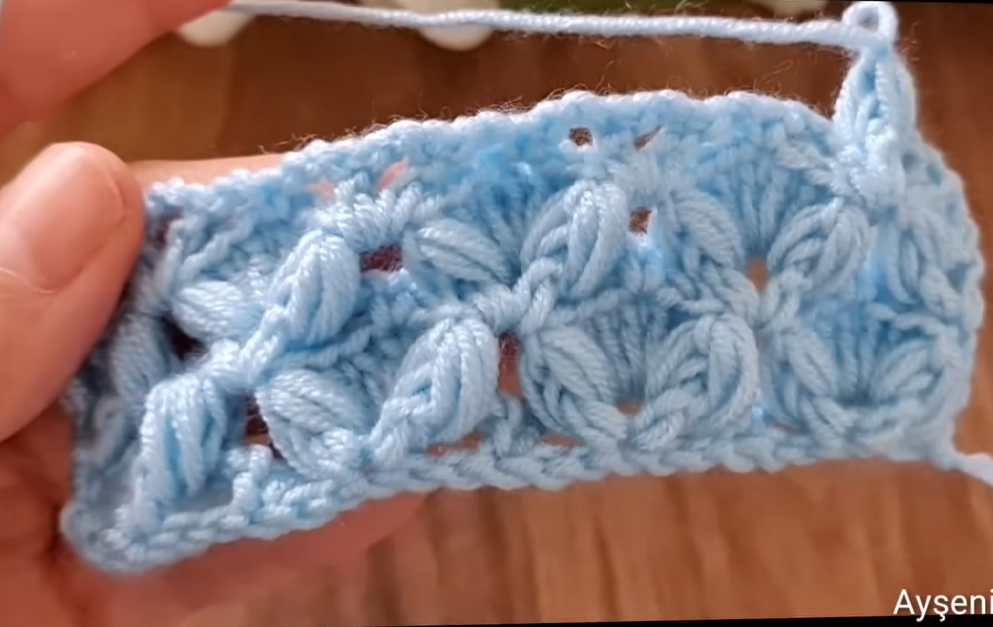
Welcome, crochet enthusiasts! Get ready to fall in love with a pattern that offers both deep, cozy texture and a beautifully scalloped edge. The fabric in the image—a lovely light blue stitch featuring staggered puff clusters and a delicate shell border—is what I call the “Bluebell Puff Lattice.”
This stitch creates a thick, warm fabric with excellent drape, making it perfect for baby blankets, cowls, warm scarves, and elegant throws. You asked for long and detailed, so let’s dive into the 4-row repeat that brings this fluffy texture to life!
🛍️ Materials & Tools: Preparing for Puffs 🛍️
Choosing a yarn with a slight fuzz or halo will make the puff stitches truly pop.
- Yarn: I recommend a soft Worsted Weight (Weight 4) or DK (Double Knitting/Weight 3) acrylic or wool blend. Softness is key for the puff stitches to bunch up nicely.
- Crochet Hook: A hook size appropriate for your yarn. For Worsted weight, a 5.0 mm (H/8) or 5.5 mm (I/9) hook is a good choice.
- Scissors: For trimming ends.
- Tapestry Needle: For neatly weaving in ends.
- Stitch Markers (Optional): Useful for marking the top of the turning chain, which can sometimes be obscured by the puffy texture.
📚 Stitch Glossary: The Language of Puffs 📚
This pattern relies on a specialized Puff Cluster stitch and a simple Shell for the border. We’ll use US Crochet Terms.
| Abbreviation | Stitch Name | Description |
| ch | Chain | Standard chain. |
| st(s) | Stitch(es) | |
| sk | Skip | |
| sl st | Slip Stitch | Standard slip stitch. |
| dc | Double Crochet | Standard double crochet. |
| Shell | Shell Stitch | (5 dc) all worked into the same stitch or space. |
| Puff | Puff Stitch | Yo, insert hook into st/sp, yo, pull up a long loop (repeat 3 times). Yo, pull through 7 loops on hook. Ch 1 to secure. |
Export to Sheets
📐 Gauge and Pattern Repeat 📐
Due to the texture, the height of this pattern is dense. Your swatch will show how much yarn is consumed by the puff stitches!
Pattern Repeat:
The pattern is worked over a multiple of 3+1 chains for the starting foundation.
- For our detailed swatch, we will start with Ch 31 (3×10=30+1=31).
- The ch 3 at the beginning of a row counts as 1 dc.
Gauge (Approximate):
- Two rows of puff clusters (Rows 2 and 4) should measure about 2 inches (5 cm) high.
🔔 The “Bluebell Puff Lattice” Pattern: Row by Row 🔔
This texture is achieved through a rhythmic 4-row repeat that alternates between mesh/shell rows and puff cluster rows.
▶️ Foundation Row:
- Ch a multiple of 3+1. (For swatch, Ch 31).
- Dc in the 4th ch from the hook (counts as 2 dc). Dc in every ch across.
- Turn. (Total stitches: 29 dc).
This row provides a stable foundation for the first set of texture stitches.
Row 1 (RS – Shell Border & Mesh Setup):
- Ch 1 (does not count as st). Sc in the first dc.
- *Ch 3, sk 2 dc, sc in the next dc.*
- Rep from * to * across the row, ending with sc in the top of the turning ch-3.
- Turn.
This row creates the base chain arches that will hold the puff clusters and the shell border.
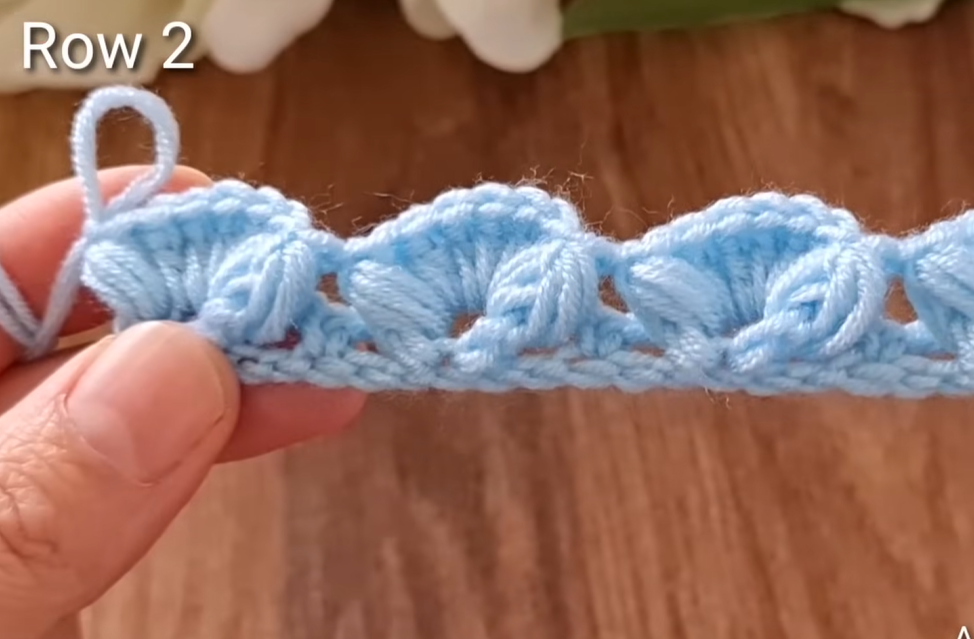
Row 2 (WS – Puff Cluster Row 1):
- Ch 3 (counts as 1 dc). 2 dc in the first ch-3 sp.
- *Puff in the next sc (the valley between ch-3 loops).
- Shell (5 dc) into the next ch-3 sp.*
- Rep from * to * across the row, ending with 3 dc in the last ch-3 sp.
- Dc in the final sc.
- Turn.
This row introduces the puff texture and the scallop shell, defining the repeating motif.
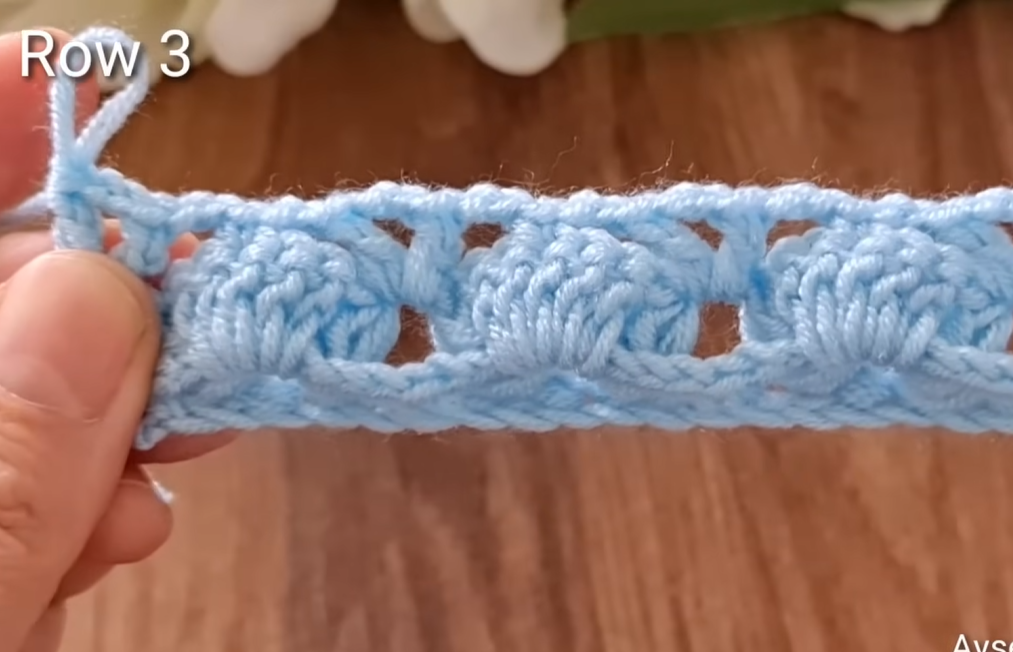
Row 3 (RS – Mesh Setup Row 2):
- Ch 1 (does not count as st). Sc in the first dc.
- Ch 3, sk 2 dc, sc in the center dc of the Shell.
- *Ch 3, sk 2 dc, sc in the ch-1 space on top of the Puff.
- Ch 3, sk 2 dc, sc in the center dc of the Shell.*
- Rep from * to * across the row, ending with sc in the top of the turning ch-3.
- Turn.
This row creates the chain arches that will offset the next row of puff clusters, making them fall in the valley between the previous row’s shells.
Row 4 (WS – Puff Cluster Row 2 – Offset):
- Ch 3 (counts as 1 dc). 2 dc in the first ch-3 sp.
- Puff in the next sc.
- Shell (5 dc) into the next ch-3 sp.
- Puff in the next sc.
- *Shell (5 dc) into the next ch-3 sp.
- Puff in the next sc.*
- Rep from * to * across the row, ending with 3 dc in the final ch-3 sp.
- Dc in the final sc.
- Turn.
This row completes the staggered texture by placing the shells directly over the puffs and the puffs in the empty spaces.
Video Tutorial:
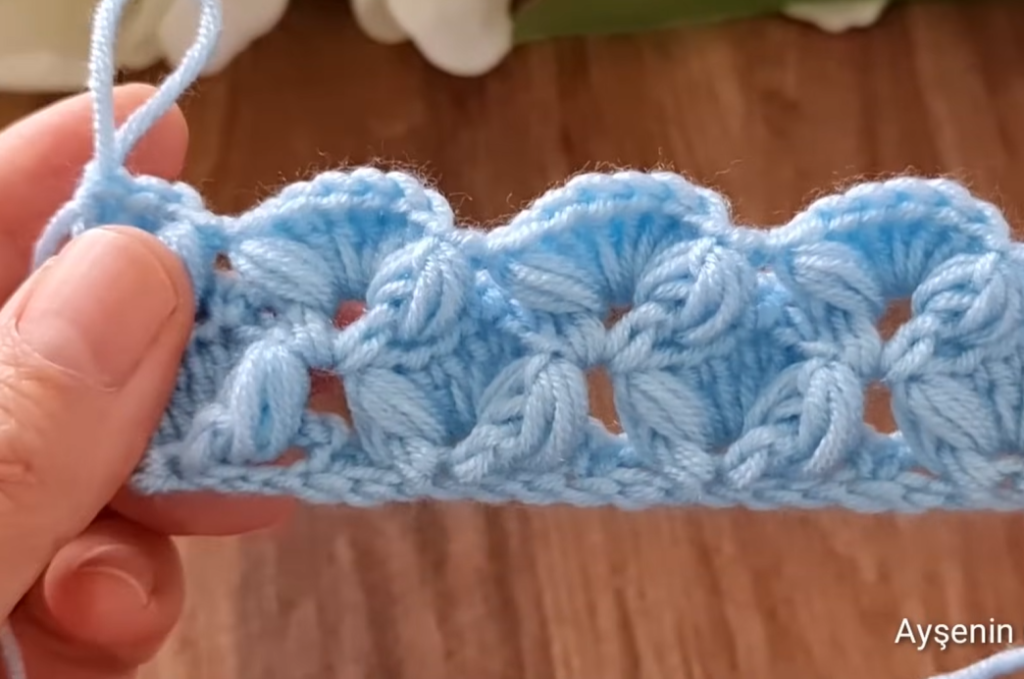
🔄 The Repeat Sequence: Building the Fabric 🔄
The pattern is now fully established! To continue the Bluebell Puff Lattice, you will repeat Rows 1-4 until your project reaches your desired size.
- The full repeating cycle is Rows 1, 2, 3, and 4.
- Key Alignment: Rows 1 and 3 set the foundation, and Rows 2 and 4 are the texture rows. The puff clusters will always sit in the valley between the scallops of the row below it.
🚿 Finishing and Blocking: Maximizing the Puff 🚿
Blocking this stitch is a great way to tidy the edges and make the texture more uniform.
- Final Edge: If you finish on a Puff Cluster Row (Row 2, 4, 6, etc.), you will have that beautiful, natural, scalloped edge. If you wish for a flat top edge, you can substitute the final Shells with simple dc stitches.
- Light Blocking: Given the density of the puff, steam blocking is often more effective than wet blocking, especially for acrylic yarn. Gently steam the base rows and flatten the edges, but avoid crushing the puff stitches so they retain their volume.
- Dry: Allow the piece to cool and dry completely before use.
🌟 Project Inspiration 🌟
- Baby Blanket or Security Blanket: The texture is soft, warm, and highly engaging for babies.
- Chunky Scarf or Cowl: A warm, statement accessory for cold weather.
- Textured Pillow Cover: Adds cozy dimension to home decor.
Happy crocheting! I hope you love the gorgeous, rhythmic texture of the Bluebell Puff Lattice!


