✨ Introduction: Blooming into Beautiful Crochet Motifs
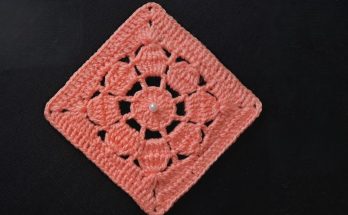
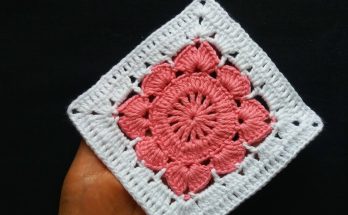
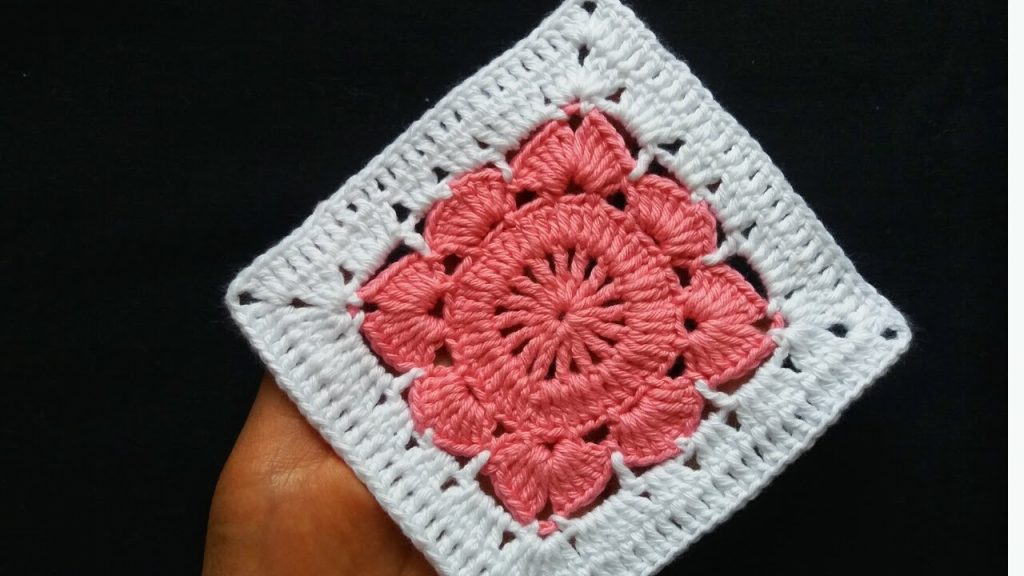
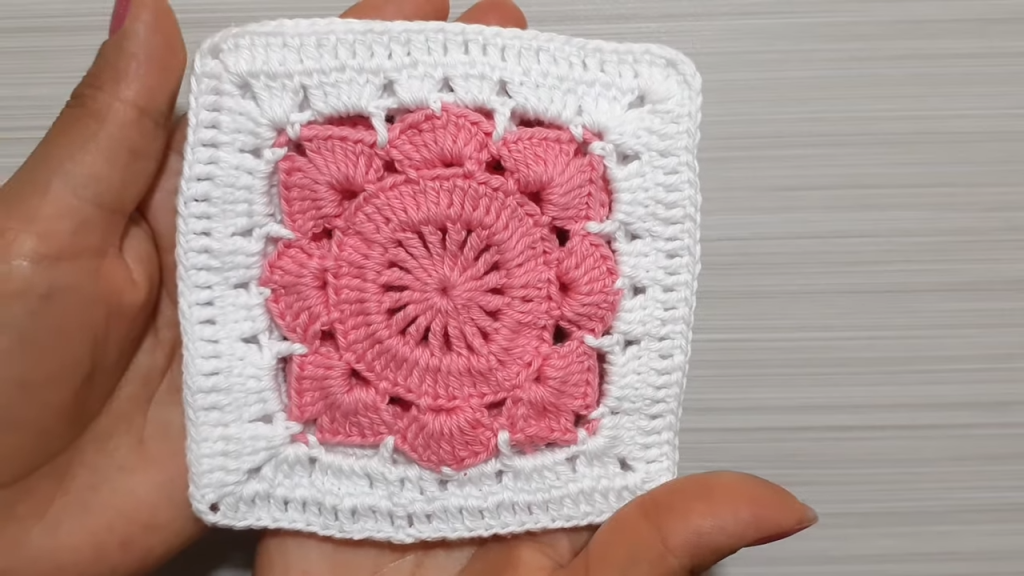
Welcome, fellow hookers! Today, we’re diving into a project that combines the classic appeal of a Granny Square with a charming, dimensional floral center. The “Blossom Center” Granny Square featured in your image is a delightful motif that starts as a vibrant flower and then seamlessly transitions into a traditional square shape using a contrasting color. This design adds a touch of modern flair and texture to the beloved granny square.
Whether you’re creating a cozy blanket, a stylish tote bag, or a unique garment, these squares are quick to work up and wonderfully customizable. This detailed pattern will guide you step-by-step to create a stunning 6-inch square, perfect for joining into larger projects.
📋 Materials You’ll Need
- Yarn:
- Color A (Blossom Color – e.g., pink): Approximately 20-25 yards of Worsted Weight (Category 4) yarn.
- Color B (Border Color – e.g., white): Approximately 25-30 yards of Worsted Weight (Category 4) yarn.
- Choose a soft acrylic or cotton blend for good stitch definition and ease of care.
- Hook: A US Size H/8 (5.0 mm) crochet hook, or the size needed to obtain gauge.
- Scissors
- Tapestry Needle (for weaving in ends).
📐 Gauge and Finished Size
Getting the gauge right ensures your squares are consistent, which is especially important if you plan to join many of them together.
- Gauge: Rounds 1-4 should measure approximately 3 inches (7.5 cm) in diameter.
- Finished Square Size: Approximately 6 inches x 6 inches (15 cm x 15 cm) after blocking.
📝 Key Crochet Abbreviations (US Terms)
This pattern uses standard crochet terms and one special stitch.
| Abbreviation | Meaning |
| ch | Chain |
| st(s) | Stitch(es) |
| sl st | Slip Stitch |
| sc | Single Crochet |
| dc | Double Crochet |
| tr | Treble Crochet (also called Triple Crochet) |
| inc dc | Invisible Chain 3 Double Crochet (Special Stitch for starting rounds – see tutorial below) |
| rep | Repeat |
| rnd | Round |
| sp | Space |
| sk | Skip |
🧵 Special Stitch Tutorial: Invisible Chain 3 Double Crochet (Inc DC)
This technique creates a much neater start to a round of double crochet, resembling a regular dc stitch rather than a bulky chain-3.
- Do not chain. Insert hook into the indicated stitch.
- Pull up a loop (2 loops on hook).
- YO, pull through 1 loop (still 2 loops on hook – this creates the “chain 1”).
- YO, pull through both loops (this completes the “single crochet”).
- Ch 2. This combined with the initial sc creates a stitch that looks like a dc.
🌷 Blossom Center Granny Square Pattern
We’ll start with Color A for the flower center and then switch to Color B to square it off.

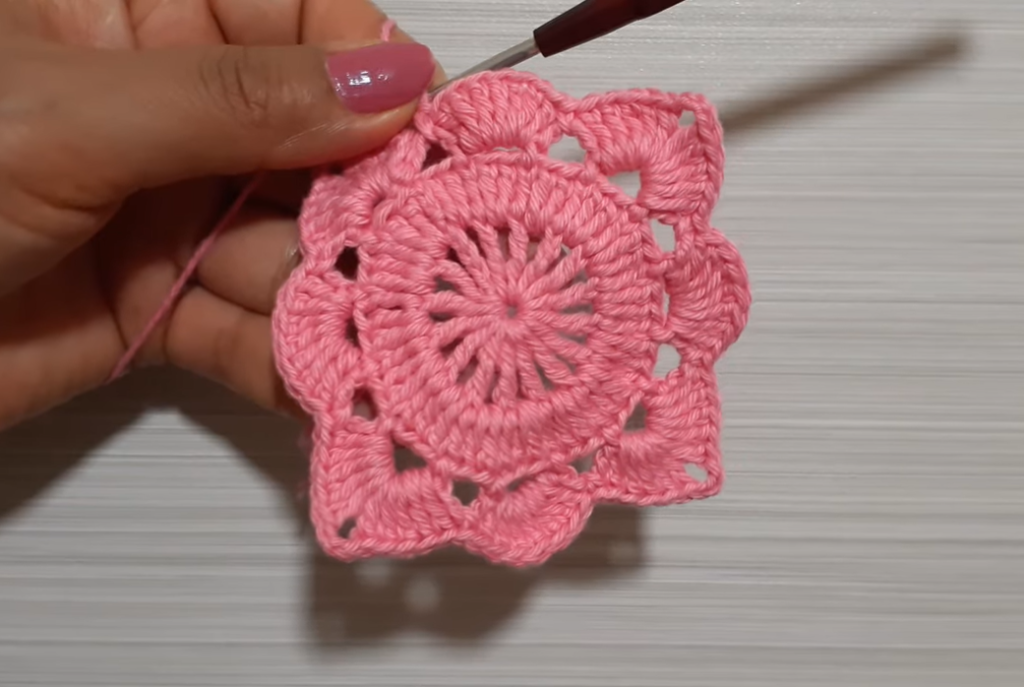
Section 1: The Blossom (Color A)
- Rnd 1: Using Color A, make a Magic Ring (or ch 4 and sl st to form a ring). Ch 3 (counts as 1 dc), work 11 dc into the ring. Join with a sl st to the top of the beginning ch-3. Pull ring tight. (12 dc)
- Rnd 2 (Petal Base): Ch 1, sc in the same st. *Ch 3, sk 1 dc, sc in the next dc*. Repeat from * to * 5 more times. Ch 3, sk 1 dc. Join with a sl st to the first sc. (6 sc, 6 ch-3 sps)
- Rnd 3 (Petals): Sl st into the first ch-3 sp. Ch 3 (counts as 1 dc), work 2 dc into the same ch-3 sp. *Work (3 dc, ch 2, 3 dc) into the next ch-3 sp*. Repeat from * to * 4 more times. Work (3 dc, ch 2) into the very first ch-3 sp where you started. Join with a sl st to the top of the beginning ch-3. (This creates 6 petals, each with 3dc, ch 2, 3dc, but starts differently to maintain chain 3 height). (6 petals, 6 ch-2 sps)
- Rnd 4 (Back Loops for Petals): Ch 1, sc in the same st (the top of the first dc of the first petal). Sc in each of the next 2 dc. Work (sc, ch 2, sc) in the ch-2 sp. *Sc in each of the next 3 dc of the petal. Work (sc, ch 2, sc) in the ch-2 sp*. Repeat from * to * around. Join with a sl st to the first sc. (42 sc, 6 ch-2 sps)
- Fasten off Color A. Weave in ends.

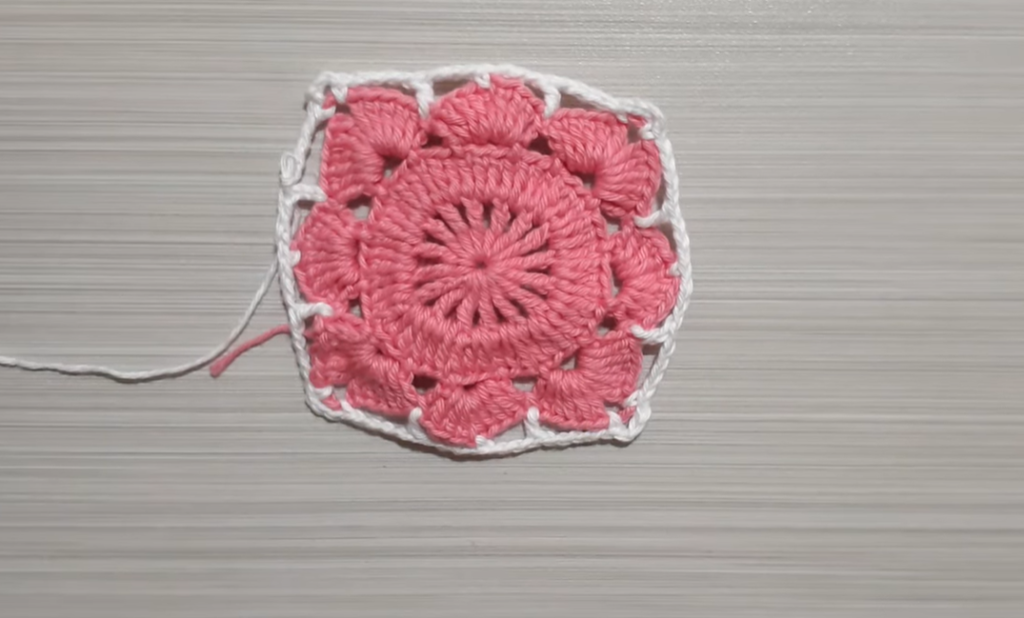
Section 2: Squaring It Off (Color B)
- Rnd 5 (First Square-Off): Using Color B, join with a sl st in any ch-2 sp from Rnd 4.
- First Corner: Inc dc in the same ch-2 sp (or Ch 3), 2 dc in the same ch-2 sp. Ch 2, 3 dc in the same ch-2 sp. (First corner made).
- Side: Dc in each of the next 7 sc.
- Next Corner: *3 dc in the next ch-2 sp, ch 2, 3 dc in the same ch-2 sp.
- Side: Dc in each of the next 7 sc*.
- Repeat from * to * 2 more times. Join with a sl st to the top of the beginning Inc dc (or ch-3). (4 corners of (3dc, ch2, 3dc), 4 sides of 7dc = 44 dc)
- Rnd 6: Ch 1, sc in the same st. Sc in each of the next 2 dc. *Work (sc, ch 2, sc) in the ch-2 sp of the corner. Sc in each of the next 13 dc*. Repeat from * to * 3 more times, ending with sc in the last 10 dc. Join with a sl st to the first sc. (60 sc, 4 ch-2 corner sps)
- Rnd 7: Sl st into the first ch-2 sp of the corner. Inc dc (or Ch 3) in the same ch-2 sp, 2 dc in the same ch-2 sp. Ch 2, 3 dc in the same ch-2 sp (First corner made). *Dc in each sc along the side until you reach the next corner ch-2 sp. Work (3 dc, ch 2, 3 dc) in the corner ch-2 sp*. Repeat from * to * 3 more times. Join with a sl st to the top of the beginning Inc dc (or ch-3). (4 corners of (3dc, ch2, 3dc), 4 sides of 19dc = 88 dc)
- Rnd 8: Ch 1, sc in the same st. Sc in each dc along the side until you reach the next corner ch-2 sp. *Work (sc, ch 2, sc) in the corner ch-2 sp. Sc in each dc along the side*. Repeat from * to * 3 more times. Join with a sl st to the first sc. (104 sc, 4 ch-2 corner sps)
Video Tutorial:
🧺 Finishing and Joining
- Weave in Ends: Use your tapestry needle to securely weave in all yarn tails. Taking the time to do this neatly will make your finished project look professional.
- Blocking: For granny squares, blocking is highly recommended, especially if you plan to join many together. It helps to even out the tension, square up the edges, and define the stitches. Pin each square to your desired dimensions (e.g., 6″ x 6″) on a blocking mat and steam or wet block.
- Joining: Once you’ve made several squares, you can join them using your preferred method (e.g., slip stitch, single crochet, invisible seam, join-as-you-go).
Congratulations on creating a beautiful “Blossom Center” Granny Square! This versatile motif is ready to be transformed into anything you can imagine.