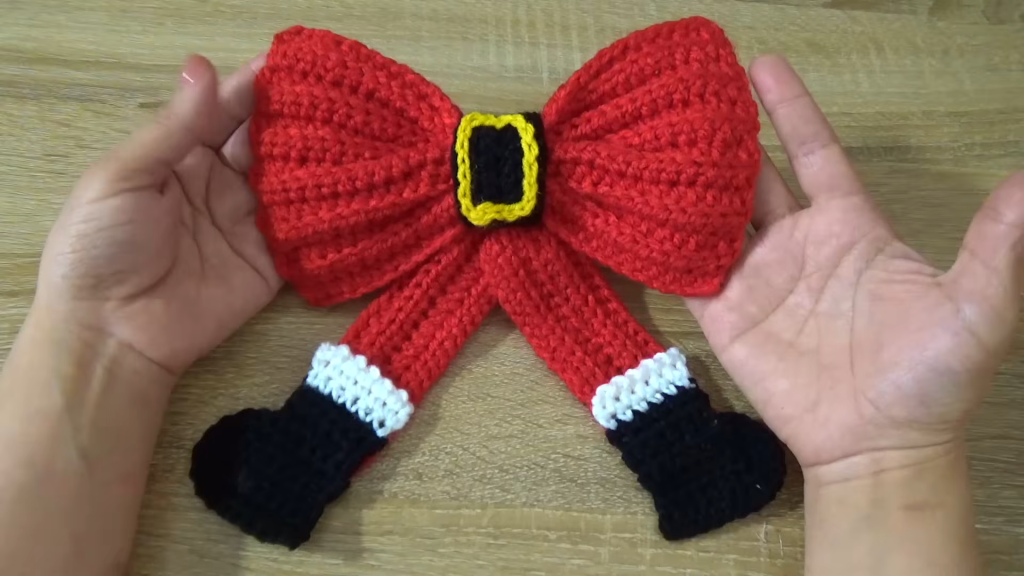
✨ Introduction: A Gift Topper with Personality
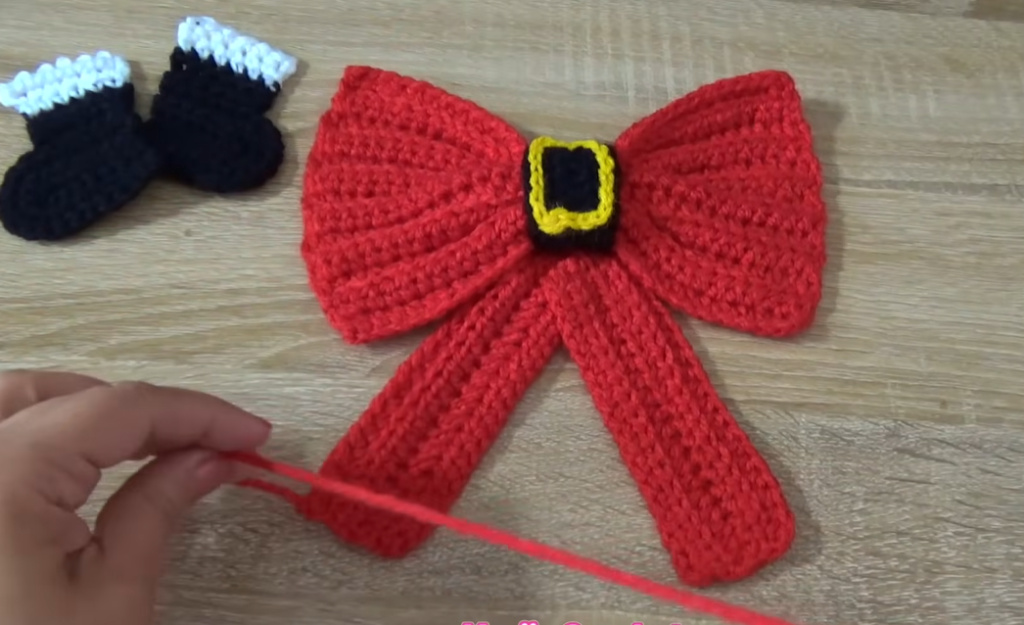
Welcome to the pattern for creating the truly unique and whimsical Crochet “Boot-Dangle” Christmas Bow! Inspired by the charming design in the video, this is much more than a simple bow; it’s a statement piece, featuring dangling “legs” and “boots” that give it a playful, festive personality. This bow is the ultimate topper for a holiday gift, adding a delightful, handmade touch that can also serve as a reusable ornament or decoration.
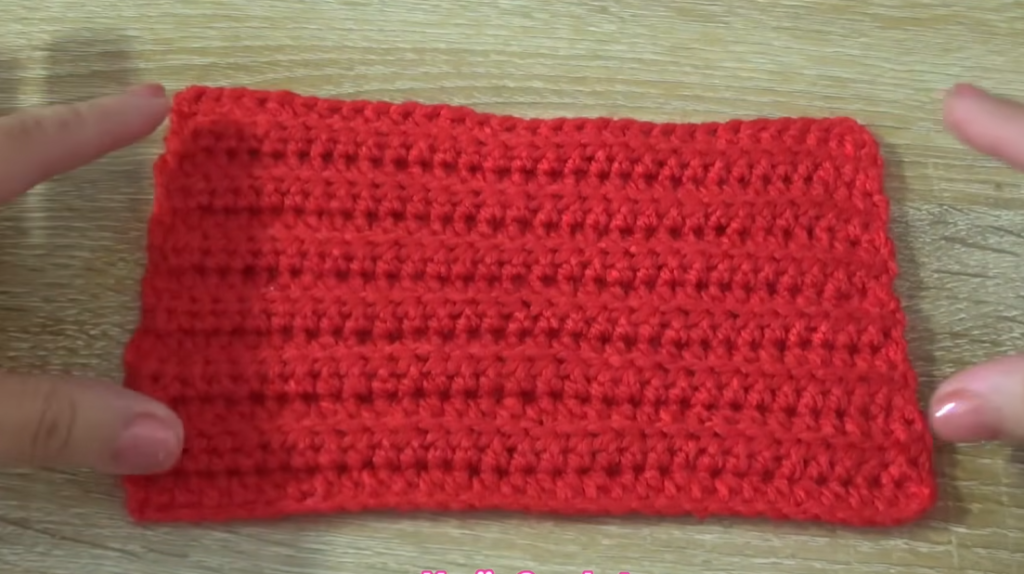
The pattern is broken down into multiple components: the main ribbed bow, the central wrap, the dangling legs, and the iconic, belted boots. The primary texture is created using the Half Double Crochet (HDC) worked in the back loop, giving the piece a stretchy, plush, and professional ribbed look.
Why You’ll Love This Whimsical Bow
- Unique Design: The addition of legs and boots sets this project apart from standard crocheted bows, making it a guaranteed conversation starter.
- Ribbed Texture: Using HDC in the back loop creates a beautiful, thick ribbing that mimics knit fabric, providing excellent structure.
- Modular Construction: Each piece is crocheted separately and then assembled, making the pattern easy to manage and transport.
- Versatile Use: Perfect for gift wrapping, but also great as a unique tree topper, door hanger, or festive wall decoration.
Suggested Projects
| Application | Notes |
| Gift Topper | Attach directly to a wrapped present using the long tails left for assembly. |
| Wreath/Door Hanger | Add a stiffening agent (like starch) to the bow shape to help it stand up. |
| Curtain Tie-Back | Sew a chain loop onto the ends of the legs to create a closure for tying back curtains. |
📌 Pattern Notes & Sizing
The entire project is worked flat in rows and then assembled. Pay close attention to the stitch placement (Back Loop Only) for the ribbed pieces.
Terminology
This pattern is written in U.S. Crochet Terms.
Gauge (Approximate)
Gauge is not critical, but consistent tension is important for matching the pieces. Using the suggested worsted weight (#4) yarn and a 3.75 mm hook, the finished main bow rectangle (before assembly) should measure approximately 12 cm (4.7 in) in width and 19 cm (7.5 in) in length (as shown in the video).
📚 Abbreviations & Special Stitches
| Abbreviation | Meaning |
| ch | Chain |
| st(s) | Stitch(es) |
| sl st | Slip Stitch |
| sc | Single Crochet |
| hdc | Half Double Crochet |
| hdc blo | Half Double Crochet in Back Loop Only |
| rep | Repeat |
🧶 Materials
- Yarn: Worsted Weight (#4) yarn in:
- Red/Green: Main Bow Color.
- Black: Boots and Belt.
- White: Boot Trim.
- Yellow/Gold: Belt Buckle.
- Hook: 3.75 mm (F/5) hook.
- Tools: Scissors, tapestry needle, and optional hot glue gun for faster assembly.
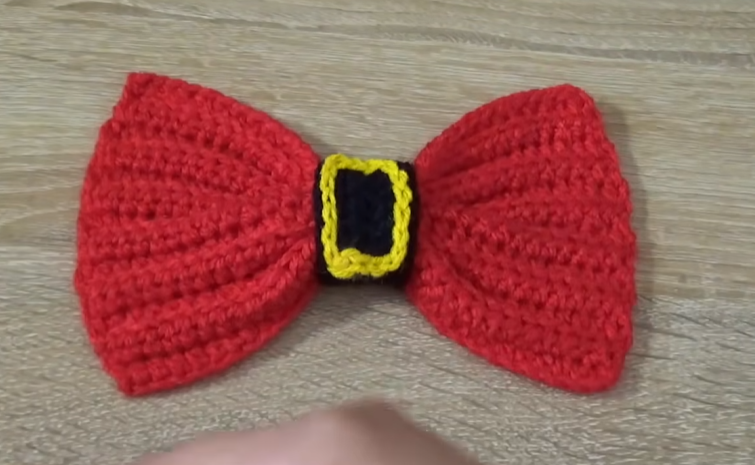
🎀 Part 1: The Main Ribbed Bow (Make 1)
This piece is a simple rectangle that is gathered in the center to form the bow shape.
Start: Using the Main Color (Red or Green).
Foundation
- Ch 31.
Row 1: Foundation Row (HDC)
- HDC in the 2nd ch from the hook and in each ch across. (This row is worked through both loops of the chain).
- [30 sts]
- Ch 1, turn.
Rows 2 – 13: Ribbing
- HDC in the BLO of the first st.
- HDC in the BLO of each st across until the last st.
- Work HDC into both loops of the very last st. (This helps keep the edges straight).
- [30 sts]
- Ch 1, turn.
Finish: Fasten off, leaving a long tail (approx. 20 inches) for gathering and attaching the bow.
👖 Part 2: The Legs (Make 2)
The two legs are long, ribbed strips that will hang down from the bow.
Start: Using the Main Color (Red or Green).
Foundation
- Ch 44.
Row 1: Foundation Row (HDC and Slip Stitch Mix)
- HDC in the 2nd ch from the hook and in the next 19 ch (20 HDC total).
- Transition: Sl st in the next 3 ch. (This creates a slight kink for the knee).
- HDC in the remaining 20 ch.
- [43 sts: 40 HDC, 3 Sl St]
- Ch 1, turn.
Rows 2 – 4: Ribbing with Sl St Center
- HDC in the BLO of the first 20 sts.
- Transition: Sl st in the BLO of the next 3 sts.
- HDC in the BLO of the next 19 sts.
- Work HDC into both loops of the very last st.
- [43 sts: 40 HDC, 3 Sl St]
- Ch 1, turn.
Finish: After Row 4, cut the yarn and Fasten off.

👢 Part 3: The Boots (Make 2)
The boots are created in three color-change sections: the white trim, the black boot, and the white top detail.
3A. Black Boot Base
Start: Using Black Yarn. Ch 8.
| Row | Instructions | Stitch Count |
| Row 1 | SC in the 2nd ch from hook. SC in next 5 ch. 5 SC inc in the last ch (5 SC in the same st). Working down the other side of the foundation chain: SC in next 6 ch. | [17 sts] |
| Row 2 | Ch 1, turn. SC in first 6 sts. [SC inc in next st, SC in next st.] Rep 3 times. SC in last 6 sts. | [20 sts] |
| Row 3 | Ch 1, turn. SC in first 6 sts. [SC inc in next st.] Rep 5 times. SC in last 6 sts. | [25 sts] |
| Row 4 | Ch 1, turn. SC in first 6 sts. SC in next 8 sts. SC in last 11 sts. (All SC, no increases). | [25 sts] |
| Row 5 | Ch 1, turn. SC in first 6 sts. Ch 1, turn and Sl st back across the 6 SC just made. (This forms the top ankle/opening). Ch 1, turn. SC in next 6 sts. | [12 sts] |
| Rows 6-7 | Ch 1, turn. SC in 6 sts. | [6 sts] |
| Row 8 | Change to White Yarn on the last pull-through of the final SC. Ch 1, turn. SC in 6 sts. | [6 sts] |
| Row 9 | Ch 1, turn. SC in 6 sts. | [6 sts] |
| Row 10 | Ch 1, turn. Sl st in 6 sts. | [6 sl st] |
Finish: Fasten off.
3B. Boot Belt and Buckle
Black Belt
- Ch 16 in Black Yarn.
- SC in 2nd ch from hook and across. (15 SC).
- Fasten off, leaving a tail.
Gold Buckle
- Ch 5 in Yellow/Gold Yarn.
- Sl st to the first ch to form a ring.
- Work sl st around the ring to thicken the shape.
- Fasten off and hide the tails.
🧵 Part 4: Assembly
1. Finish the Legs and Boots
- Attach Boots to Legs: Sew the Black Boot Base to the bottom edge of the two Leg pieces. The top of the boot (where the ankle opening is) should meet the bottom edge of the Leg.
- Attach Belt: Wrap the Black Belt horizontally around the middle of the top section of the Black Boot. Sew the ends of the belt together at the back of the boot.
- Attach Buckle: Sew the Gold Buckle ring over the stitched seam of the Black Belt.
2. Create the Bow Shape
- Gather: Thread the long tail left on the Main Bow piece onto a tapestry needle.
- Run the needle back and forth (or weave) across the center width of the rectangle.
- Pull the yarn tail tight to gather the rectangle into the classic bow shape. Secure the gathering with a firm knot, creating the “crimp” in the center.
3. Attach the Legs
- Place the two finished Legs side-by-side behind the gathered center of the Bow.
- Using the same tail used to gather the bow, stitch the tops of the two Legs securely to the back center of the Bow.
4. Center Wrap
- Central Piece: Ch 16 in the Main Color (Red/Green).
- Row 1: SC in the 2nd ch from the hook and in each ch across. (15 SC).
- Fasten off, leaving a short tail.
- Wrap this small strip tightly around the gathered center of the Bow (covering the gathering stitches and the top of the Legs).
- Sew the ends of the strip together securely at the back of the bow.
Video Tutorial:
Your Whimsical “Boot-Dangle” Christmas Bow is complete! Sew a loop to the back or simply tie the long ends around your next holiday gift.