
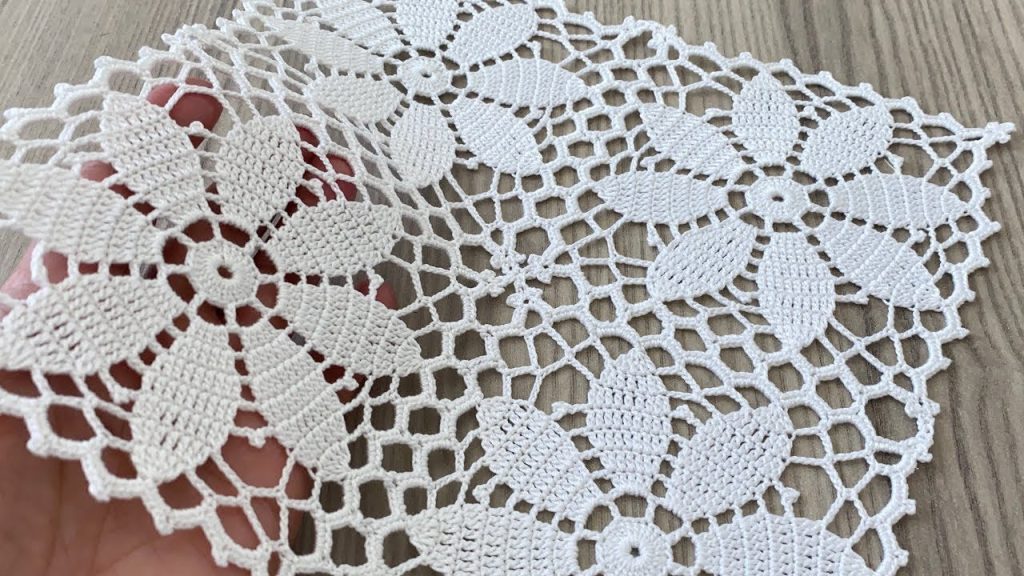
Welcome back to the loom, my detailed crocheters! Today, we are dissecting the intricate beauty of the motif showcased in the video. I’ve interpreted this stunning geometric design into the Filigree Window Square. This square perfectly balances a dense, cozy center with a delicate, open lace frame, resulting in a versatile and visually striking component for any project. The construction is worked in the round, making it an excellent motif for joining into a continuous lace afghan, a sophisticated shawl, or a bohemian runner.
The pattern utilizes simple Double Crochet (DC) stitches for the solid foundation and introduces chain spaces and strategic clusters to build the airy, “window-like” lace border.
✨ Project At a Glance
| Skill Level | Intermediate (Requires accurate counting and working into chain spaces) |
| Finished Size | Approximately 6.5 x 6.5 inches (16.5 x 16.5 cm) after blocking (using recommended materials) |
| Construction | Worked in the round from the center outwards |
| Stitch Multiple | Not applicable, as it’s a fixed-size square motif. |
| Project Ideas | Lace Throws, Garment Panels, Window Valances, Table Linens. |
🧶 Materials and Preparation
The motif’s dual texture—solid center and lacy edge—is best emphasized using two contrasting colors, but a single color will beautifully highlight the dimensional lace.

- Yarn: DK (Light Weight / Size 3) or Worsted (Medium Weight / Size 4) yarn. A cotton or cotton blend is highly recommended for defining the crisp lace details.
- Color A (Center Foundation): Approx. 20 yards
- Color B (Lace Frame): Approx. 15 yards
- Hook: Size G/6 (4.0 mm) or H/8 (5.0 mm) crochet hook, or the size needed to obtain a light, draping gauge.
- Notions: Yarn needle for weaving in ends, scissors, stitch markers (to mark corners in early rounds, if needed).
📝 Essential Stitch Abbreviations (US Terms)
This pattern uses mostly standard stitches, with the addition of a simple Pico for the final touch.
- Ch: Chain
- St(s): Stitch(es)
- Sl St: Slip Stitch
- Sc: Single Crochet
- Dc: Double Crochet
- Sk: Skip
- Sp: Space
- Pico: Chain 3, Sl St into the first Chain.
🪟 The Filigree Window Square Pattern
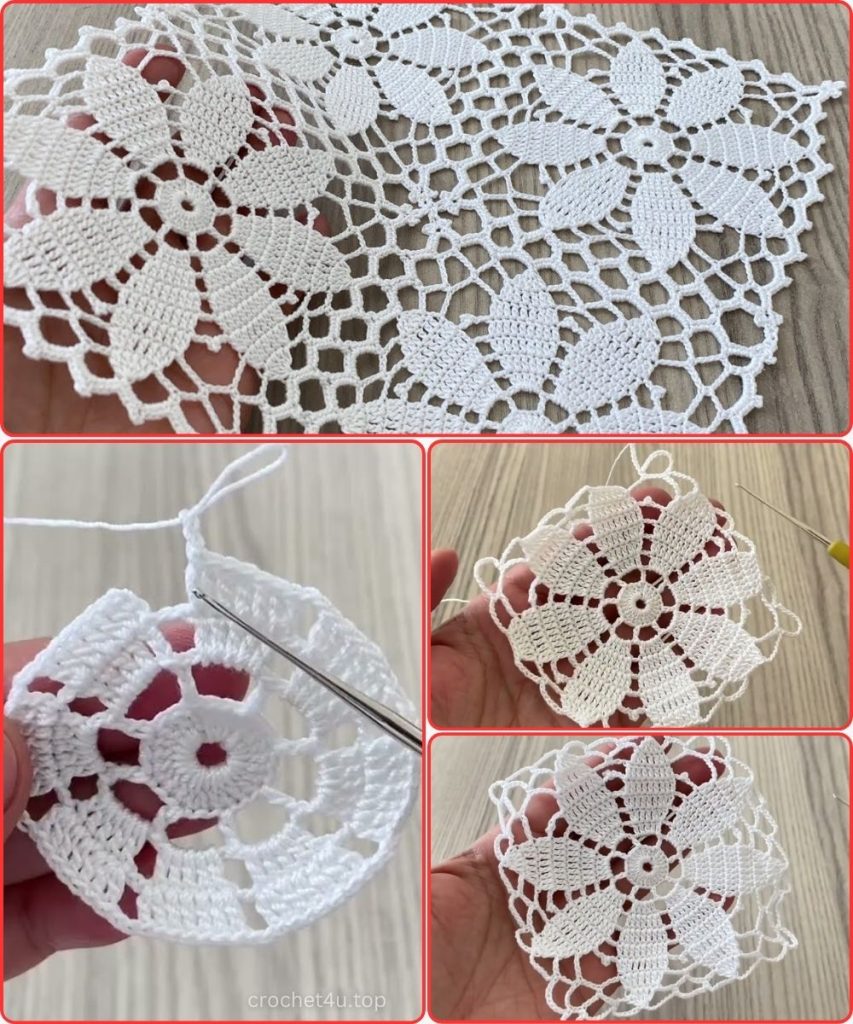
This motif is worked in 7 rounds. We will be using Color A for the first 3 rounds to establish the solid center and Color B for the remaining 4 rounds to create the intricate lace frame.
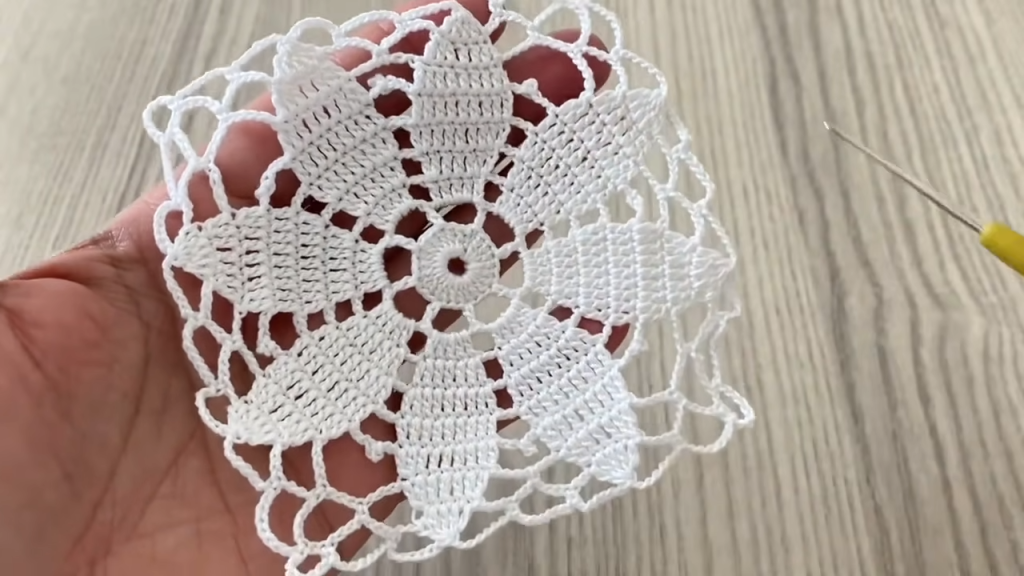
Solid Center Foundation (Color A)

Start: Using Color A.
Make a Magic Ring (or Ch 4, Sl St to first Ch to form a ring).
Round 1:
Ch 3 (counts as 1 Dc), work 2 Dc into the ring. Ch 2, 3 Dc into the ring. Repeat from * to * 3 more times. Ch 2, join with a Sl St to the top of the beginning Ch 3. (4 x 3-Dc groups, 4 Ch-2 Sps)
This sets up the first square shape.
Round 2:
Sl St into the next 2 Dc and into the corner Ch-2 Sp. Ch 3 (counts as 1 Dc). Work (2 Dc, Ch 2, 3 Dc) in the same corner Ch-2 Sp (First Corner made).
1 Dc in each of the next 3 Dc. In the next corner Ch-2 Sp, work (3 Dc, Ch 2, 3 Dc) (Corner made).
Repeat from * to * 2 more times. 1 Dc in each of the final 3 Dc. Join with a Sl St to the top of the beginning Ch 3. (4 x 9-Dc groups, 4 Ch-2 Sps)
Round 3:
Ch 3 (counts as 1 Dc). 1 Dc in each of the next 4 Sts.
In the corner Ch-2 Sp, work (3 Dc, Ch 2, 3 Dc) (Corner made). 1 Dc in each of the next 9 Sts.
Repeat from * to * 2 more times. 1 Dc in each of the remaining 4 Sts. Join with a Sl St to the top of the beginning Ch 3. (4 x 15-Dc groups, 4 Ch-2 Sps).
Fasten off Color A.
This completes the dense, solid, central diamond section.
Lace Frame & Squaring (Color B)
Round 4: Lattice Setup
Join Color B with a Sl St into the top of the beginning Ch 3 from the previous round.

Ch 3 (counts as 1 Dc). 1 Dc in the next Dc.
- Corner: In the corner Ch-2 Sp, work (2 Dc, Ch 3, 2 Dc) (Corner made).
- Side: [Ch 1, Sk 1 Dc, 1 Dc in the next Dc] 5 times. Ch 1, Sk 1 Dc. 1 Dc in the next 3 Dc.*Repeat from * to * 3 more times. Join with a Sl St to the top of the beginning Ch 3. (5 Ch-1 Sps per side)The Ch 1 spaces begin the open lattice work that frames the center.
Round 5: Inner Arch Frame
Ch 3 (counts as 1 Dc). 1 Dc in the next 3 Dc.
- Corner: In the corner Ch-3 Sp, work (3 Dc, Ch 3, 3 Dc) (Corner made).
- Side: [Ch 3, 1 Sc in the next Ch-1 Sp]. Repeat 4 times. Ch 3. 1 Dc in the next 5 Dc.*Repeat from * to * 3 more times. 1 Dc in the remaining Sts. Join with a Sl St to the top of the beginning Ch 3. (4 Ch-3 Arches per side)This row solidifies the corners while creating large archways along the sides.
Round 6: Outer Filigree Window
Ch 3 (counts as 1 Dc). 1 Dc in each of the next 4 Dc.
- Corner: In the corner Ch-3 Sp, work (3 Dc, Ch 3, 3 Dc) (Corner made).
- Side: [Ch 5, 1 Sc in the next Ch-3 Sp]. Repeat 3 times. Ch 5. 1 Dc in each of the next 7 Dc.*Repeat from * to * 3 more times. 1 Dc in the remaining Sts. Join with a Sl St to the top of the beginning Ch 3. (4 Ch-5 Arches per side)These large chain spaces create the prominent “window” effect, giving the pattern its name.
Round 7: Final Pico Edging
Ch 1 (does not count as a St). 1 Sc in each of the first 5 Dc.
- Corner: In the corner Ch-3 Sp, work (1 Sc, Pico, 1 Sc).
- Side: [Ch 2, 1 Sc in the next Ch-5 Sp]. Repeat 4 times. Ch 2. 1 Sc in each of the next 9 Dc.*Repeat from * to * 3 more times. 1 Sc in the remaining Sts. Join with a Sl St to the first Sc.Fasten off Color B.
💡 Tips for Crafting Excellence
- Tension Consistency: For the lace rounds (4-7), focus on keeping your chains loose and even. Tight chains will cause the square to curl inwards, making it impossible to join flatly.
- Counting Arches: The most critical check points are Rounds 5 and 6. Ensure you have the correct number of chain arches (4 in Round 5, 4 in Round 6) between the corner groups.
- Working into Spaces: In the lace rounds, you should be working your Sc stitches around the chain loops (into the space), not into the individual chain stitches, unless otherwise specified.
- Joining Method: Because the final border (Round 7) is a neat single crochet row, this square is ideal for the Slip Stitch Join or Single Crochet Join for a durable and clean seam when making afghans.
Video Tutorial:
🛁 Finishing and Care
- Weaving Ends: Securely weave in all yarn tails on the back side of the work using your yarn needle. The thick center (Color A) is a great place to hide the Color A tails.
- Blocking (Essential): Blocking is crucial for this square to define the lace pattern and ensure all motifs are the exact same size and perfectly square for joining.
- Method: Wet block or steam block the motifs. Gently stretch and pin the square to a blocking mat, focusing on opening up the Ch-5 spaces and securing the four corners into a 90-degree angle.
- Drying: Allow the piece to dry completely before unpinning.
Enjoy the striking geometric elegance of your new Filigree Window Square project!


