
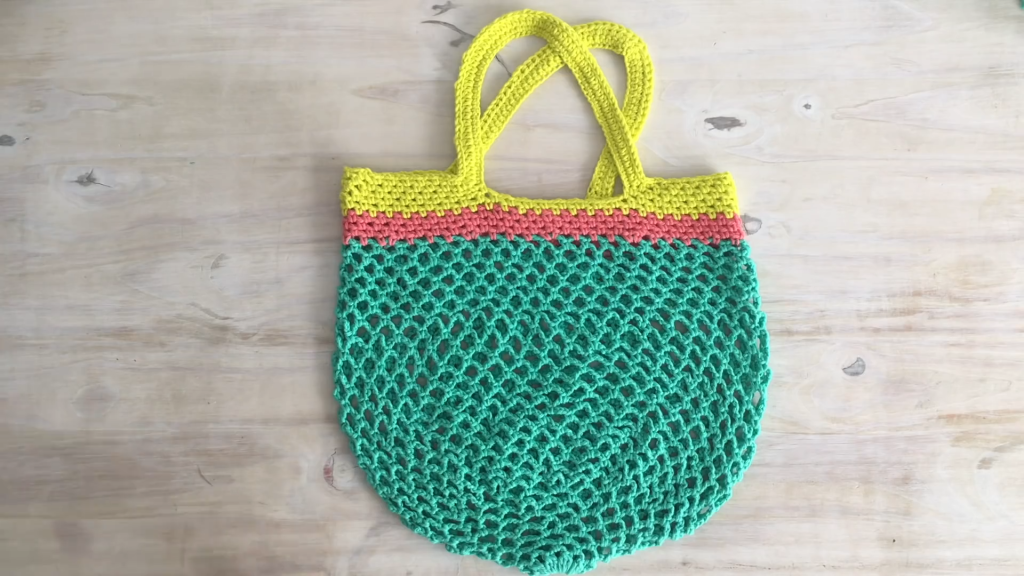
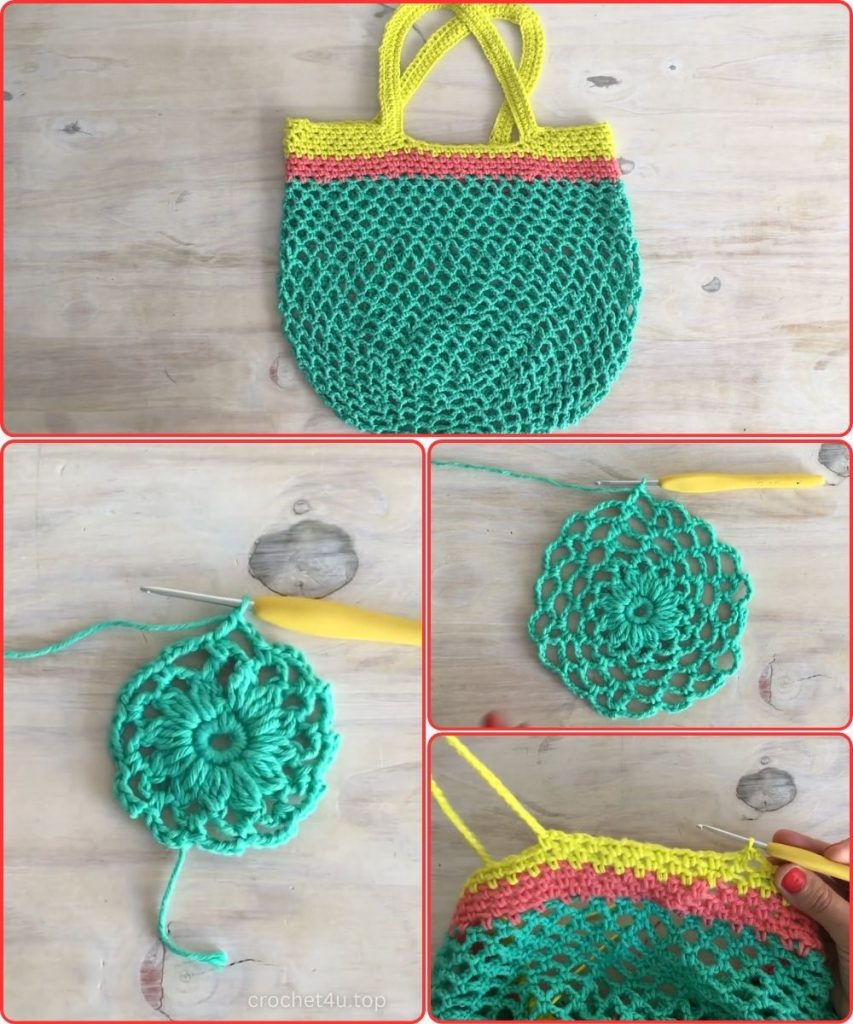
Hello, eco-conscious and stylish crafters! The pattern featured in the video is a fantastic, versatile design for a lightweight market bag, often called an “ecobolsa.” I have developed a detailed, easy-to-follow pattern for the Woven Mesh Market Tote. This bag is incredibly spacious due to its stretchy, airy lace body and features a strong, solid base and durable handles. It’s perfect for groceries, beach days, or yarn storage!
This pattern is ideal for confident beginners and intermediate crocheters, as it primarily uses basic stitches but requires careful counting and a special “Floating Join” technique to ensure a seamless spiral-like finish.
✨ Project Specifications
| Skill Level | Beginner to Intermediate |
| Finished Bag Size | Approximately 18 inches tall (before stretching) x 14 inches wide (unstretched), not including handles. |
| Gauge | Not critical for a bag, but the initial circle (R4) should be approx. 2.5 inches across. |
| Stitch Multiple | Not applicable, as it’s worked in the round with specific increases. |
| Project Ideas | Market Bag, Produce Bag, Beach Tote, Storage Bag. |
🧶 Materials and Preparation
The video uses a rustic, medium-weight yarn, which is highly recommended for durability and stretch.
- Yarn: Worsted (Medium Weight / Size 4) yarn. Cotton or a cotton/acrylic blend is ideal for strength and stretch.
- Color A (Main Body): Approx. 100-150 grams (The video uses about 100g)
- Color B/C (Trim/Handles): Approx. 20-40 grams in contrasting colors (optional).
- Hook: Size G/6 (4.0 mm) or H/8 (5.0 mm), depending on your yarn and desired mesh size.
- Notions: Yarn needle for weaving ends, scissors, stitch marker (optional, for marking increases).
📝 Essential Stitch Abbreviations (US Terms)
This pattern introduces the crucial Floating Join which is used to start the next round exactly in the center of the chain space.
- Ch: Chain
- St(s): Stitch(es)
- Sl St: Slip Stitch
- Sc: Single Crochet (The video calls this “medio punto”)
- Dc: Double Crochet (The video calls this “vareta”)
- Hdc: Half Double Crochet (Used for the handle shaping)
- 3-Dc Cl (3 Double Crochet Cluster): [Yarn over, insert hook into specified stitch, yarn over, pull up a loop, yarn over, pull through 2 loops] 3 times in the same stitch (4 loops remaining on hook). Yarn over and pull through all 4 loops on hook.
- Floating Join: Ch 2, then work 1 Dc into the beginning Sc of the round. (This places the working loop in the center of the arch to start the next round).
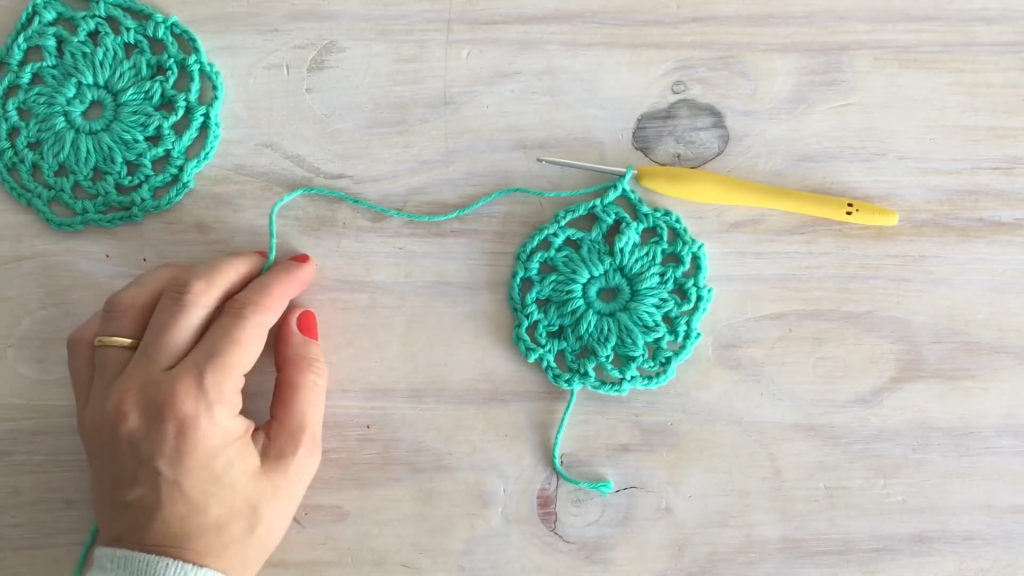
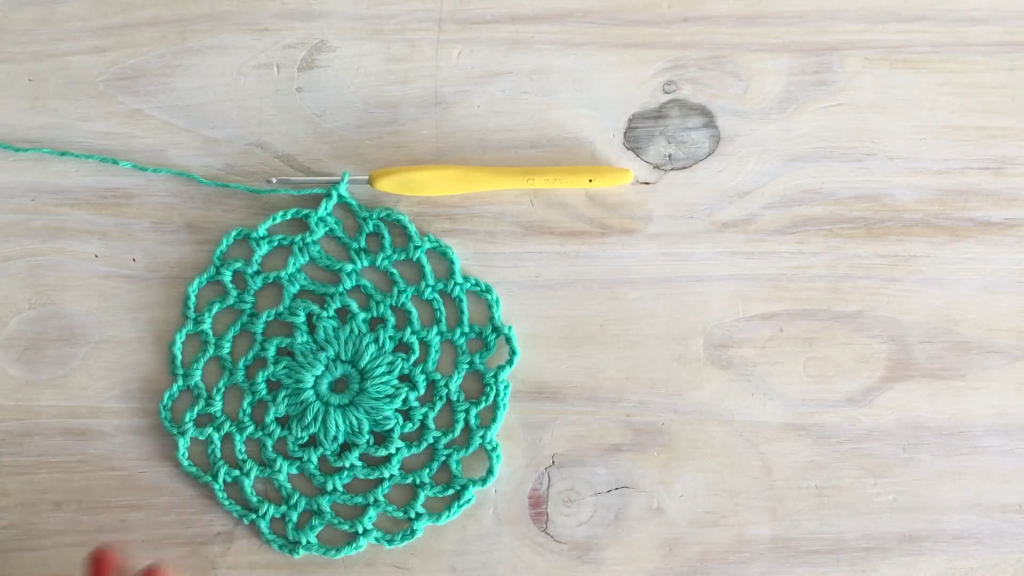
👜 Section 1: Base and Initial Flower (The Start)
We begin by crocheting a small, dense circle which transitions into a loose mesh.
Start (Color A): Make a Magic Ring (or Ch 6, Sl St to first Ch to form a ring).
Round 1 (Base):
Ch 1 (does not count as a st). Work 12 Sc into the ring. Join with a Sl St to the first Sc. (12 Sc)
Round 2 (Petal/Arch Setup):
Ch 2 (counts as first leg of 3-Dc Cl). Work 2 incomplete Dc into the same st, closing all loops together to form the first 3-Dc Cl.
Ch 4, 3-Dc Cl in the next Sc.
Repeat from * to * 10 more times. After the final cluster, Ch 2, then work 1 Dc into the top of the starting cluster. (12 Clusters, 12 Arches)
This is your first Floating Join, positioning you in the center of the arch.
Round 3 (Small Mesh):
Ch 1 (does not count as a st). 1 Sc around the arch you are currently in.
Ch 4, 1 Sc around the next arch.
Repeat from * to * around the round. To close, Ch 2, then work 1 Dc into the starting Sc. (12 Arches)
Round 4 (Medium Mesh):
Ch 1. 1 Sc around the arch you are currently in.
Ch 5, 1 Sc around the next arch.
Repeat from * to * around the round. To close, Ch 2, then work 1 Dc into the starting Sc. (12 Arches)
This is the end of the solid base. The remaining rounds form the stretchy bag body.
⬆️ Section 2: Body Growth (The Increases)
We will increase the number of mesh arches over three rounds to create the bag’s widening shape. The increase is a Double Arch Increase (working 2 arches into one arch space).
Round 5 (Increase to 18 Arches):
Ch 1. 1 Sc around the arch you are currently in.
Ch 5, 1 Sc around the next arch (Simple Arch).
Ch 5, 1 Sc around the next arch. Ch 5, 1 Sc in the same arch (Double Arch Increase).
Repeat from * to * 5 more times. You should alternate between one simple arch and one Double Arch Increase.
To close, Ch 2, then work 1 Dc into the starting Sc. (18 Arches)
Round 6 (No Increase):
Ch 1. 1 Sc around the arch you are currently in.
Ch 5, 1 Sc around the next arch.
Repeat from * to * around the round. To close, Ch 2, then work 1 Dc into the starting Sc. (18 Arches)
Round 7 (Increase to 27 Arches):
Ch 1. 1 Sc around the arch you are currently in.
Ch 5, 1 Sc around the next arch (Simple Arch).
Ch 5, 1 Sc around the next arch. Ch 5, 1 Sc in the same arch (Double Arch Increase).
Repeat from * to * 8 more times. You should alternate between one simple arch and one Double Arch Increase.
To close, Ch 2, then work 1 Dc into the starting Sc. (27 Arches)
Round 8 (No Increase):
Ch 1. 1 Sc around the arch you are currently in.
Ch 5, 1 Sc around the next arch.
Repeat from * to * around the round. To close, Ch 2, then work 1 Dc into the starting Sc. (27 Arches)
Round 9 (Increase to 40 Arches – Final Increase):
Ch 1. 1 Sc around the arch you are currently in.
Ch 5, 1 Sc around the next arch (Simple Arch).
Repeat this simple arch 3 times total.
Ch 5, 1 Sc around the next arch. Ch 5, 1 Sc in the same arch (Double Arch Increase).
Repeat the sequence of (3 Simple Arches, 1 Double Arch Increase) around the round. You should have 13 increases total.
To close, Ch 2, then work 1 Dc into the starting Sc. (40 Arches)
Rounds 10 – 22 (Straight Body):
Ch 1. 1 Sc around the arch you are currently in.
Ch 5, 1 Sc around the next arch.
Repeat from * to * around the round. To close, Ch 2, then work 1 Dc into the starting Sc. (40 Arches per round)
Work these 13 rounds straight to form the main body of the bag.
📉 Section 3: Decreases and Transition (The Top Neck)
The next section uses smaller chain loops to pull the top of the bag inward, creating a neat neck before the handle.
Round 23 (First Decrease in Arch Size):
Ch 1. 1 Sc around the arch you are currently in.
Ch 4, 1 Sc around the next arch.
Repeat from * to * around the round. To close, Ch 2, then work 1 Dc into the starting Sc. (40 Arches)
Rounds 24 – 28:
Repeat Round 23. (40 Arches per round)
Round 29 (Second Decrease in Arch Size):
Ch 1. 1 Sc around the arch you are currently in.
Ch 3, 1 Sc around the next arch.
Repeat from * to * around the round. To close, Ch 1, then work 1 Hdc into the starting Sc. (40 Arches)
Note the change in the Floating Join to Hdc to maintain the smaller chain height.
Round 30 (Trim Row and Final Increase – Color Change):
Change to Color B (or your preferred trim color).
Ch 1. 1 Sc around the arch you are currently in.
Ch 2, 1 Sc around the next arch (Simple Arch).
Repeat this simple arch 2 more times (3 simple arches total).
Ch 2, 1 Sc around the next arch. Ch 2, 1 Sc in the same arch (Double Arch Increase).
Repeat the sequence of (3 Simple Arches, 1 Double Arch Increase) around the round.
To close, Ch 1, then work 1 Hdc into the starting Sc. (50 Arches)
Rounds 31 – 35 (Handle Base Body):
Ch 1. 1 Sc around the arch you are currently in.
Ch 2, 1 Sc around the next arch.
Repeat from * to * around the round. To close, Ch 1, then work 1 Hdc into the starting Sc. (50 Arches per round)
Work these 5 rounds to create a dense edge for the handles.
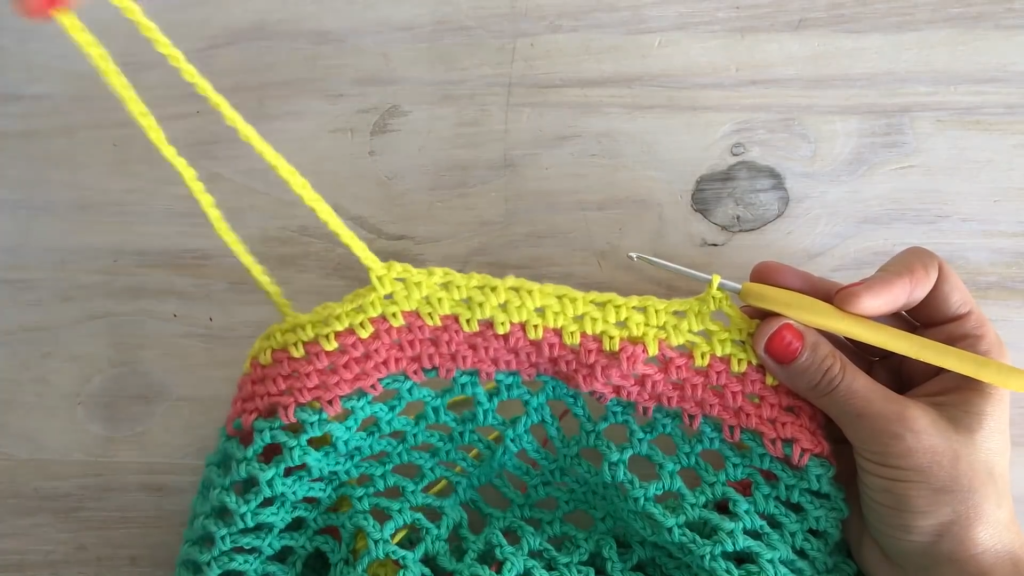
🔗 Section 4: Handle Construction
The handles are created with long chains and reinforced with Sc and Hdc for maximum strength.
Round 36 (Handle Creation):
Ch 1. 1 Sc around the arch you are currently in.
Ch 2, 1 Sc around the next arch.
Repeat from * to * until you have worked 9 arch repeats (10 Sc stitches total).
Handle 1: Ch 60 (This forms the first handle chain).
Skip 7 arches on the bag body (count 7 Sc spaces). 1 Sc in the 8th arch.
Ch 2, 1 Sc around the next arch.
Repeat from * to * for 18 arch repeats (19 Sc stitches total) across the back side of the bag.
Handle 2: Ch 60 (This forms the second handle chain).
Skip 7 arches on the bag body. 1 Sc in the 8th arch.
Complete the round with the remaining arch repeats. Join with a Sl St to the first Sc.
Round 37 (Handle Foundation Row):
Ch 1. 1 Sc in each Sc and 1 Sc in each Ch-2 Sp until you reach the start of the first handle chain (60 chains).
Handle 1: Work 1 Sc into the back bump of each of the 60 chains.
Continue 1 Sc in each Sc and Ch-2 Sp across the back section of the bag until you reach the second handle chain.
Handle 2: Work 1 Sc into the back bump of each of the 60 chains.
Complete the round 1 Sc in each Sc and Ch-2 Sp. Join with a Sl St to the first Sc.
Round 38 (Handle Shaping Row):
Ch 2 (counts as 1 Hdc). 1 Hdc in each Sc and Ch-2 Sp until you reach the first Sc of the Handle (60 Scs).
Handle 1: Work 1 Hdc in each of the 60 Scs of the handle.
Continue 1 Hdc in each Sc and Ch-2 Sp across the back section of the bag.
Handle 2: Work 1 Hdc in each of the 60 Scs of the handle.
Complete the round with 1 Hdc in each remaining St. Join with a Sl St to the top of the starting Ch 2.
Round 39 (Final Edge – Sl St Trim):
Ch 1. Work 1 Sl St in each Hdc around the entire bag, including the handles.
Ensure your slip stitches are loose enough that the handles do not curl.
Join with a Sl St to the first Ch 1.
Fasten off.
💡 Pro-Tips for Durability
- Floating Join Consistency: The unique Floating Join (Ch 2/Dc or Ch 1/Hdc) is critical. It avoids the obvious seam caused by traditional Sl St joins and centers the loop perfectly for the next row of arches.
- Handle Strength: Pulling the Sc and Hdc stitches tight when working along the Ch-60 loops in Rounds 37 and 38 will make the handles much more durable and reduce future stretching.
- Color Changes: When changing colors (e.g., Round 30), join the new color on the final pull-through of the Sc or Hdc stitch in the Floating Join of the previous round.
Video Tutorial:
🛁 Finishing and Care
- Weaving Ends: Securely weave in all yarn tails on the back side of the work using your tapestry needle. Since the bag is a mesh, ensure tails are hidden within the solid stitches of the base and the final Hdc/Sl St rounds of the handle.
- Blocking/Stretching (Recommended): The bag will look short and narrow when finished, but the mesh is designed to stretch significantly under weight.
- Method: For its final size, wet the bag and hang it (perhaps with a few water bottles inside) until it dries completely. This sets the stretch and achieves the full “market bag” size.
Enjoy the style and functionality of your new Woven Mesh Market Tote!


