
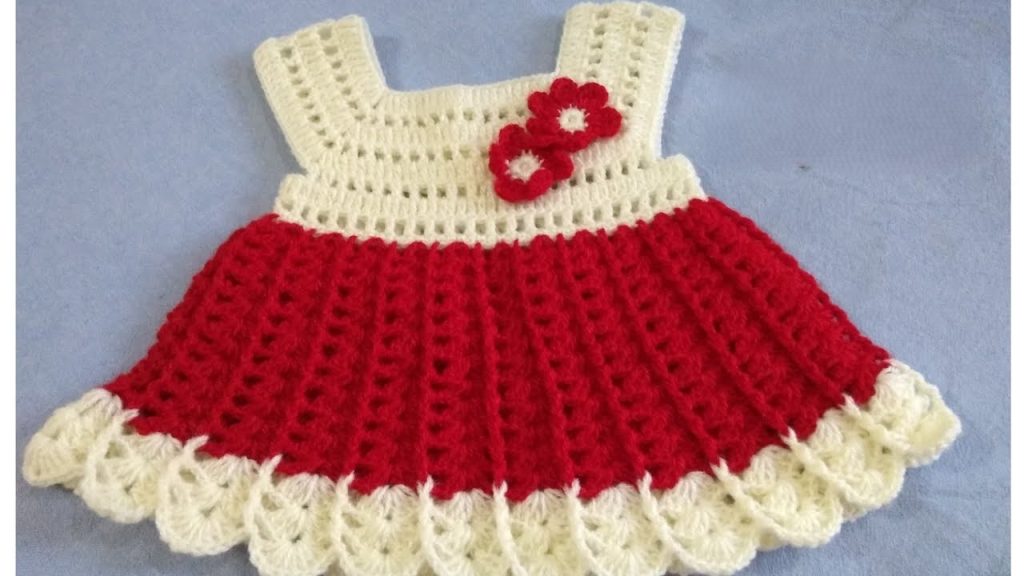
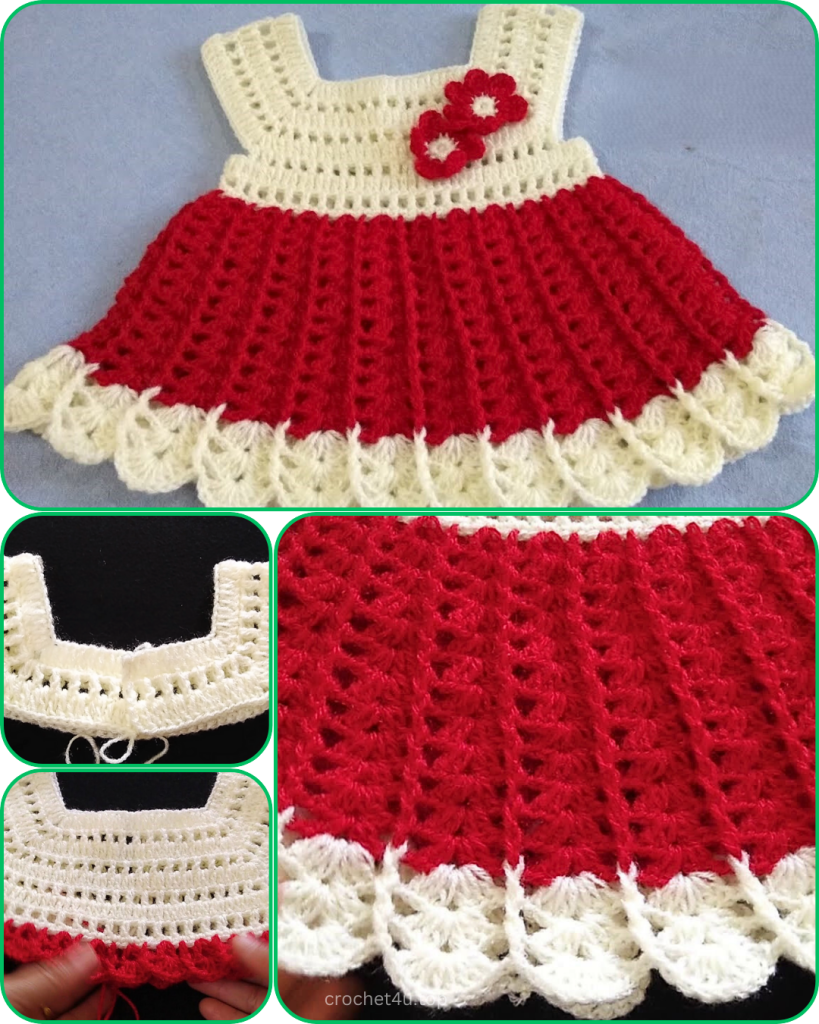
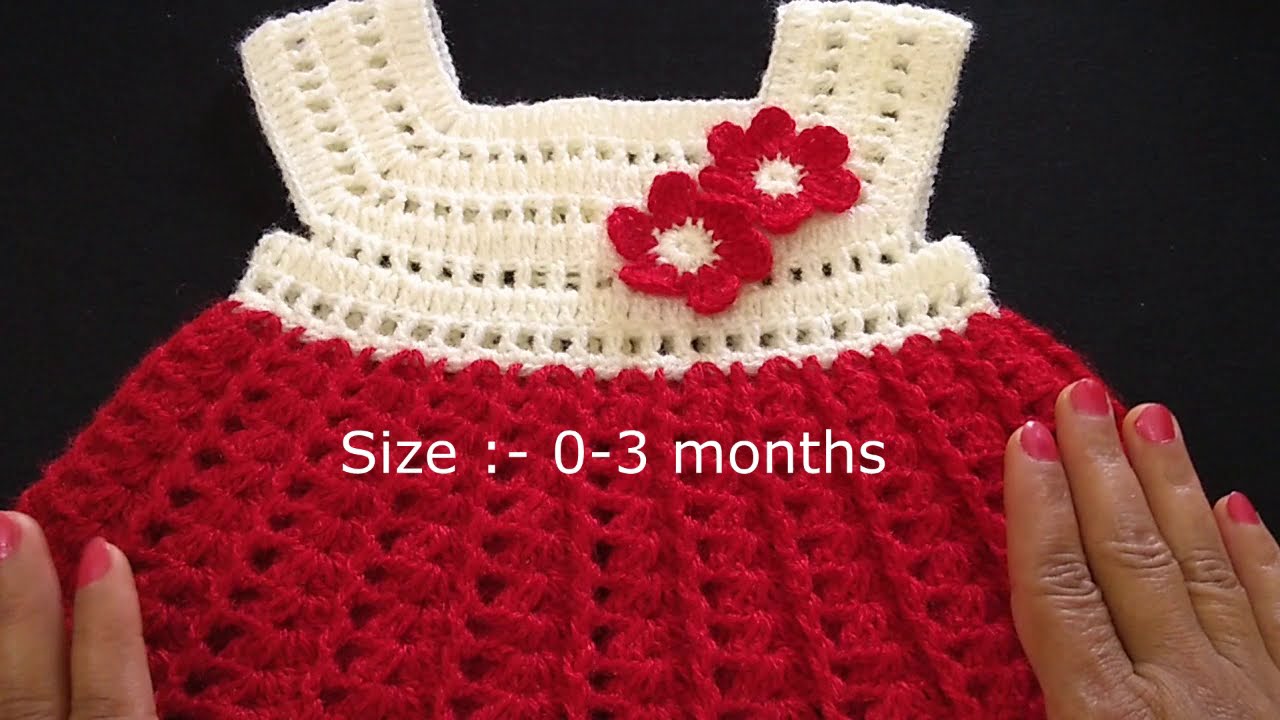
Create an adorable and classic baby frock with this detailed crochet pattern. This design features a clean, two-color look: a timeless cream bodice and a vibrant red skirt, finished with a matching cream scalloped hem. The simple stitches and top-down construction make this a great project for crocheters of all skill levels. This pattern is sized for a baby, approximately 6-12 months.
Materials
- Yarn: Approximately 100-150 yards of DK weight (Category 3) yarn in cream or white for Color A.
- Contrast Yarn: Approximately 150-200 yards of DK weight (Category 3) yarn in red for Color B.
- Hook: A 4.0 mm (G/6) crochet hook.
- Accessories: A yarn needle for weaving in ends and scissors.
Stitches Used (US Terms)
- ch: Chain
- sl st: Slip Stitch
- sc: Single Crochet
- dc: Double Crochet
- inc: Increase (work two stitches in the same stitch)
- shell: (3 dc, ch 1, 3 dc) in the same stitch or space
- sk: Skip
Part 1: The Yoke (Color A)
The yoke is worked from the top down, in a single piece, creating a seamless foundation. The increases are strategically placed to ensure a perfect fit that lays flat.
Initial Chain: Ch 60. This will be the starting chain for the neckline.
Row 1: Dc in the 4th ch from the hook (the skipped 3 ch count as the first dc) and in each ch across. Ch 3, turn. (58 dc)
Row 2 (Increase Row): 2 dc in the first st (inc), dc in the next 7 sts. Inc, dc in the next 7 sts. Repeat * to * across to the last st. Dc in the last st. Ch 3, turn. (65 dc)
Row 3: Dc in each st across. Ch 3, turn. (65 dc)
Row 4 (Increase Row): 2 dc in the first st (inc), dc in the next 8 sts. Inc, dc in the next 8 sts. Repeat * to * across to the last st. Dc in the last st. Ch 3, turn. (72 dc)
Row 5: Dc in each st across. Ch 3, turn. (72 dc)
Row 6 (Increase Row): 2 dc in the first st (inc), dc in the next 9 sts. Inc, dc in the next 9 sts. Repeat * to * across to the last st. Dc in the last st. Ch 3, turn. (79 dc)
Row 7: Dc in each st across. Do not fasten off. (79 dc)
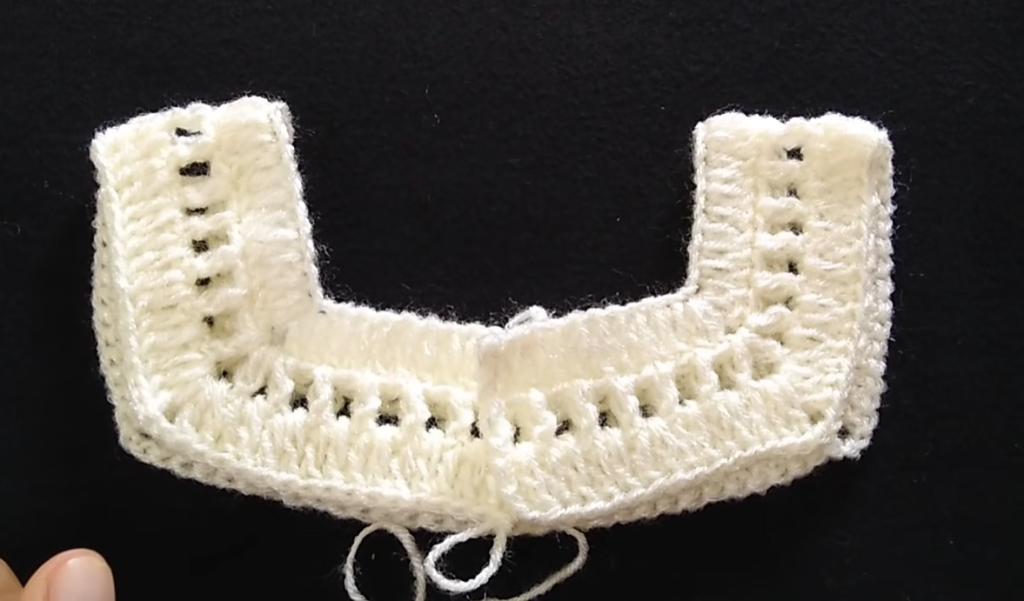
Part 2: Dividing for Sleeves and Joining for the Skirt
Now we’ll separate the front and back panels to create the armholes, then join to work in the round for the skirt.
Row 8: Ch 3, dc in the next 11 sts. Ch 2 (skip 18 sts for the first sleeve), dc in the next 20 sts. Ch 2 (skip 18 sts for the second sleeve), dc in the next 12 sts. Join with a sl st to the top of the ch 3.
Row 9: Ch 3, dc in each st and each ch-2 space around. Join with a sl st. (46 dc)
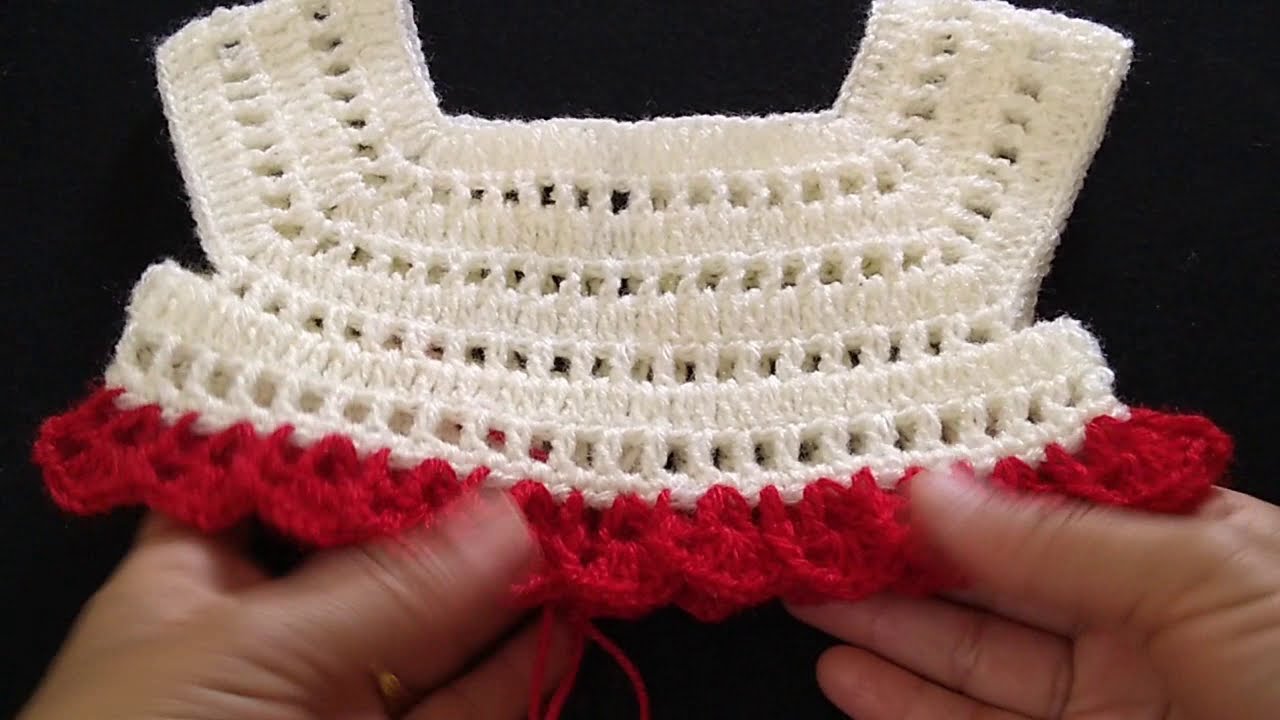
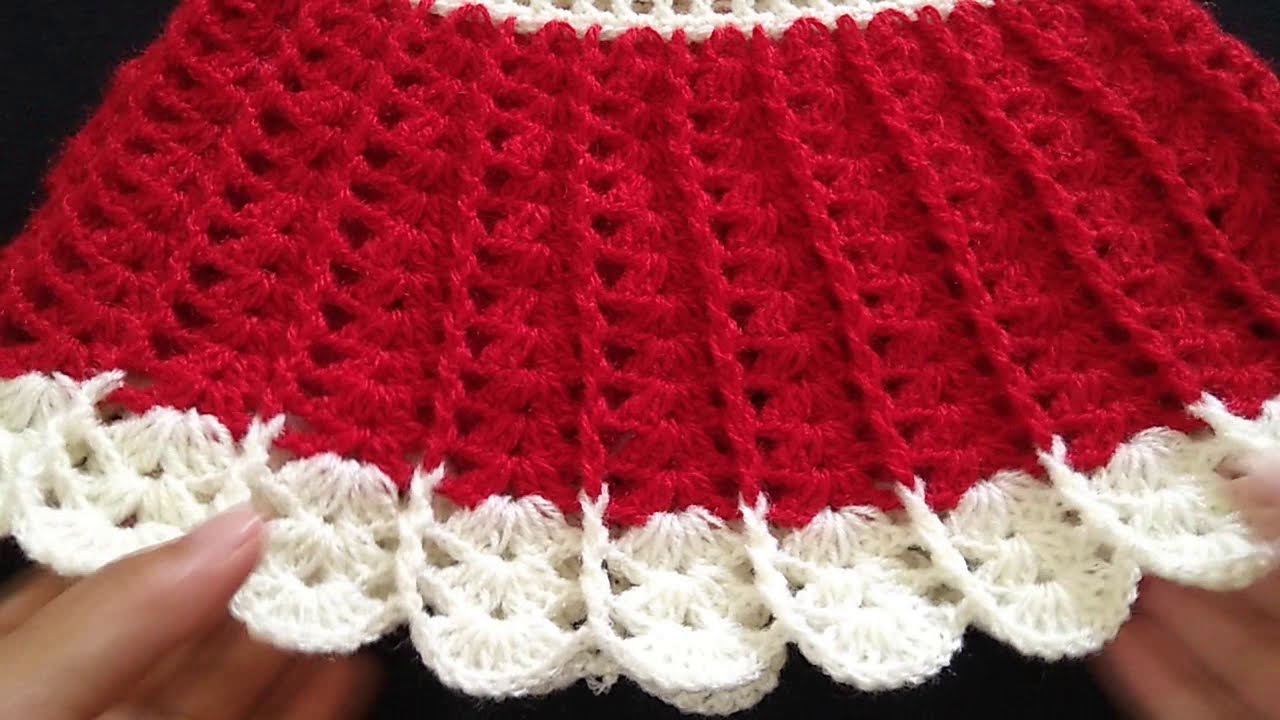
Part 3: The Skirt (Color B)
Attach Color B and begin the beautiful shell stitch pattern that gives the skirt its flowing, elegant look.
Change to Color B: Fasten off Color A. Attach Color B with a sl st to any stitch.
Round 1: Ch 1, sc in the same st. Sc in the next 2 sts. Sk 2 sts, work a shell in the next st. Sk 2 sts, sc in the next 3 sts, sk 2 sts, work a shell in the next st. Repeat * to * around. Join with a sl st to the first sc. This round sets the foundation for your shell stitches.
Round 2: Ch 3, sk the next 2 sc. Sc in the ch-1 space of the shell from the previous round. Ch 3, sk the next 3 sc. Sc in the ch-1 space of the next shell. Repeat * to * around. Join with a sl st to the first ch of the round. This round creates the chain spaces for the next row of shells.
Round 3: Ch 3. Work a shell in the ch-3 space from the previous round. Work a shell in the next ch-3 space. Repeat * to * around. Join with a sl st to the top of the ch 3. This is the main shell pattern repeat.
Repeat Round 2 and Round 3 until the skirt reaches your desired length. Approximately 8-10 rounds should be sufficient for a baby dress, but you can add more for a longer frock.
Part 4: The Hem and Flowers
The Hem (Color A)
Attach Color A to create a beautiful scalloped edge that perfectly complements the top and skirt.
- Round 1: Join Color A with a sl st to the bottom of the skirt. Work a round of sc around. Join with a sl st.
- Round 2 (Scallops): Ch 1. Sk 1 st, and in the next st, work (sl st, ch 2, 3 dc, ch 2, sl st). Sk 2 sts, and in the next st, work (sl st, ch 2, 3 dc, ch 2, sl st). Repeat * to * around the entire hem. Fasten off and weave in ends.
The Flowers (Color B)
Make two flowers to decorate the yoke. The layered petals give them a beautiful, three-dimensional effect.
- Ch 4, join with a sl st to form a ring.
- Round 1: Ch 1, 10 sc in the ring. Join with a sl st.
- Round 2 (Petals): In the first sc, work a series of (sl st, ch 2, 3 dc, ch 2, sl st). This forms one petal. Repeat this in each of the remaining 9 sc from the previous round. You will have 10 petals.
- Fasten off, leaving a long tail for sewing.
Video Tutorial:
Video Tutorial:2
Final Touches
Weave in all remaining ends with your yarn needle. Gently block the finished dress to help it lay flat and showcase the stitches. Sew the two flowers onto the front of the yoke. You can stack them or place them side by side for a customized look.
This sweet dress is a wonderful way to create a classic, handcrafted piece. The contrasting colors and textured stitches make it a standout item, and the result is a beautiful garment that is sure to be treasured.


