
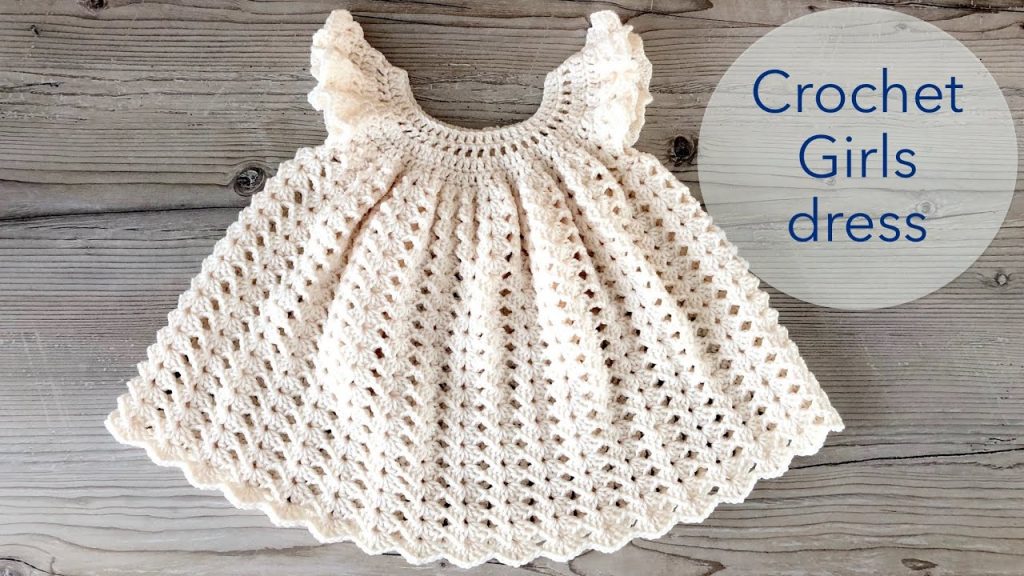
Crocheting garments for little ones is one of the most rewarding projects for any maker. A handmade dress is not only practical but also a keepsake that families can treasure for years. Today’s pattern is for a delicate and elegant crochet girl’s dress, perfect for babies and toddlers. The featured design has a soft, lacy skirt, flutter-style sleeves, and a gentle round yoke that makes it comfortable for a baby to wear while still looking sophisticated. Whether you are preparing for a baby shower, a first birthday, or just want to crochet something timeless for your little one, this dress is an excellent choice.
This tutorial will walk you through everything you need to know to create this beautiful dress. It is written in US crochet terms, with detailed step-by-step instructions, tips for adjusting sizes, and finishing suggestions to ensure your dress turns out polished and professional.
Materials Needed
- Yarn: Soft DK weight cotton or cotton-acrylic blend is recommended. The sample shown is worked in a cream shade, but you can choose any pastel or bright color depending on the occasion.
- 0–6 months: approx. 250 g (500–550 yards)
- 6–12 months: approx. 300 g (600–650 yards)
- 12–24 months: approx. 350 g (700–750 yards)
- Hook: 3.5 mm (E/4) or 4.0 mm (G/6), depending on your yarn and tension.
- Notions:
- Scissors
- Tapestry needle for weaving ends
- Stitch markers
- Blocking board and pins (optional but recommended)
- Ribbon or decorative buttons for embellishment (optional)
Gauge
Gauge is important to ensure proper sizing.
- 16 double crochet stitches × 8 rows = 4 inches (10 cm) using 4.0 mm hook.
Always crochet a test swatch and adjust hook size if necessary.
Stitches and Abbreviations
- ch – chain
- sc – single crochet
- dc – double crochet
- sl st – slip stitch
- sk – skip
- st(s) – stitch(es)
- sp – space
- rep – repeat
- fpdc – front post double crochet (for textured yoke)
Sizing Chart (Chest Measurement & Length Guide)
| Size | Chest (inches) | Dress Length (inches) | Starting Chain (yoke) |
|---|---|---|---|
| 0–3 months | 16 in | 12 in | 68 chains |
| 3–6 months | 17 in | 14 in | 72 chains |
| 6–12 months | 18–19 in | 16 in | 80 chains |
| 12–24 months | 20–21 in | 18–19 in | 88 chains |
Note: Adjustments can be made by increasing or decreasing the foundation chain in multiples of 4.
Construction Overview
This dress is worked top-down in one piece:
- The yoke is crocheted in rounds, shaped with increases.
- The armholes are formed by skipping stitches and continuing with the body.
- The skirt is worked with a shell/lattice pattern that gives the dress its flowing, airy structure.
- Finally, the sleeves and edging are added, and finishing touches like ribbon can be sewn in.
Step-by-Step Pattern Instructions
Yoke (0–6 months size as base)
Foundation:
Ch 72. Join with sl st to form a ring. Be careful not to twist.
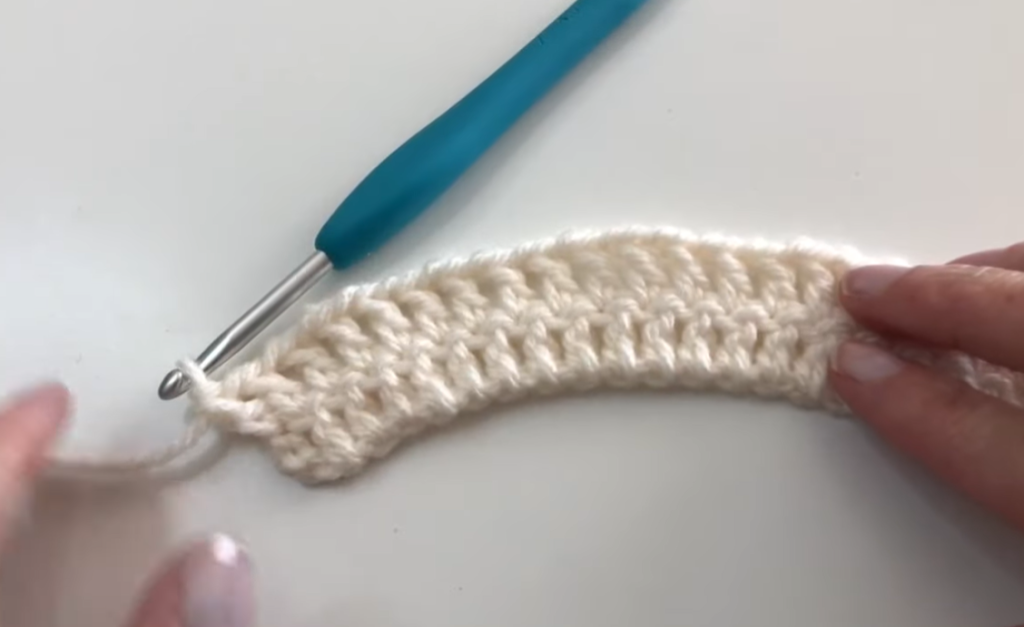
Round 1: Ch 3 (counts as dc), dc in each ch around. Join with sl st. (72 dc)
Round 2–4: Ch 3, fpdc around next st, dc in next st. Rep around. Join. (This creates a textured rib effect for the neckline.)
Round 5 (Increase Round): Ch 3, 2 dc in same st, dc in next 8 sts. Rep around. Join. (80 dc)
Round 6–8: Dc in each st around. Join. (Maintain stitch count)
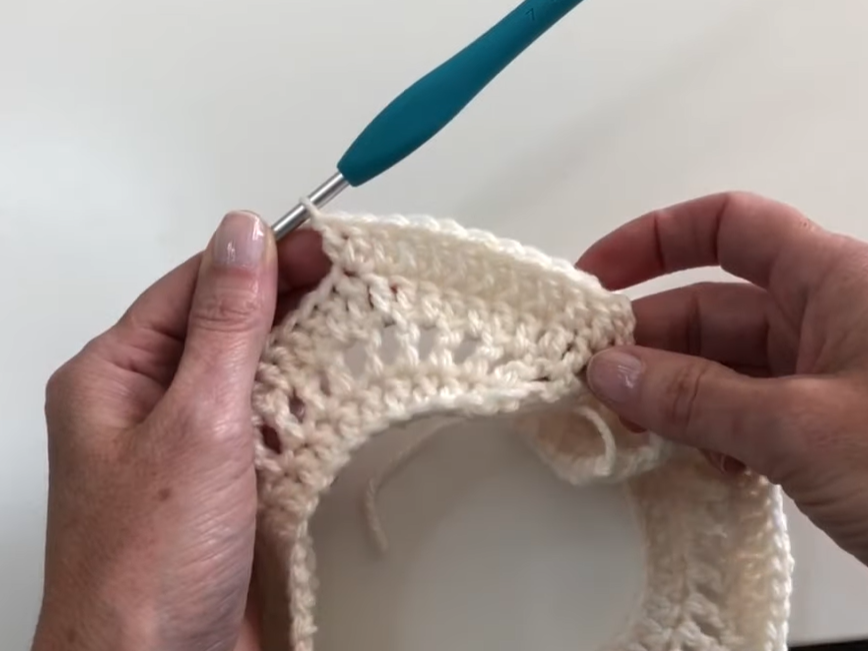
Round 9 (Divide for Armholes):
- Dc in first 12 sts (front), ch 6 (armhole), sk 18 sts (sleeve), dc in next 24 sts (back), ch 6 (armhole), sk 18 sts (sleeve), dc in last 12 sts (front). Join.
You now have armholes formed and will continue with the body.

Body of the Dress (Skirt Section)
Round 10 (Set-up for Lace): Ch 3, dc in each st and ch-sp around. Join. (Approx. 60 dc)
Round 11 (Shell Pattern Begins): Ch 3, sk 1, 3 dc in next st, sk 1, dc in next st. Rep around. Join.
Round 12: Ch 3, sk next dc, 3 dc in center dc of shell below, sk next dc, dc in next dc. Rep around.
Continue this shell repeat pattern until desired length is reached.
- For 0–6 months: work 20 rounds.
- For 6–12 months: work 24 rounds.
- For 12–24 months: work 28 rounds.
Edging
Once the skirt is complete:
Round 1: Ch 1, sc around evenly.
Round 2: Sk 1 st, 5 dc in next st (shell), sk 1 st, sc in next st. Rep around. Join with sl st.
This creates the scalloped hemline.
Sleeves
Reattach yarn at armhole.
Round 1: Work sc evenly around armhole. Join.
Round 2: Sk 1 st, 3 dc in next st, sk 1 st, sc in next. Rep around.
Round 3: Rep round 2 for fuller ruffle. Fasten off and weave in ends.
Finishing
- Weave in all ends neatly with a tapestry needle.
- Block lightly to shape the lace and yoke evenly.
- Add an optional satin ribbon around the waistline, weaving it through the stitches for decoration.
- Decorative buttons or flowers can be sewn near the neckline for an extra touch.
Video Tutorial:
Adjustments for Larger Sizes
To make the dress for larger babies/toddlers:
- Increase Foundation Chain according to sizing chart (multiples of 4).
- Add more rounds in the yoke before dividing for armholes.
- Extend the skirt length by repeating the lace pattern until desired measurement.
Styling Ideas
- Classic look: Cream or white yarn with a pastel ribbon.
- Festive look: Bright yarn (red, green, or gold) with contrasting trim for holidays.
- Summer look: Cotton yarn in yellow, aqua, or coral with no sleeves.
- Winter look: Use a soft acrylic blend and pair with a long-sleeved top underneath.
Care Instructions
Since baby garments need to be practical:
- Wash on gentle cycle in cold or lukewarm water.
- Lay flat to dry to maintain shape.
- Avoid harsh detergents or bleach.
- If blocking is needed after washing, pin lightly to restore lace definition.
Conclusion
This crochet girl’s dress is a versatile, timeless piece that combines beauty with comfort. The lacy shell skirt gives it elegance, while the top-down construction ensures it is easy to size and adjust. Whether you are making it for your own child, as a gift, or to sell at craft fairs, this pattern will be a delightful addition to your crochet projects.
Crocheting baby garments is always special because they carry both warmth and love. Every stitch in this dress will be cherished by the family that receives it. With the detailed instructions provided here, you can confidently create a piece that is not only practical but also heirloom-worthy.


