
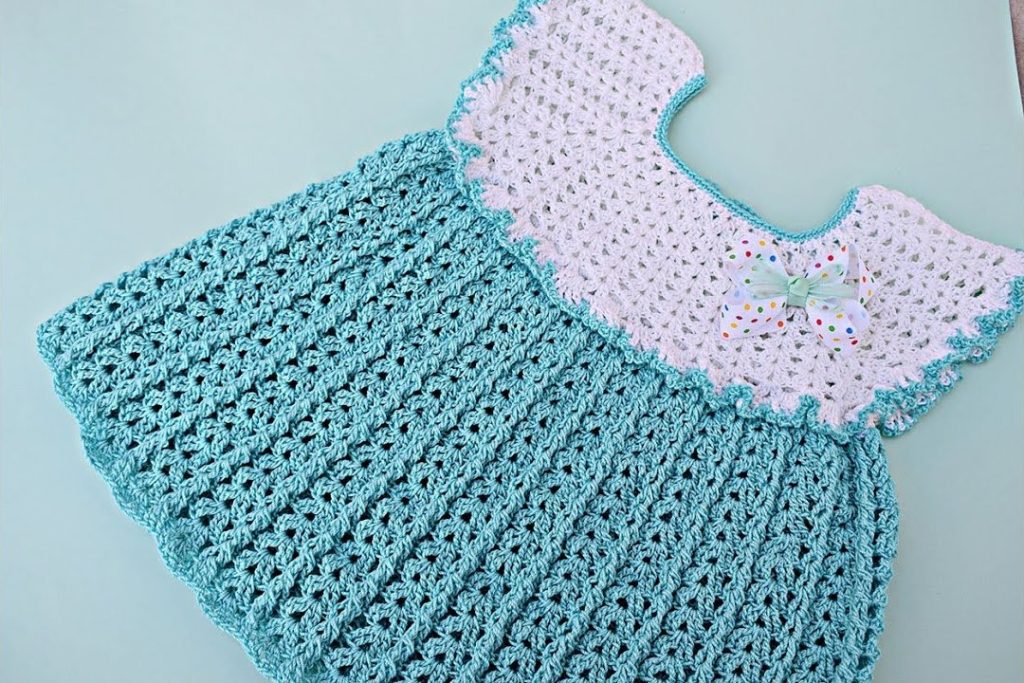
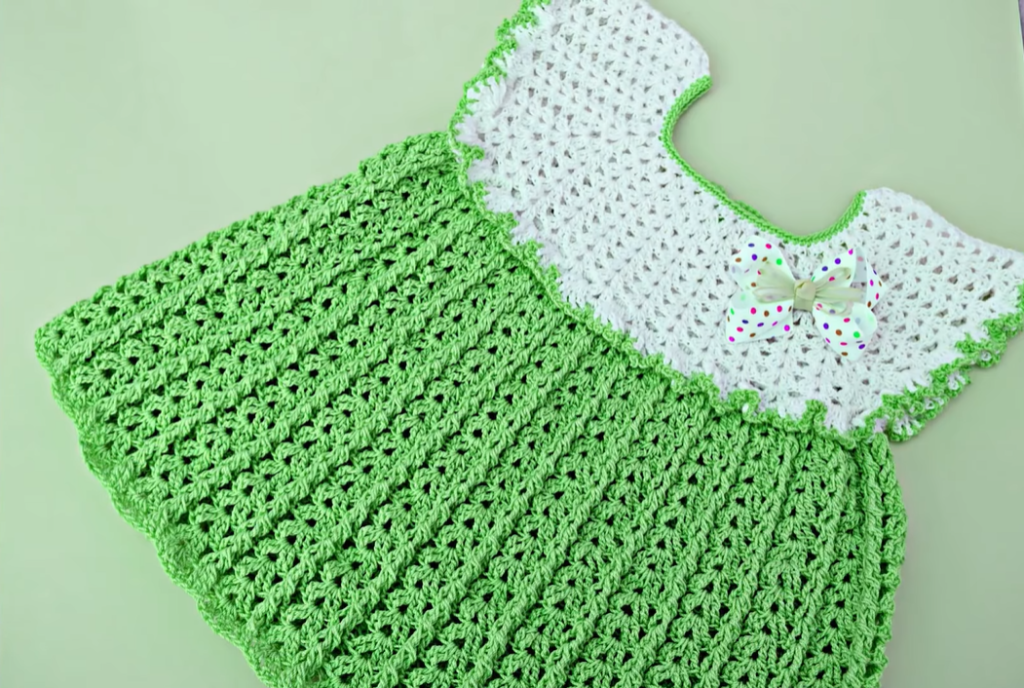
This dress perfectly captures a light, airy feel with its contrasting yoke and skirt textures. The top uses a beautiful open V-stitch pattern, while the skirt features the dense, textured Moss Stitch. Finished with a sweet ruffled border and a delicate bow, this Aqua and White Dress is an absolute delight to crochet and a wonderful piece for warmer weather.
This pattern is written for the 3-6 Month size and is suitable for an Intermediate crocheter.
Materials Needed 🧶
- Yarn: Approximately 350-400 yards of Sport Weight (#2) or light DK Weight (#3) yarn. Cotton or a cotton blend is recommended for drape and coolness.
- Main Color (MC): Approx. 150 yards (Snow White for the Yoke)
- Contrast Color (CC): Approx. 250 yards (Aqua Teal for the Skirt)
- Crochet Hook: 3.5 mm (US E-4), or the size needed to obtain gauge.
- Ribbon: A small polka-dot or patterned ribbon for the bow.
- Tapestry Needle: For weaving ends and assembly.
Skill Level & Notes 💡
- Skill Level: Intermediate. Requires knowledge of raglan shaping, joining new stitches, and working simple repeating lace and textured stitches.
- Construction: The dress is worked top-down, beginning flat for the back opening, and then joining to work the skirt in the round.
- Chains: The starting chain (e.g., ch 3) at the beginning of DC/GVS rows always counts as the first stitch unless noted otherwise.
Gauge 📏
In Double Crochet (DC) (Yoke section) using a 3.5 mm hook: 18 DC stitches and 9 rows = 4 inches (10 cm) square.
Abbreviations 📚
| Abbreviation | Description |
| ch | chain |
| sl st | slip stitch |
| sc | single crochet |
| dc | double crochet |
| st(s) | stitch(es) |
| rep | repeat |
| PM | Place Marker |
| sp | space |
| sk | skip |
Special Stitches ✨
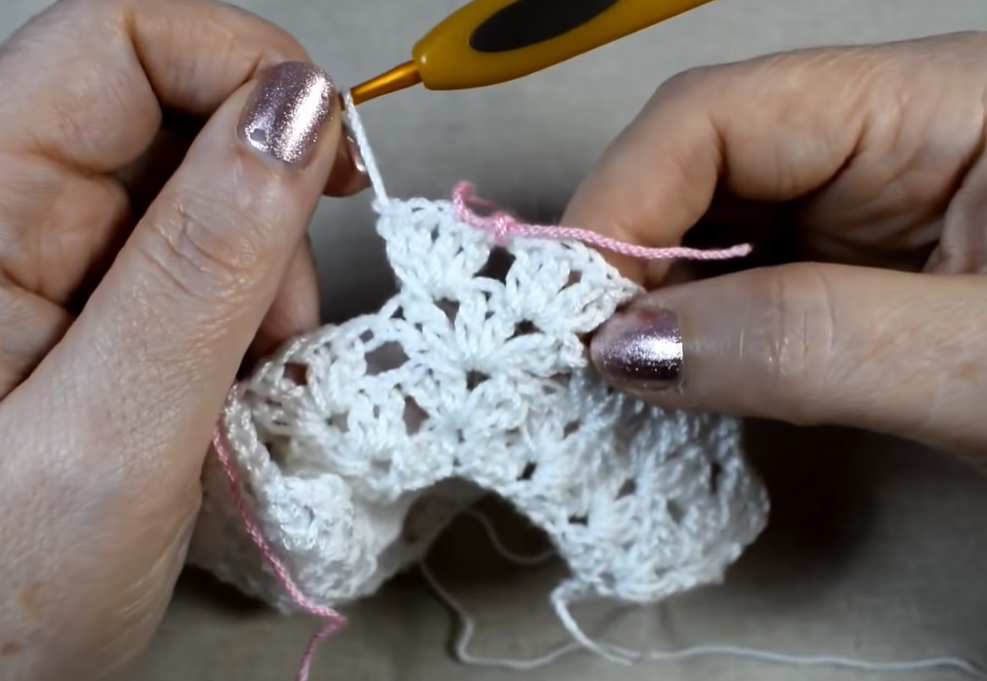
Granny V-Stitch (GVS)
- GVS: (Dc, ch 1, dc) all worked into the same stitch or space.
Moss Stitch (MS)
- MS: Alternating sc and ch-1 spaces. Sc is worked into the ch-1 sp of the previous round.
Part 1: The Yoke (MC – Snow White) ⬆️
The yoke is worked flat in rows with a back opening.
Row 1 (Foundation): Ch 54. GVS in the 4th ch from hook (counts as 1 GVS). [GVS in the next ch, ch 1, GVS in the next ch (PM in ch-1 sp)] 4 times, distributing stitches for Back, Shoulder, Front, Shoulder, Back sections. Work GVS in each remaining ch. (Approx. 22 GVS, 4 ch-1 sps)
Row 2 (Increase Row): Ch 3 (counts as dc), turn. Work GVS in each ch-1 sp or GVS center of the previous row until the first corner ch-1 sp. [GVS, ch 1, GVS] in the corner ch-1 sp (PM in the new ch-1 sp). Rep [GVS in each st/sp to the next corner ch-1 sp, (GVS, ch 1, GVS) in ch-1 sp] 3 times. Work GVS in each remaining ch-sp/st.
Rows 3-8: Repeat Row 2. Continue working GVS into all ch-1 spaces and GVS centers, increasing at the 4 marked corners.
Row 9 (Armhole Joining Row): Ch 3, turn. Work GVS until the first corner ch-1 sp. Dc in the ch-1 sp. Ch 2 (skips the sleeve section). Dc in the second corner ch-1 sp. Work GVS until the third corner ch-1 sp. Dc in the ch-1 sp. Ch 2 (skips the second sleeve section). Dc in the fourth ch-1 sp. Work GVS in each remaining sp/st. Do not join.
Part 2: The Transition & Ruffle 🌊
We now join for the round and create the ruffle. Fasten off MC.

Round 10 (CC – Aqua Teal): Attach CC to the corner where the row ended.
- Ch 1, sc in the first st. Sc evenly around the row ends, working 3 sc for every 2 rows, and sc across the ch-2 armhole spaces and all stitches/spaces of the last row. (Ensure total stitch count is a multiple of 3). Sl st to join, closing the back opening. (Approx. 102 sc)
Round 11 (Ruffle Row – CC): Ch 1. Sc in the first st. [Sk 1 st, 5 dc in the next st (Small Shell), sk 1 st, sc in the next st] rep around. Sl st to the beg sc.
- This creates the tiny ruffle where the yoke meets the skirt.
Part 3: The Skirt (CC – Aqua Teal) 👗
We will transition from the ruffle row to the textured Moss Stitch skirt.
Round 12 (MS Setup): Ch 1. Sc in the first st. Ch 1, sk 1 st, sc in the center (3rd) dc of the next shell. [Ch 1, sk 1 st, sc in the next sc of the previous row (between shells)] rep around, ending with a ch 1, sk 1 st. Sl st to the beg sc to join. (Approx. 51 sc, 51 ch-1 sps)
Round 13 (Moss Stitch): Ch 1. Sc in the first ch-1 sp. [Ch 1, sc in the next ch-1 sp] rep around. Sl st to the beg sc.
Round 14: Ch 1. Sc in the first ch-1 sp. [Ch 1, sc in the next ch-1 sp] rep around. Sl st to the beg sc.
Round 15 (Increase): Ch 1. Sc in the first ch-1 sp. [Ch 1, sc in the next ch-1 sp] rep 10 times. [Ch 1, sc in the next ch-1 sp, ch 1, sc in the same ch-1 sp (Increase)]. Rep the pattern and increase sequence 5 times total around the skirt. Sl st to join. (Increases Moss Stitch pairs by 5.)
Rounds 16-20: Repeat Round 13.
Rounds 21-35: Continue the Moss Stitch pattern, repeating the Increase Round (Rnd 15) every 5 rounds to maintain the A-line flare.
Final Hem: Sl st around to the next ch-1 sp. Work one final round of sc in each sc and each ch-1 sp. Sl st to join. Fasten off.

Part 4: Finishing and Edging 🎀
A. Neckline Edging (CC)
- Attach CC to the back neck opening. Work 1 round of sc evenly around the entire neckline. Sl st to join and fasten off.
B. Armhole Edging (CC)
- Attach CC to the underarm. Work 1 round of sc evenly around the armhole opening. Sl st to join and fasten off. Repeat for the second armhole.
C. Back Closure
- Attach CC to the bottom of the back opening. Work a row of sc up the side. Ch 3 (creates loop). Sl st back into the last sc. Fasten off.
- Sew a small button onto the opposite back opening, aligning it with the button loop.
Video Tutorial:
Assembly and Final Touches 🫧
- Thread Ribbon: Securely tie the patterned ribbon into a small bow and sew it neatly onto the white yoke, slightly off-center below the neckline, as pictured.
- Weave in all ends securely using the tapestry needle.
- Blocking: Gently wet or steam block the dress. Pin the yoke to keep it flat and allow the skirt to hang straight, setting the Moss Stitch texture.
Your beautiful Seaside Aqua Crochet Dress is now ready! Enjoy the wonderful texture contrast!


