
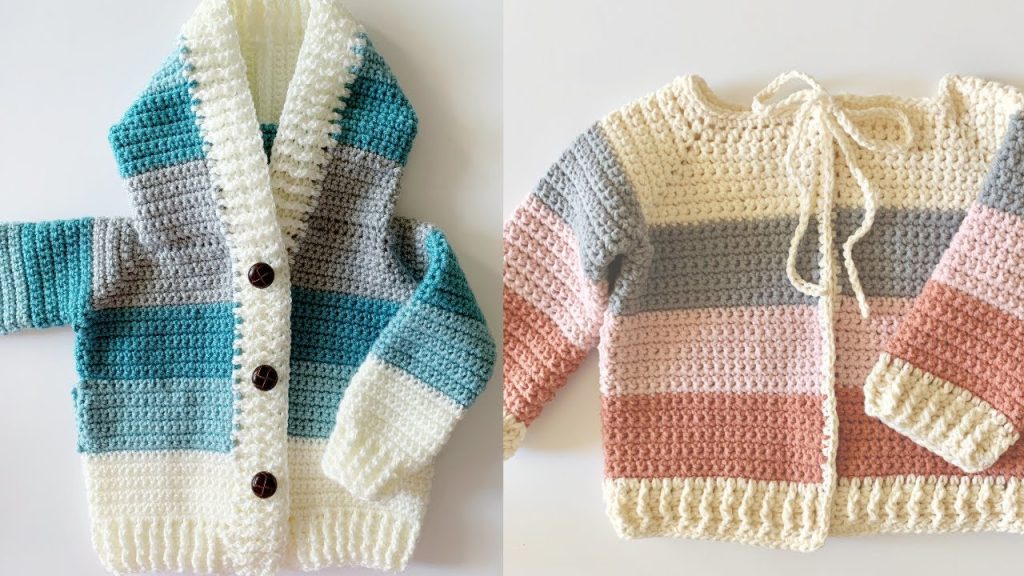
Get ready to bundle up your little adventurer in The Mountain Trail Striped Cardigan! This cozy jacket is designed with warmth and style in mind, featuring a multi-toned stripe sequence, a wonderfully thick ribbed shawl collar, and a snug fit. Worked seamlessly from the top-down using simple Half Double Crochet (HDC), this pattern is perfect for those looking to master color changes and ribbed detailing.
This detailed pattern is written for the 12-18 Month size and is best suited for the Intermediate crocheter who is comfortable with top-down raglan shaping and managing multiple yarn colors.
Materials Needed 🧶
- Yarn: Approximately 550-600 yards total of Worsted Weight (Aran / #4) yarn. Use a consistent brand/line for uniform tension.
- Main Color (MC): Cream/White (Approx. 150 yds – for collar, placket, and base stripes)
- Contrast Color 1 (CC1): Aqua/Teal (Approx. 150 yds)
- Contrast Color 2 (CC2): Gray (Approx. 150 yds)
- Contrast Color 3 (CC3): Navy/Dark Blue (Approx. 100 yds – optional, added for a full four-color effect)
- Crochet Hook: 5.0 mm (US H-8), or the size needed to obtain gauge.
- Tapestry Needle: For seaming and weaving in ends.
- Stitch Markers: 4 markers for the raglan corners.
- Buttons: 4-5 large (approx. 1 inch) round buttons (e.g., dark brown wooden buttons, as shown in the image).
Skill Level & Notes 💡
- Skill Level: Intermediate. You’ll need to work flat for the body, in the round for the sleeves, manage multiple color changes, and construct a ribbed shawl collar.
- Construction: The jacket is worked flat in rows from the top-down (raglan style). The front bands/collar are added last.
- Chains: Ch 2 at the beginning of HDC rows always counts as the first HDC unless noted otherwise.
- Color Changes: Change colors on the last yarn over of the previous row’s last stitch. When a color is repeated in the next stripe, carry it loosely up the side edge of the body.
Gauge 📏
In Half Double Crochet (HDC) (Yoke section) using a 5.0 mm hook: 13 HDC stitches and 9 rows = 4 inches (10 cm) square.
Abbreviations 📚
| Abbreviation | Description |
| ch | chain |
| sl st | slip stitch |
| sc | single crochet |
| hdc | half double crochet |
| st(s) | stitch(es) |
| rep | repeat |
| MC | Main Color (Cream) |
| CC1 | Aqua/Teal |
| CC2 | Gray |
| CC3 | Navy |
| BLO | Back Loop Only |
Export to Sheets
Stripe Sequence ✨
Each stripe consists of 2 rows of HDC. The pattern repeats through the yoke, body, and sleeves:
| Row Number | Color |
| 1-2 | MC (Cream) |
| 3-4 | CC1 (Aqua) |
| 5-6 | CC2 (Gray) |
| 7-8 | CC3 (Navy) |
| 9-10 | MC (Cream) |
| 11-12 | CC1 (Aqua) |
| Repeat from Row 5 | CC2, CC3, MC, CC1, etc. |
Part 1: The Yoke (HDC) ⬆️
Work flat, incorporating the Stripe Sequence.

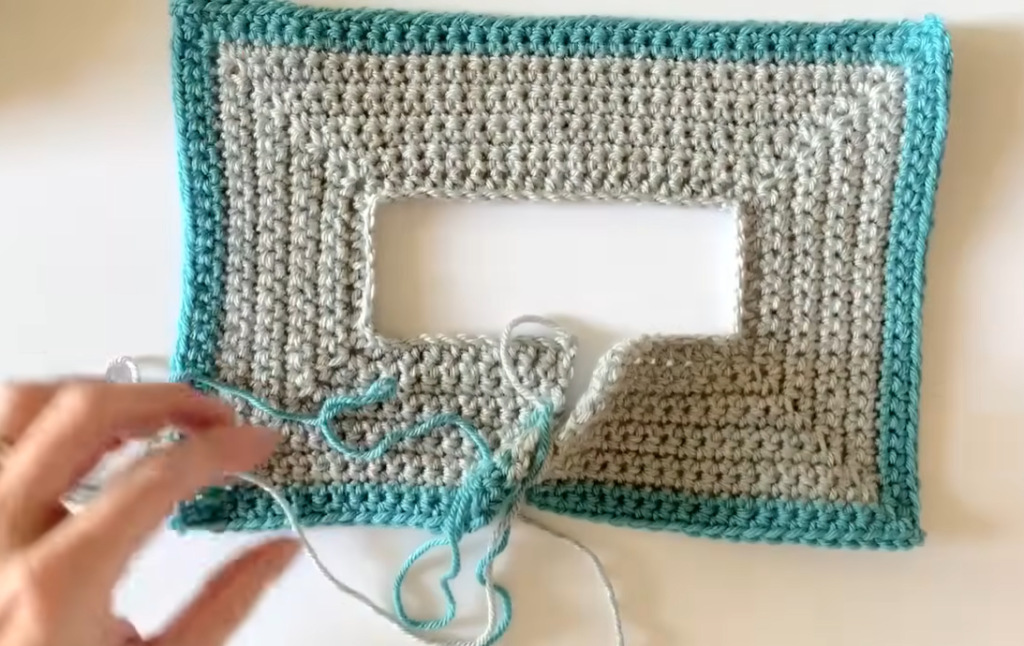
Row 1 (MC, Foundation): Ch 76. Hdc in the 3rd ch from hook (counts as 2 hdc). Hdc in the next 10 ch. [Hdc, ch 2, hdc] in the next ch (PM in ch-2 sp). Hdc in the next 12 ch (Shoulder). [Hdc, ch 2, hdc] in the next ch (PM). Hdc in the next 18 ch (Back). [Hdc, ch 2, hdc] in the next ch (PM). Hdc in the next 12 ch (Shoulder). [Hdc, ch 2, hdc] in the next ch (PM). Hdc in the last 6 ch. Change to CC1. (80 hdc, 4 ch-2 sps)
Rows 2-12 (Increase Rows): Follow the Stripe Sequence. Ch 2, turn. Hdc in each st until the first ch-2 sp. [Hdc, ch 2, hdc] in the ch-2 sp. Rep the increase sequence 3 more times. Hdc in each remaining st. Change color on the last st of the second row of each stripe.
- End of Row 12 Stitch Count: 176 hdc, 4 ch-2 sps.
Part 2: Body Separation & Body 🧥
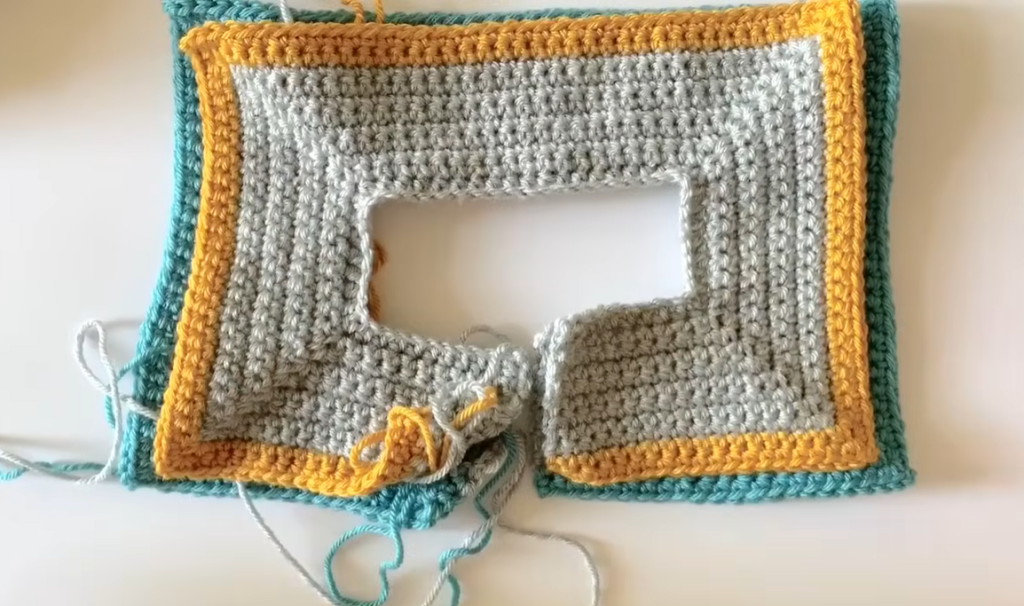
Row 13 (Separation – CC3): Ch 2, turn. Hdc in each st until the first ch-2 sp. Hdc in the ch-2 sp. Ch 2 (skips the sleeve sts/PMs). Hdc in the second ch-2 sp. Hdc in each st across the back to the third ch-2 sp. Hdc in the ch-2 sp. Ch 2 (skips the second sleeve sts). Hdc in the fourth ch-2 sp. Hdc in each remaining st. Change to MC. (128 hdc)
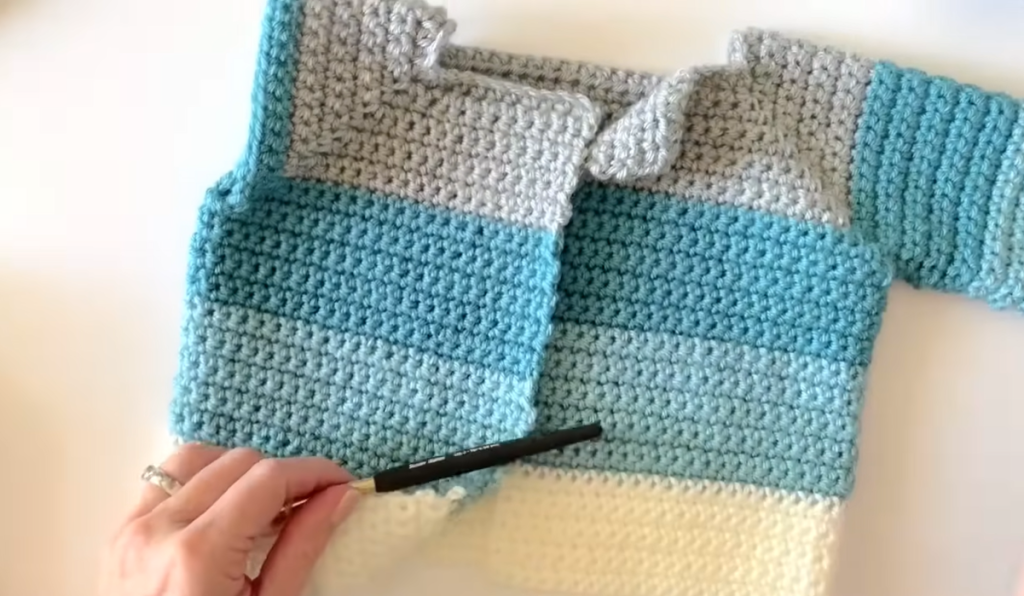
Row 14 (Body Start – MC): Ch 2, turn. Hdc in each st and 2 hdc into each ch-2 underarm sp. (132 hdc)
Rows 15-32: Continue the Stripe Sequence (10-12 total stripe repeats from the yoke start) until the jacket measures approximately 8 inches from the underarm, ending with a MC stripe (Rows 1-2 of the sequence). Fasten off CC1, CC2, and CC3.
Bottom Ribbing (MC):
- Ch 6. Sc in the 2nd ch from hook and in the next 4 ch. Sl st in the last ch. (5 sc)
- Sl st into the next two unworked HDC stitches on the bottom edge of the jacket.
- Ch 1, turn. Sc in the BLO of the 5 sc.
- Ch 1, turn. Sc in the BLO of the 5 sc. Sl st into the next two unworked HDC stitches on the jacket.
- Repeat Steps 3 and 4 until you have created a ribbed band around the entire bottom edge. Join the ends of the band with a sl st seam. Fasten off.
Part 3: The Sleeves 👚
Make 2 sleeves, worked in the round, continuing the stripe sequence.
Round 1 (Setup – CC1): Attach CC1 at the center of the underarm ch-2 space. Ch 2. Work 42 hdc evenly around the armhole opening (2 hdc in the ch-2 sp, 1 hdc per st on the sleeve side). Sl st to join. Change to CC2. (42 hdc)
Rounds 2-25: Continue the Stripe Sequence in the round until the sleeve reaches the desired length (approx. 8 inches from underarm), ending with an MC stripe.
Cuff Ribbing (MC):
- Ch 6. Sc in the 2nd ch from hook and in the next 4 ch. Sl st in the last ch. (5 sc)
- Sl st into the next unworked HDC stitch on the sleeve edge.
- Ch 1, turn. Sc in the BLO of the 5 sc.
- Ch 1, turn. Sc in the BLO of the 5 sc. Sl st into the next unworked HDC stitch on the sleeve.
- Repeat Steps 3 and 4 around the cuff. Join the ends of the band with a sl st seam. Fasten off.
Part 4: The Shawl Collar & Placket (MC) 🧣
The collar is created by extending the ribbed front band.
- Placket Foundation: Attach MC at the bottom right front corner. Ch 7. Sc in the 2nd ch from hook and in the next 5 ch. Sl st in the last ch. (6 sc)
- Row 1 (Joining): Sc in the BLO of the first 5 sc. Sl st in the last sc. Sl st into the next two row-end stitches of the jacket body to join.
- Rows 2-85 (Placket & Collar): Repeat the short-row ribbing technique from Part 2 (working away, then working back and joining to the jacket body) all the way up the right front, across the neckline, and down the left front. The short rows will naturally curve into the collar shape across the neckline. Fasten off.
Video Tutorial:
Finishing and Final Touches 🫧
- Weave in all yarn tails securely, especially those from the color changes.
- Attach Buttons: Sew the 4-5 buttons evenly spaced along the left front placket (the side without buttonholes). The tight crochet stitch of the right front placket will serve as the buttonholes.
- Blocking: Gently steam block the entire garment. Pin the ribbed bands flat and stretch the body slightly to open up the stitches for better drape. This step is essential for setting the shape of the shawl collar.
Your vibrant Mountain Trail Four-Color Striped Cardigan is now complete!


