
🌟 Introduction
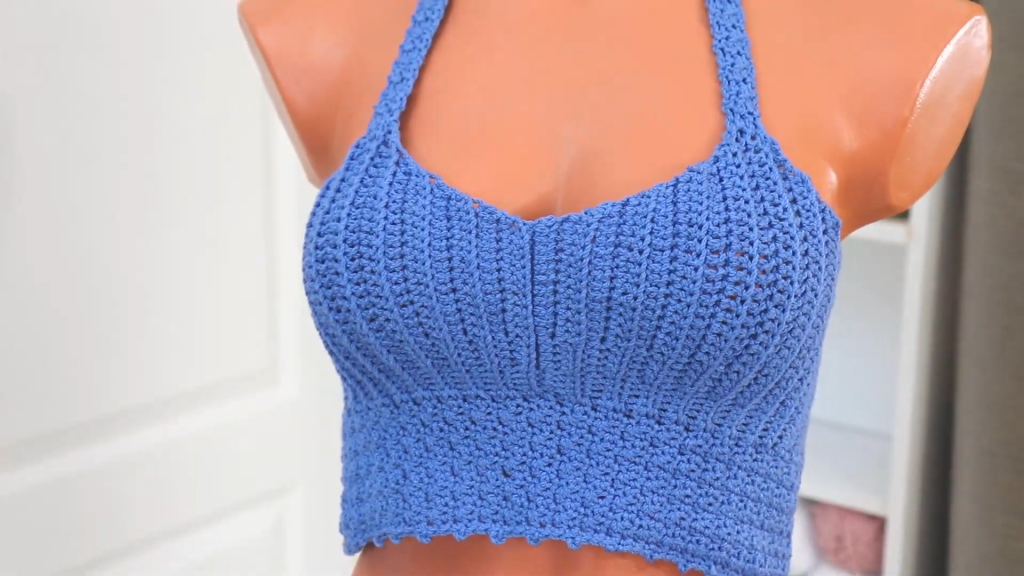
Embrace summer vibes with the stylish and comfortable Azure Ribbed Halter Crop Top! This pattern creates a flattering, form-fitting top featuring beautifully molded cups with a subtle vertical ribbing, a snug underbust band, and a simple tie-up halter neck. Perfect for festivals, beach days, or layering, this top is a fun and rewarding project for those ready to tackle shaping in crochet.
Skill Level: Intermediate
Finished Size: Small (Bust Size 32-34 inches). Instructions for adjusting size are included in the ‘Tips & Customization’ section.
🧵 Materials & Gauge
✨ Materials Needed
- Yarn: Approximately 200-250 yards of DK Weight (Light Worsted/8-ply) cotton or a cotton blend yarn. Cotton is recommended for breathability and stitch definition in garments. (The sample image uses a lovely azure blue.)
- Hook: Size G/6 (4.0 mm) crochet hook, or size needed to obtain gauge.
- Notions: Stitch markers (at least 2), yarn needle for weaving in ends, and scissors.
📏 Gauge (Crucial for Sizing!)
- Cup Ribbing: 10 HDC BLO rows should measure approximately 2 inches (5 cm) tall.
- Cup Width: 15 HDC BLO stitches should measure approximately 3 inches (7.5 cm) wide.
- Underbust Band: 4 rows of HDC should measure 1 inch (2.5 cm) tall.
Important: Take your time to check gauge, especially for garments, as it directly impacts the finished size!
💡 Special Stitches & Abbreviations
📝 Pattern Abbreviations (US Terms)
| Abbreviation | Meaning | | Abbreviation | Meaning | | :—: | :— | :—: | :— | | ch | chain | | st(s) | stitch(es) | | sl st | slip stitch | | rep | repeat | | sc | single crochet | | inc | increase (work 2 sts into 1 st) | | hdc | half double crochet | | hdc2tog | half double crochet 2 together (decrease) | | dc | double crochet | | BLO | Back Loop Only | | MR | Magic Ring | | sk | skip |
⭐ Special Stitches (Written Instructions)
- HDC BLO (Half Double Crochet Back Loop Only): Yarn over, insert hook into only the back loop of the specified stitch, yarn over, pull up a loop (3 loops on hook), yarn over, pull through all 3 loops. This creates the vertical ribbing on the cups.
- HDC2tog (Half Double Crochet 2 Together – Decrease): Yo, insert hook into first st, yo, pull up loop (3 loops on hook). Insert hook into next st, yo, pull up loop (4 loops on hook). Yo, pull through all 4 loops.
👙 The Pattern: Azure Ribbed Halter Crop Top
Note: The pattern starts with one cup, then the second cup, which is joined to the first, and then the body is worked across both.
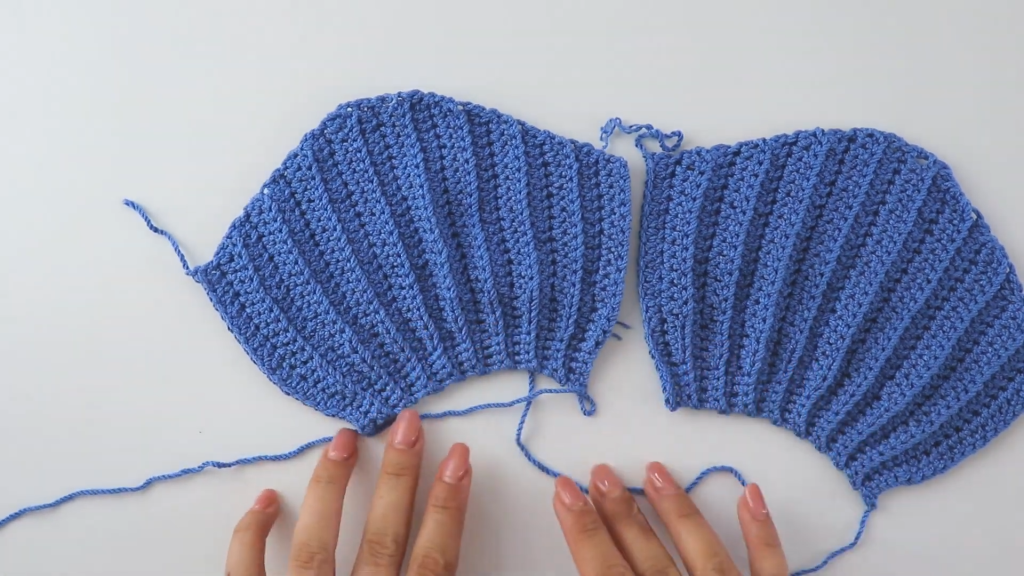
Part 1: The Cups (Make Two Identical)
The cups are worked in rows to create vertical ribbing and shaped with increases.

Cup A:
Foundation: Ch 16 (adjust for desired cup height; this is for a B/C cup).
Row 1: Hdc in the 2nd ch from the hook, hdc in each ch across. Ch 1, turn. (15 hdc)
Row 2 (HDC BLO): Hdc BLO in each st across. Ch 1, turn. (15 hdc)
Row 3 (Increase Row): Hdc BLO in the first st, 2 hdc BLO in the next st (inc made). Hdc BLO in each st until the last 2 sts. 2 hdc BLO in the second to last st (inc made). Hdc BLO in the last st. Ch 1, turn. (17 hdc)
Row 4 (No Increase): Hdc BLO in each st across. Ch 1, turn. (17 hdc)
Rows 5-14: Repeat Rows 3 & 4 five more times. Your stitch count will increase by 2 sts every other row. After Row 14, you should have 27 hdc.
Row 15 (Final No Increase Row): Hdc BLO in each st across. Ch 1, turn. (27 hdc)
Do NOT fasten off Cup A. Keep the loop on your hook.
Part 2: Joining Cups and Underbust Band
Now we’ll create the second cup and join it, then work the body.
Cup B:
Repeat Rows 1-15 exactly as for Cup A. Do NOT fasten off Cup B.
Joining the Cups:
- Place Cup A (with working loop) and Cup B side by side, so the wider edges are at the bottom. The open edge from Row 15 of Cup B should be next to the open edge from Row 15 of Cup A.
- With working loop from Cup B, sl st into the first st of Cup A at the bottom/outer edge. This joins the inner corners.
- Ch 1, turn. You are now ready to work along the bottom edge of both cups.

Round 1 (Underbust Band Foundation):
- Work 1 sc in the side of each row of Cup A (there are 15 rows, so 15 sc).
- Work 3 sc into the joined center (this creates a slight dip and reinforces the center).
- Work 1 sc in the side of each row of Cup B (15 sc).
- Ch 2 (creates a turning chain that will allow you to work back and forth for the band), turn. (33 sc total)
Round 2 (Underbust Band – HDC): Hdc in the first sc and in each sc across. Ch 2, turn. (33 hdc)
Round 3: Hdc in the first hdc and in each hdc across. Ch 2, turn. (33 hdc)
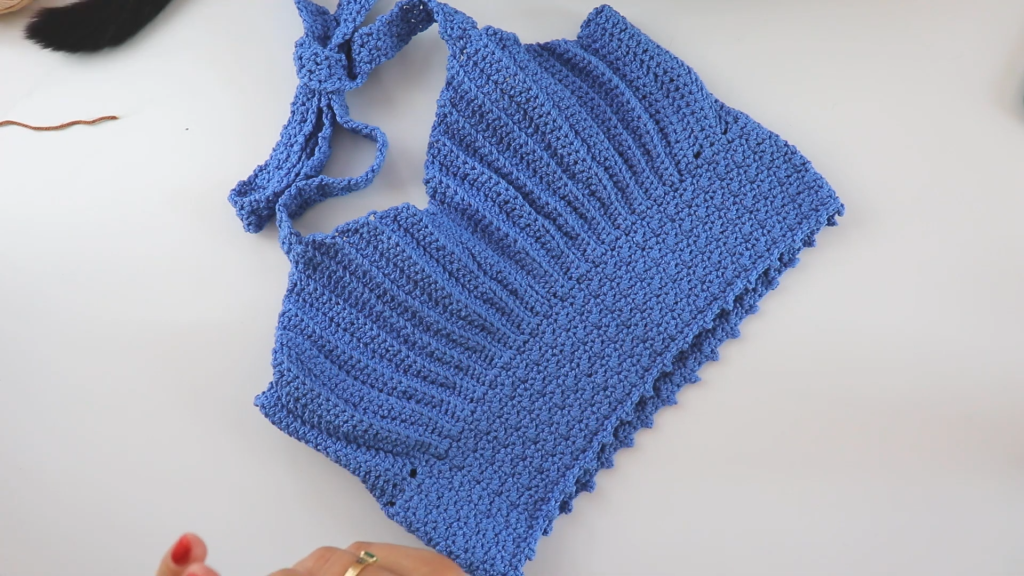
Repeat Round 3 until the band reaches your desired length (e.g., 8-10 rows total from the top of the cups). This creates a fitted band below the bust. The sample image shows about 8-10 rows.
Final Underbust Edging (Optional Scallop):
- Ch 1, turn.
- Sc in the first st. Sk 1 st, (dc, ch 1, dc) in the next st. Sk 1 st, sc in the next st. Rep from * across.
- Fasten off and weave in ends.
Part 3: The Halter Neck Straps
We will now create the straps that tie around the neck.
- Attach yarn with a sl st to the top-outer corner of Cup A (the narrower top edge of the cup).
- Ch 70-80 (adjust for desired strap length; typically, 20-25 inches).
- Sl st back into the 2nd ch from hook and in each ch back down the strap. Sl st into the cup to secure.
- Fasten off.
- Repeat steps 1-4 for the top-outer corner of Cup B.
Part 4: Back Ties (Optional)
If you prefer a tie-back instead of buttons/zipper, you can add long chains to the bottom of the underbust band.
- Attach yarn with a sl st to the bottom-outer corner of the underbust band on one side.
- Ch 80-100 (adjust for desired tie length).
- Sc back down the chain, starting in the 2nd ch from hook. Sl st into the band to secure.
- Fasten off.
- Repeat steps 1-4 for the other side of the underbust band.
Video Tutorial:
✂️ Finishing & Customization
📏 Sizing Adjustments
- Cup Size:
- Smaller Cup (A/B): Start with Ch 12-14. Repeat Rows 3 & 4 fewer times.
- Larger Cup (C/D+): Start with Ch 18-20. Repeat Rows 3 & 4 more times until the cup width is sufficient, ensuring an odd number of stitches for the increase pattern.
- Band Circumference: To adjust the overall circumference of the top, you will adjust the starting chain in Round 1 of the Underbust Band Foundation. You need to calculate how many sc you need for your desired total circumference. This pattern has 33 sc. For a larger size, you might need 40, 45, etc.
- Top Length: Add or subtract rows from the Underbust Band (Part 2, Rounds 2-3 repetition).
🧺 Care Instructions
- Gently hand wash in cold water with a mild detergent.
- Lay flat to dry, reshaping the top to its original dimensions. Do not hang, as it may stretch.
Congratulations! You’ve created a beautiful and unique Azure Ribbed Halter Crop Top perfect for warm weather and showing off your crochet skills!


