
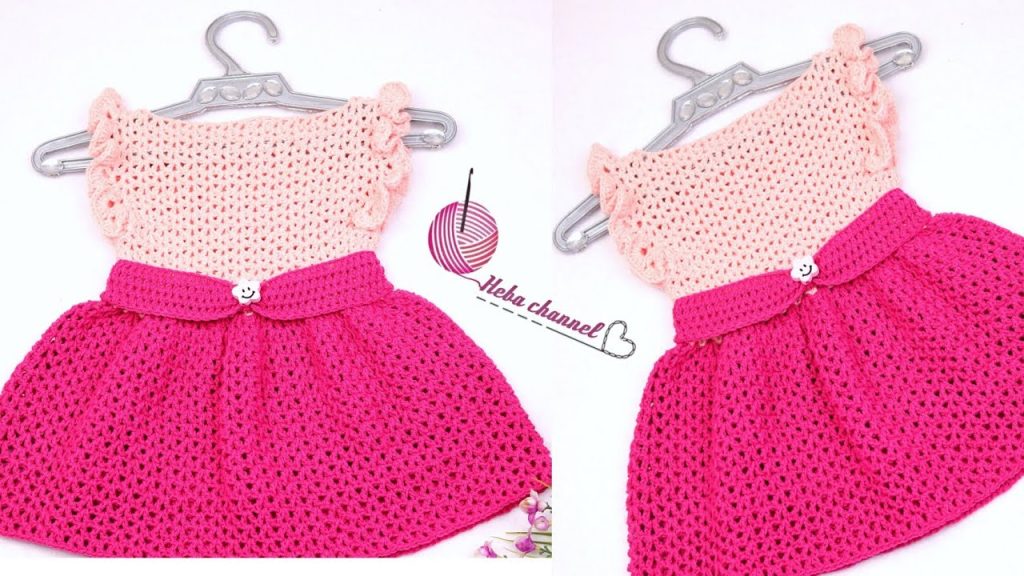
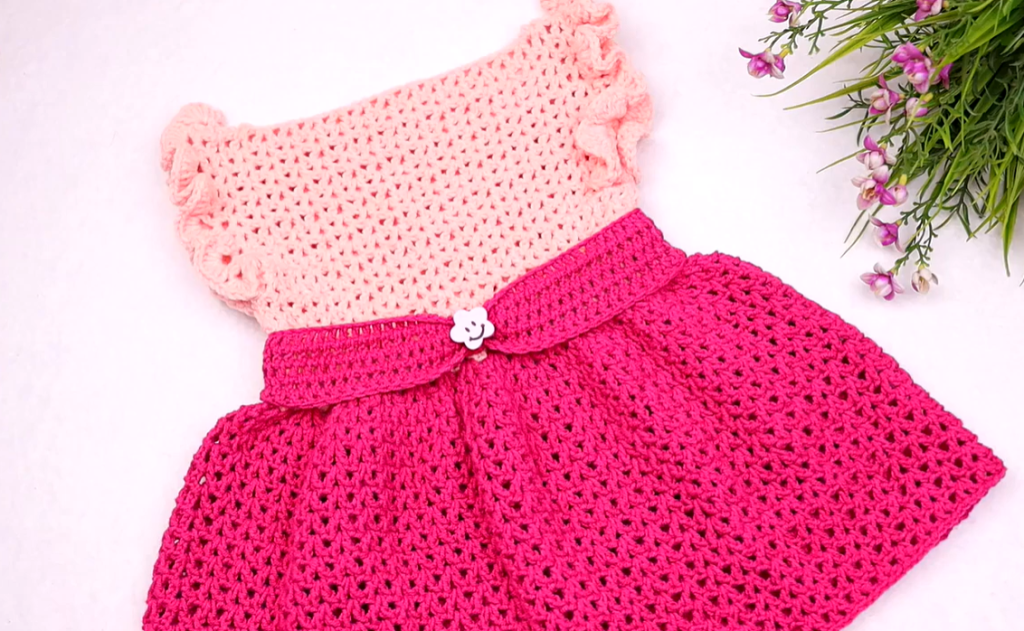
Hello, sunny day crafters! Get ready for a project that’s as bright and sweet as summer itself: the Strawberry Lemonade Dress. This beautiful dress uses classic top-down construction to achieve its perfect fit, featuring a light, solid Lemonade Pink yoke with cute ruffled cap sleeves, a textured waistband, and a vibrant Strawberry Pink mesh skirt for fantastic drape and flare.
This pattern is written for an Intermediate skill level. The yoke shaping is straightforward, but adding the ruffles and managing the simple mesh increases for the skirt flare require attention to detail.
🛍️ Section 1: Materials & Gauge
🧶 Supplies You’ll Need
- Yarn A (Lemonade Pink): Approximately 150-200 yards of DK weight (Category 3) yarn for the yoke and ruffles.
- Yarn B (Strawberry Pink): Approximately 300-400 yards of DK weight (Category 3) yarn for the skirt and waistband.
- Hook: 4.0 mm (G/6) crochet hook, or size needed to obtain gauge.
- Button: 1 small decorative button (flower shape preferred, as shown) for the waistband.
- Tools: Stitch markers (for the yoke corners and sleeves!), a tapestry needle, and scissors.
📏 Gauge Check
Work in Double Crochet (DC): 16 DC and 8 rows = 4 inches (10 cm).
- Yoke gauge is essential for the proper fit!
📝 Key Abbreviations
| Abbreviation | Meaning | Abbreviation | Meaning | |
| Ch | Chain | Dc | Double Crochet | |
| Sl St | Slip Stitch | V-st | V-Stitch (Dc, Ch 1, Dc in the same space) | |
| Sc | Single Crochet | Dc Cl | Dc Cluster (3 Dc in space) | |
| Hdc | Half Double Crochet | Open Mesh | (Dc, Ch 1, Sk 1) repeat | |
| Sk | Skip | Fpdc/Bpdc | Front/Back Post Dc |
Export to Sheets
🌸 Section 2: The Yoke (Top & Ruffles)
The yoke is worked flat in rows using Yarn A (Lemonade Pink) to create the back opening. This size is for 6-12 months. The yoke utilizes a simple, slightly textured DC pattern.
Foundation & Shaping (Solid DC)
Row 1 (Foundation): Ch 76. Dc in the 4th Ch from the hook and in each Ch across. (74 Dc). Ch 3 (counts as 1st Dc throughout), turn.
Yoke Shaping & Division
Divide the 74 stitches for the corners: 12 (Back Right) | 1 (Corner) | 12 (Sleeve Right) | 1 (Corner) | 24 (Front) | 1 (Corner) | 12 (Sleeve Left) | 1 (Corner) | 12 (Back Left).
- Row 2: Dc in the first 12 sts. (Dc, Ch 2, Dc) in the next st (corner). Dc in the next 12 sts. (Dc, Ch 2, Dc) in the next st (corner). Continue this pattern around. Ch 3, turn.
- Row 3 (Texture Row): Work Fpdc around the first st. Bpdc around the next st. Rep (Fpdc, Bpdc) across the panel up to the Ch-2 sp. (Dc, Ch 2, Dc) in the Ch-2 sp. Continue the Fpdc/Bpdc pattern across all panels, placing (Dc, Ch 2, Dc) in each corner. Ch 3, turn.
- Row 4 (Solid Row): Dc in each Dc, Fpdc, and Bpdc across. (Dc, Ch 2, Dc) in each corner Ch-2 sp. Ch 3, turn.
Rows 5-8: Repeat Rows 3 and 4. Continue until the yoke measures approximately 5 inches (12.5 cm) from the top.
Ruffled Cap Sleeves
- Next Row (Sleeve Ruffle): Work Dc across the Back Panel up to the first Ch-2 sp. Sl St to the Ch-2 sp. Ch 1. Now, work only on the Sleeve Panel:
- Ruffle Row 1: Sc in the Ch-2 sp. (5 Dc Shell in the next Dc, Sc in the next Dc). Repeat the Shell/Sc pattern across the top of the sleeve stitches. Sc in the next Ch-2 sp.
- Ruffle Row 2: Ch 1, turn. (3 Dc, Ch 1, 3 Dc) into the center (3rd) Dc of each 5 Dc Shell. Sl St to the next Sc. Repeat across. FO Yarn A.
- Joining for Armholes (Back/Front/Back): Join Yarn B at the end of the Front Right Panel. Continue the final yoke row (DC) across the Front Panel. Ch 2 (underarm chain). Dc across the Back Panel. Ch 2 (underarm chain). Continue across the Front Left Panel. Join with Sl St to the beg Ch 3 to form a circle. (Approx. 110-120 stitches).
💖 Section 3: Skirt & Waistband
The skirt is worked in the round using Yarn B (Strawberry Pink).
Waistband
- Round 1 (Waistband Base): Ch 2. Hdc in each st around (including the Ch-2 underarm sts). Join with Sl St.
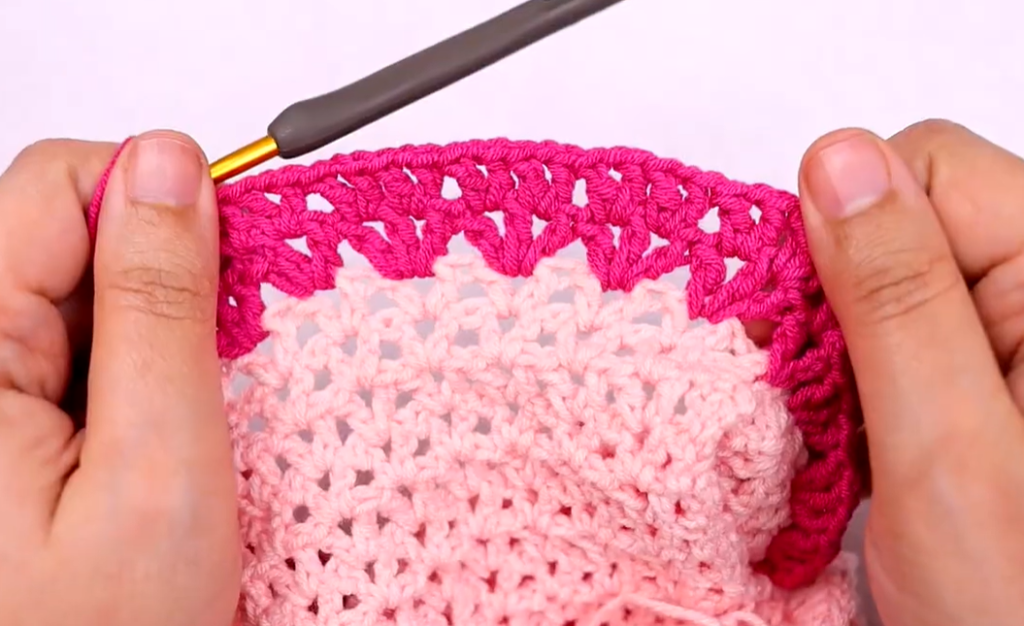
- Round 2 (Waistband Texture): Ch 2. Fpdc around the first st. Bpdc around the next st. Rep (Fpdc, Bpdc) around. Join with Sl St.
- Round 3 (Ribbon/Button): Ch 1. Sc in each st around. Join with Sl St.
Skirt Start & Mesh Flare
- Round 4 (Increase/Mesh Setup): Ch 3 (counts as 1st Dc). 2 Dc in the same st. Dc in the next 2 sts. 2 Dc in the next st, Dc in the next 2 sts. Rep from * to * around. Join with Sl St. (Approx. 146-160 sts).
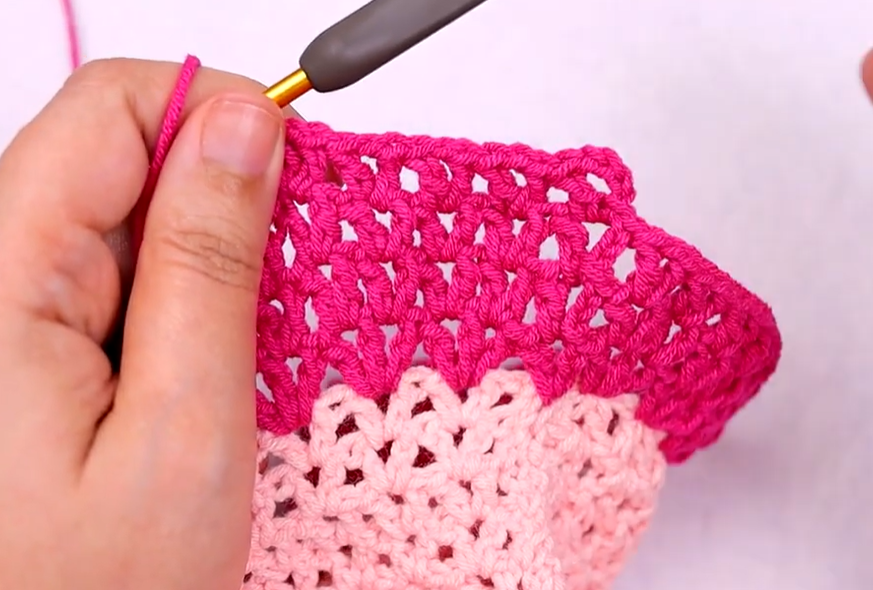
- Round 5 (Mesh Start): Ch 3 (counts as 1st Dc). Ch 1, Sk 1 st, Dc in the next st. Rep from * to * around. Join with Sl St to top of Ch 3.
- Round 6 (Increase): Ch 3. Work (Dc, Ch 1, Dc) in the first Ch-1 sp (a V-st increase). Dc in the next Dc. (V-st in the next Ch-1 sp, Dc in the next Dc). Rep around, inserting an extra (Dc, Ch 1, Dc) V-st 4-5 times evenly throughout the round. Join with Sl St. (This increases the stitches and creates the flare).
- Rounds 7 – 14: Continue alternating the Mesh Row (Row 5 repeat) and the V-Stitch Increase Row (Row 6 repeat).
- Length: Continue the alternating pattern until the skirt reaches the desired length, approximately 8-10 inches (20-25 cm) from the waistline.
Hem Finish
- Final Round (Scallop Hem): Work one round of Sc evenly around the bottom edge. FO. The alternating V-stitch naturally creates a slight scallop.
Video Tutorial:
🎀 Section 4: Finishing Touches
✨ Button Detail
- Button: Sew the decorative flower button securely onto the center front of the ribbed waistband (Round 3).
✂️ Edging & Closure
- Neckline & Back Slit: Join Yarn A at the bottom of the back opening. Ch 1, Sc evenly up the edge, around the entire neckline, and back down the other side of the slit. FO.
- Back Slit Closure: Work a small Ch 3 loop at the top right of the neckline opening, and sew a corresponding small button onto the left side for a simple neck closure.
💖 Final Assembly
- Weave in all loose yarn ends securely.
Your delightful Strawberry Lemonade Dress is complete! The contrasting colors and textures are perfect for any little one.
Would you like me to find a simple pattern for a sun hat to match this cheerful dress?


