
Hello, cherished members of the crochet community!
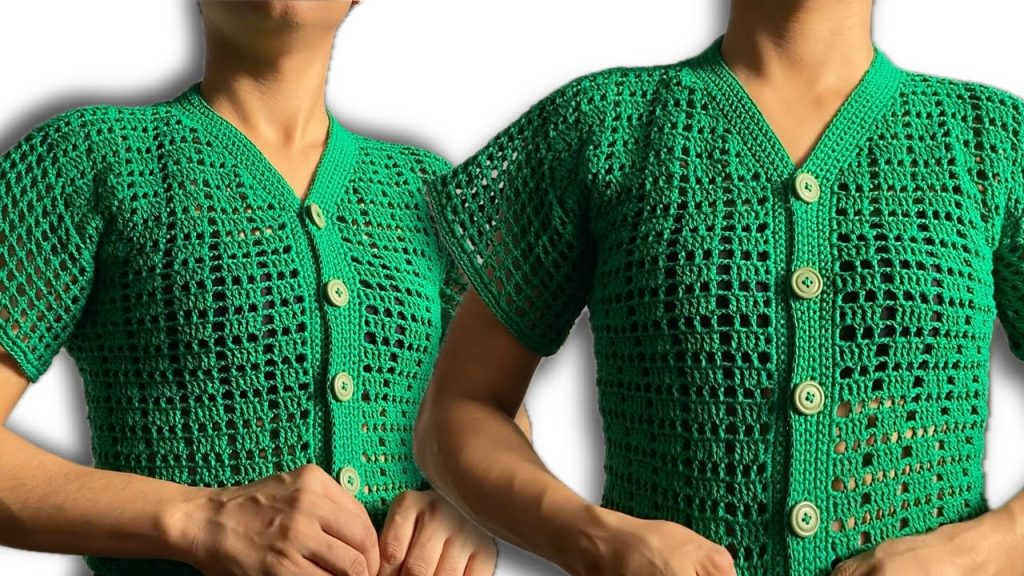
Today, we are exploring a stitch pattern that is the epitome of classic elegance: the Lace Block Trellis. This beautiful stitch is a fantastic two-row repeat that cleverly alternates between sections of solid, textural blocks and airy, open mesh windows. The result is a flowing, sophisticated fabric with excellent drape, making it the perfect choice for the intricate button-up blouse demonstrated in the video.
The genius of this pattern lies in its structure: the solid blocks give the fabric body and allow for easy seaming, while the open trellis work keeps the garment breathable and visually light. It’s a pattern that looks far more challenging than it is, relying only on simple chains and double crochets.
If you’re ready to create a heirloom-quality garment that combines tradition and style, let’s dive into the details!
🧶 Materials & Sizing
The choice of yarn is critical for achieving the beautiful drape this stitch is known for, especially for a structured garment like a button-up blouse.
- The Yarn:Fingering or Sport Weight (Weight 2 or 3).
- Recommendation: A Mercerized Cotton or Cotton/Rayon Blend. These yarns offer excellent stitch definition and a slight sheen, which enhances the detail of the mesh. Their good drape is essential for a flowy blouse.
- Hook Size: Select a hook size that complements your yarn, often between 3.0mm to 3.5mm for a dense lace, or up to 4.0mm for a very airy fabric.
- Tools:
- Measuring Tape (Essential for accurate garment sizing).
- Stitch Markers (Highly recommended for marking turning chains and seam allowances).
- Tapestry Needle for assembly.
- Buttons (Choose a size that fits the buttonholes you create).
- Sizing Note: The video uses a custom-fit approach. You will measure your shoulder-to-shoulder width and divide that measurement by two to determine the starting width for each front panel. The back panel will use the full width measurement. Always swatch first!
📚 Abbreviations & Key Terms (US Terminology)
- Ch: Chain
- St(s): Stitch(es)
- Sk: Skip
- SC: Single Crochet (Used in the edging/button band)
- DC: Double Crochet
- Ch-sp: Chain space (the opening created by chains in the previous row)
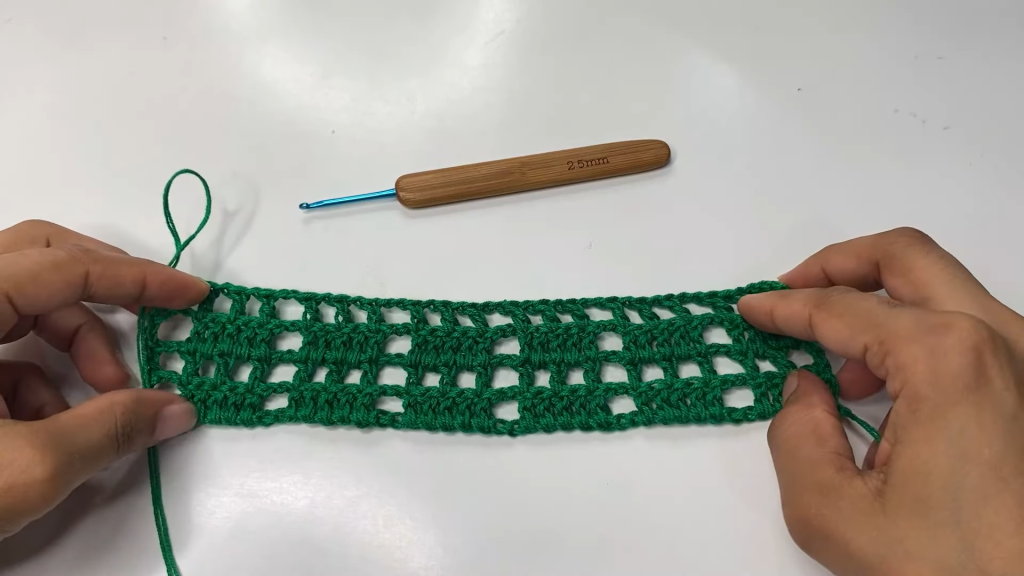
- Solid Block: A continuous section of 5 DC stitches.
- Mesh Trellis: The open network created by the DC, Ch 1, Sk 1 sequence.
📐 Pattern Math & Gauge
Getting your starting chain correct is the cornerstone of this stitch pattern.
- The Multiple: This pattern is based on a Multiple of 7, plus 5 chains for the turning chain and end anchor.
- Chain Calculation: Chain a number that is divisible by 7 (e.g., 42, 49, 56), and then add 5 extra chains.
- Example from Video: The creator used 47 chains, which is $(7 \times 6) + 5$.
- Chain Calculation: Chain a number that is divisible by 7 (e.g., 42, 49, 56), and then add 5 extra chains.
- Starting Chain Breakdown: The initial chains account for the pattern repeat across the width, plus the necessary turning chains for height and spacing.
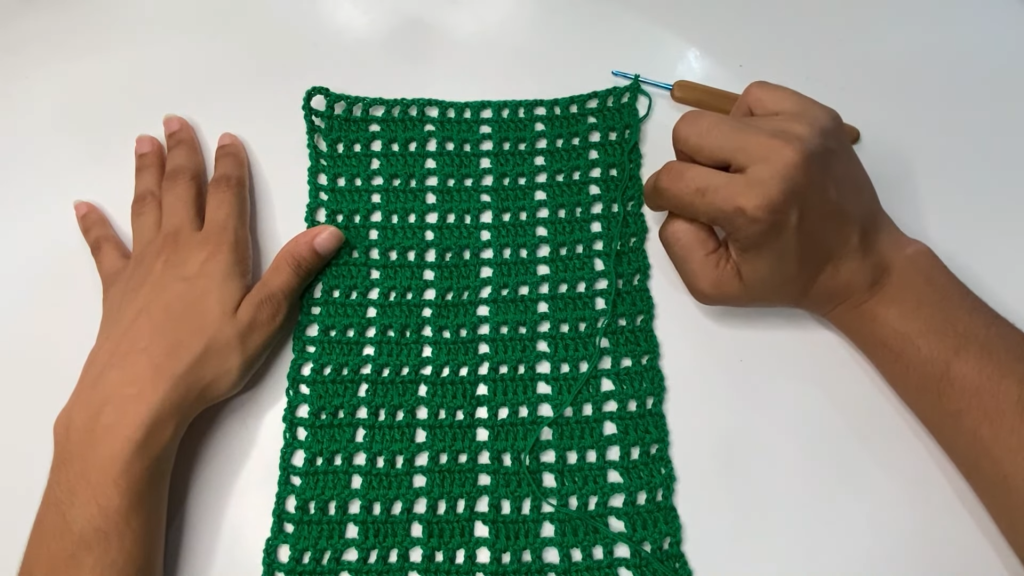
- Gauge: To check your tension and sizing, crochet at least 3 repeat sections (21 stitches) over 4 rows. Measure the width of your block and compare it to your required garment width. Adjust your hook size until you achieve the desired fabric density and size.
✍️ Step-by-Step Stitch Instructions
The core of the Lace Block Trellis is a simple two-row repeat that builds the alternating texture.
Phase 1: Foundation Row
- Start: Chain your calculated length (Multiple of 7 + 5).
- Row 1 (The Solid Block Row – Foundation):
- Count 5 chains from the hook. DC into the 5th chain. (This Ch 5 counts as DC + Ch 2 space, creating the side anchor.)
- DC in the next 4 foundation chains (creating the first Solid Block of 5 DCs).
- The Repeat Begins: [Ch 2, Sk 2 foundation chains, 5 DC in the next 5 foundation chains].
- Repeat Step 3 across the row until you have 3 chains remaining.
- End: Ch 2, Sk 2 chains, DC into the very last chain.
Phase 2: The Two-Row Repeat
- Row 2 (The Mesh/Trellis Row): This row creates the signature open work over the solid blocks.
- Ch 3 and turn (counts as the first DC).
- Ch 1, Sk the first DC of the block. DC in the next DC.
- Ch 1, Sk the next DC. DC in the last DC of the block. (You now have 3 DCs separated by Ch 1 spaces).
- The Repeat Begins: [Ch 2, Sk the Ch 2 space from the row below. DC in the first DC of the next block. Ch 1, Sk 1 DC, DC in the next DC. Ch 1, Sk 1 DC, DC in the last DC].
- Repeat Step 4 across the row.
- End: Ch 2, Sk the Ch 2 space from the row below. DC into the 3rd chain of the turning Ch 5 from Row 1.
- Row 3 (Repeat of Solid Block Row): This row stacks the new blocks, filling in the mesh spaces.
- Ch 5 and turn (counts as DC + Ch 2).
- Work 5 DC over the Mesh Trellis: [DC into the first DC, DC into the Ch 1 space, DC into the next DC, DC into the next Ch 1 space, DC into the last DC].
- The Repeat Begins: [Ch 2, Sk the Ch 2 space from the row below. Work 5 DC over the Mesh Trellis (as detailed above)].
- Repeat Step 3 across the row.
- End: Ch 2, Sk the Ch 2 space from the row below. DC into the 3rd chain of the turning Ch 3 from Row 2.
Continuous Pattern: Continue repeating Row 2 and Row 3 until you reach the necessary length for your garment (usually up to the armpit/sleeve opening).
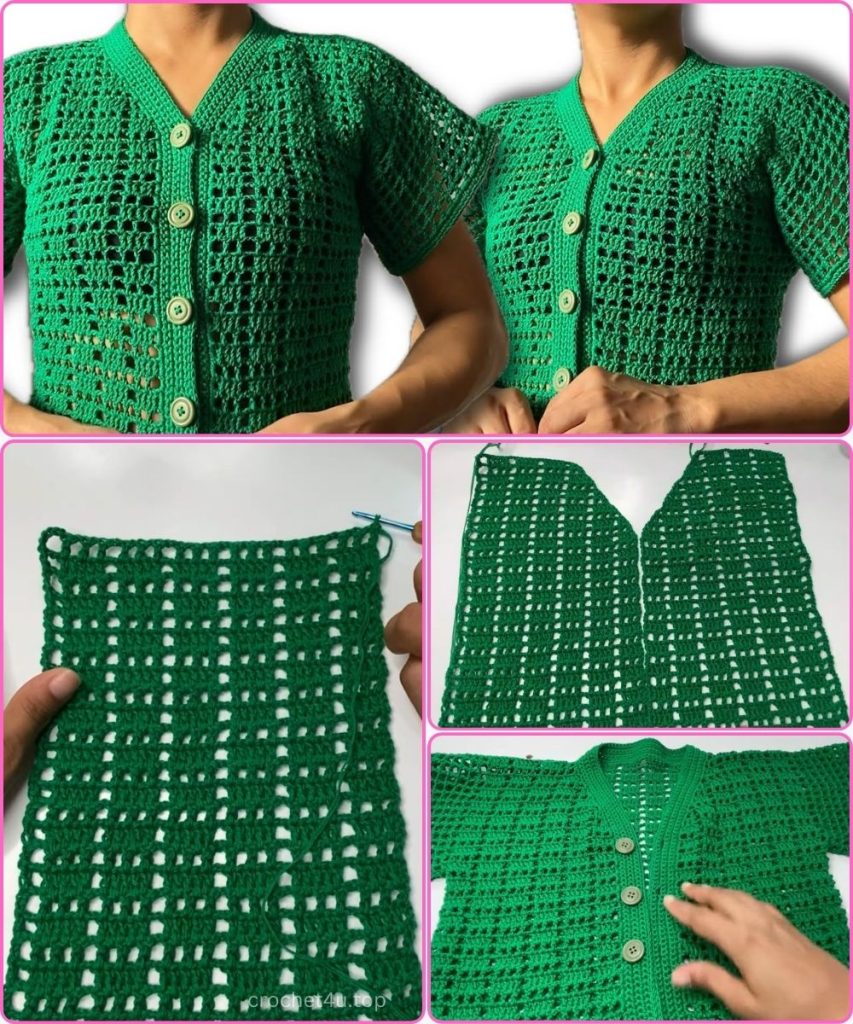
👗 The Garment Construction
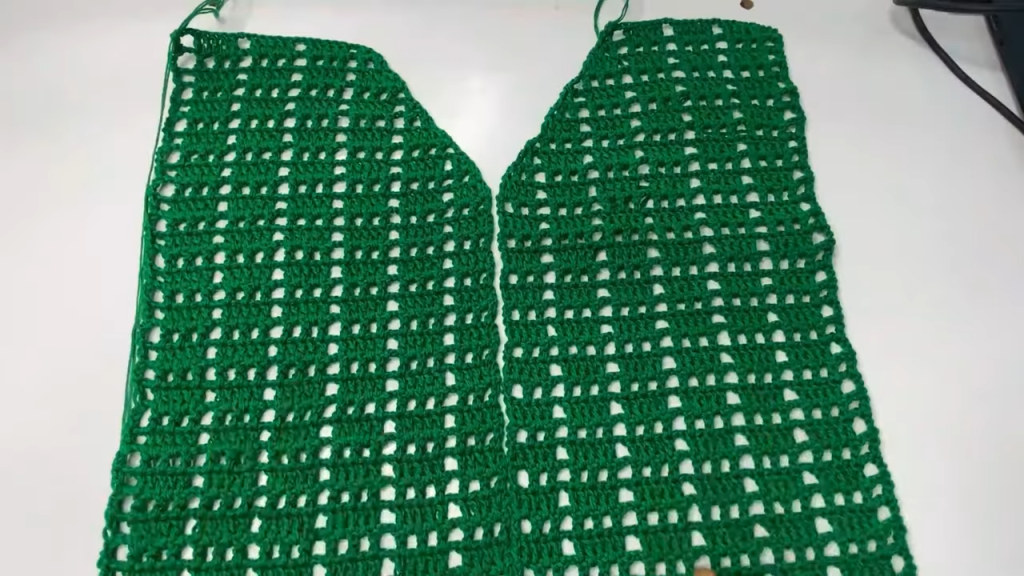
The blouse in the video is constructed from three panels: two front panels and one back panel.
- Front Panels (Mirror Images):
- Chain the length equal to half your shoulder-to-shoulder width (plus half the gap for the button band).
- Work the pattern up to the armhole depth (your underarm measurement).
- Decreasing for the Armhole (Sleeve Opening): The creator decreases on one side only by slip stitching or by creating a slightly reduced turning chain (e.g., Ch 2 instead of Ch 3) at the start of the row, working the reduction over the first block. This shapes the shoulder curve.
- Back Panel:
- Chain the full shoulder-to-shoulder width.
- Work the pattern straight (no decreases) until it matches the length of the front panel at the shoulder.
- Assembly:
- Use a tapestry needle and the mattress stitch or slip stitch to sew the shoulder seams and the side seams, leaving an opening for the sleeves.
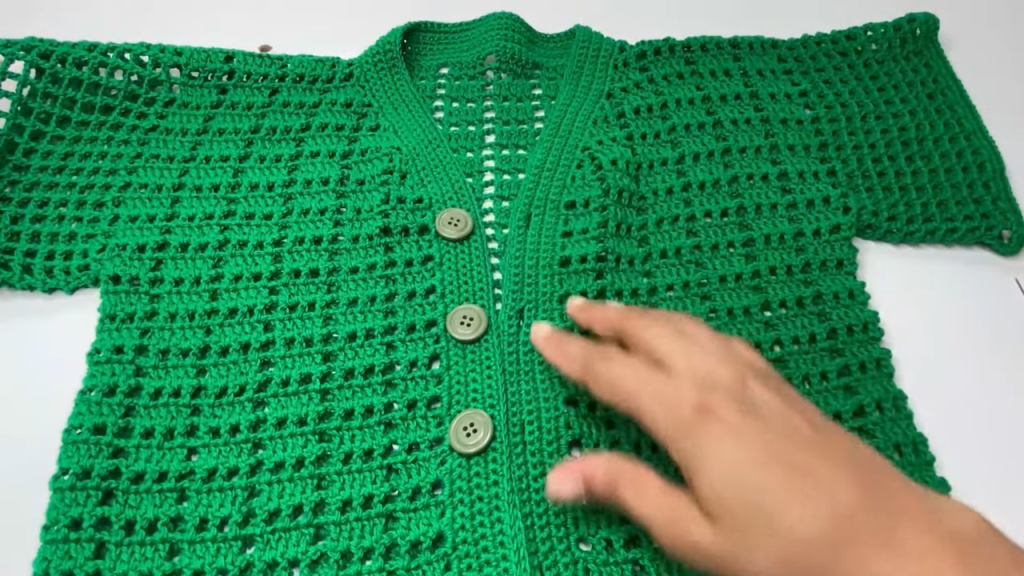
💖 Edging and Finishing Touches
The details are what truly elevate this blouse.
- Button Band and Placket:
- Work multiple rows of Single Crochet (SC) along the straight front edges of both panels. The video uses approximately four rows. This creates a stable base for the buttons and buttonholes.
- Buttonholes:
- On one side of the placket, mark the placement of your buttons.
- On a designated SC row (the video uses the 5th SC row), create the buttonholes by chaining the required number (e.g., Ch 3) and skipping the same number of SCs below to create the opening.
- On the next row, SC over the chain-space to stabilize the hole.
- Sleeve Addition:
- Attach yarn around the armhole opening.
- Work in rounds, creating a mesh-style sleeve using the pattern (e.g., DC, Ch 2, Sk 2) for length.
- The video suggests finishing the sleeve with a final border of SC and then a scalloped edge (like 5-DC fans anchored by SCs).
- Bottom Edging: Finish the bottom hem of the blouse with one or two simple rounds of SC for a clean, stable edge.
Video Tutorial:
✅ Troubleshooting & Pro-Tips
- Straight Edges: Always place your final DC of Row 2 (the Mesh Row) into the 3rd chain of the turning Ch 3 from the previous row. Use a stitch marker to find this chain easily!
- Counting Clusters: Regularly check that you have the same number of 5-DC blocks in every repeat of the Solid Block Row. This ensures your piece does not unexpectedly widen or narrow.
- Seam Consistency: When joining the panels, aim to join chain-space to chain-space and block edge to block edge. This helps the stitch pattern remain uniform across the seams.
- Button Sizing: Always test your button against your proposed buttonhole chain count before committing to the whole row. It’s better to be too loose (and tighten the next row) than too tight!
- Final Blocking: After seaming, wet block the entire garment. Pin it out to your exact measurements, paying close attention to opening up the lace sections. Blocking will soften the yarn, straighten the lines, and give the blouse a professional, store-bought finish.


