
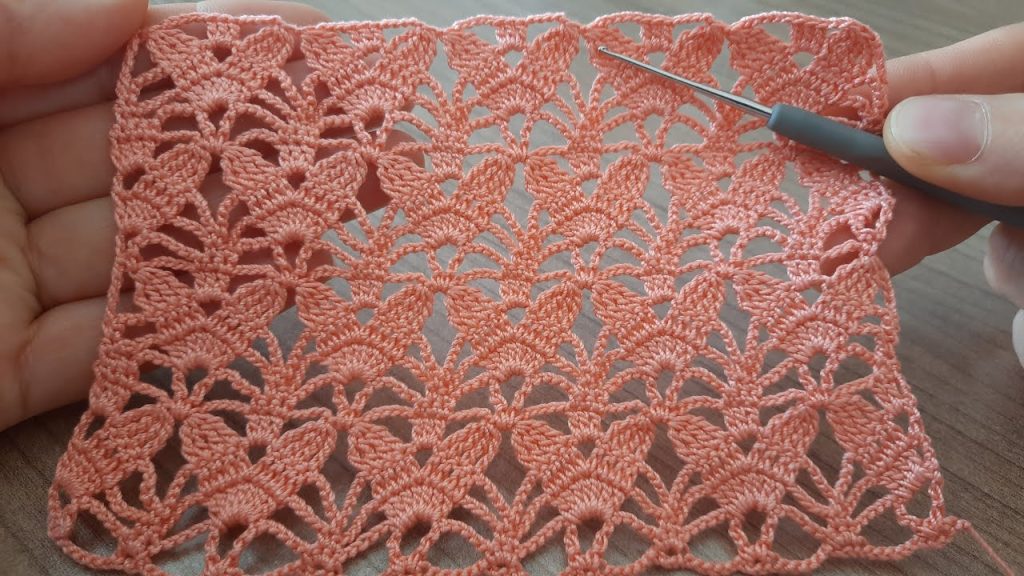
Welcome, fellow texture enthusiasts! Today’s pattern is one of breathtaking elegance. The fabric you see above—a beautiful, repeating fan or leaf motif that creates a diamond lattice—is the “Willow Leaf Lace.” This pattern produces a flowing fabric with incredible drape, making it perfect for shawls, light throws, or even a stunning summer skirt.
You asked for long and detailed, and that is exactly what you will receive! We’ll break down this lovely 4-row repeat that creates this gorgeous, vertical texture.
🛍️ Materials & Tools: Your Lace Kit 🛍️
The detail in this pattern requires a yarn that holds its shape and a hook that encourages a light tension.
- Yarn: I recommend a Sport Weight (Weight 2) or DK (Double Knitting/Weight 3) yarn. Mercerized cotton is ideal for the crispness and sheen seen in the photo, but a smooth acrylic or bamboo blend will also work beautifully.
- Crochet Hook: To achieve the open lace look, use a hook size appropriate for your yarn, such as a 3.5 mm (E/4) or 4.0 mm (G/6) for DK weight.
- Scissors: For clean cuts.
- Tapestry Needle: Essential for weaving in ends neatly.
- Stitch Markers (Optional): Helpful for marking the central stitch of the fan motif.
📚 Stitch Glossary: The Language of Fans 📚
This pattern relies on a specific Fan Stitch (or shell) and clustering stitches together to form the “veins” of the leaf. We’ll use US Crochet Terms.
| Abbreviation | Stitch Name | Description |
| ch | Chain | Standard chain. |
| st(s) | Stitch(es) | |
| sk | Skip | |
| sl st | Slip Stitch | Standard slip stitch. |
| sc | Single Crochet | Standard single crochet. |
| dc | Double Crochet | Standard double crochet. |
| Fan | Fan Motif | (3 dc, ch 1, 3 dc) all in the same stitch or space. |
| V-st | V-Stitch | (dc, ch 1, dc) all in the same stitch or space. |
Export to Sheets
📐 Gauge and Pattern Repeat 📐
Swatching is key to ensuring your Fan motifs align to create the staggered, leafy columns.

Pattern Repeat:
The pattern is worked over a multiple of 10+2 chains for the starting foundation.
- For our detailed swatch, we will start with Ch 42 (10×4=40+2=42).
- The ch 3 at the beginning of rows counts as 1 dc.
Gauge (Approximate):
- One complete leaf/fan motif (from the bottom point to the next) should measure about 1.5 inches (3.8 cm) tall.
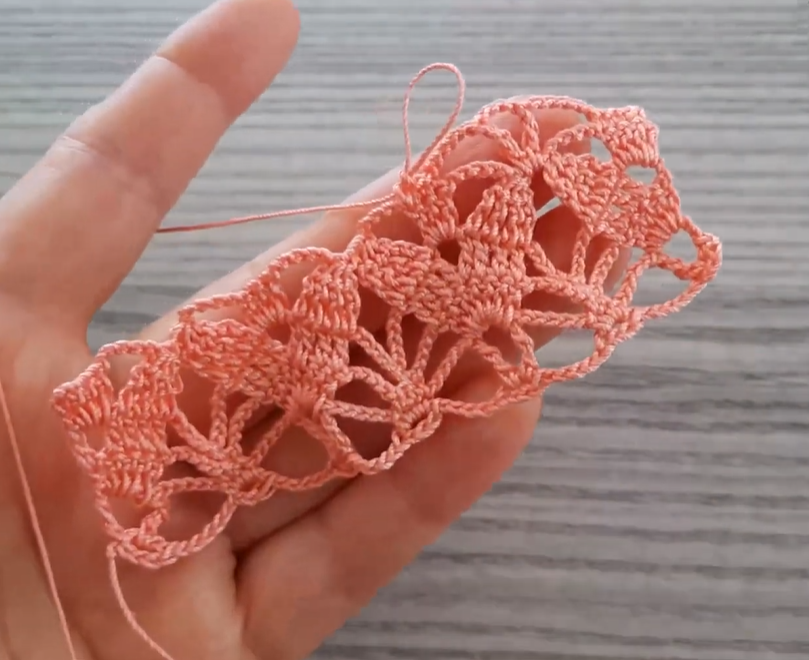
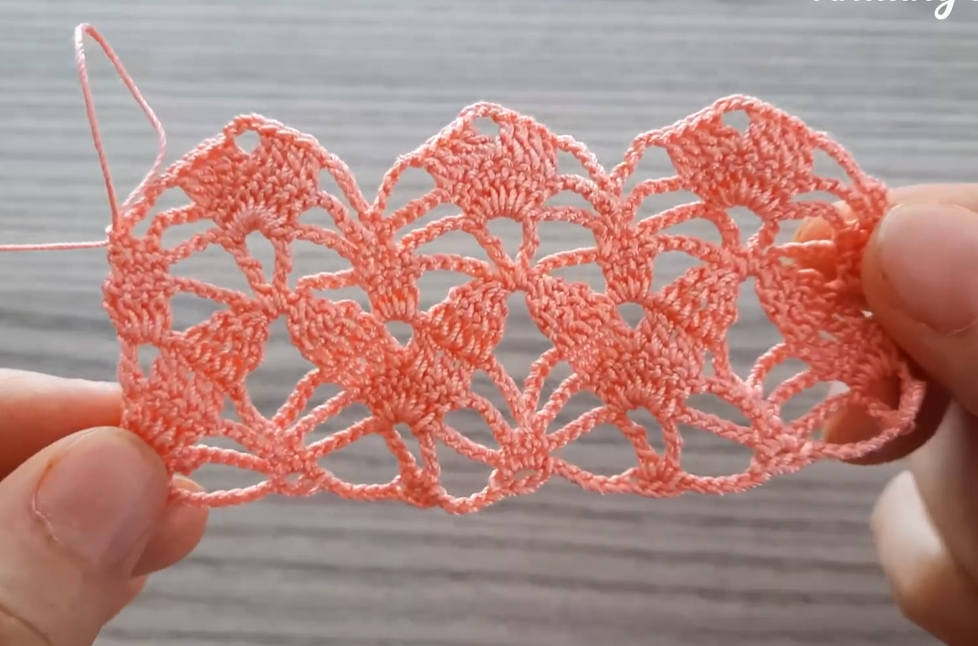
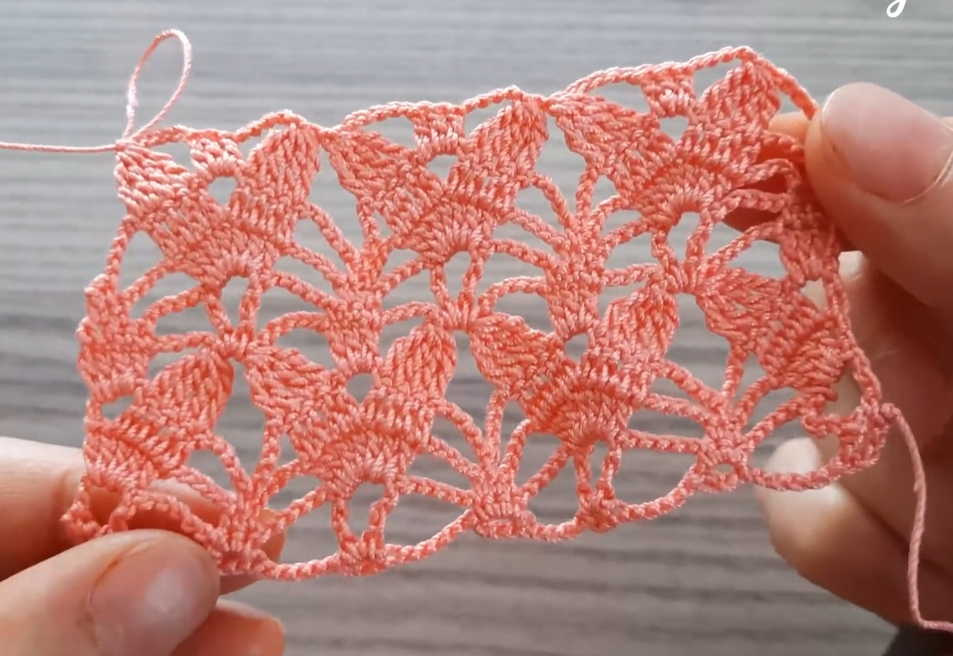
🍃 The “Willow Leaf Lace” Pattern: Row by Row 🍃
This beautiful texture is achieved through a rhythmic 4-row repeat that alternates between open mesh and solid fans.
▶️ Foundation Row:
- Ch a multiple of 10+2. (For swatch, Ch 42).
Row 1 (RS – Mesh Setup):
- Dc in the 4th ch from the hook (counts as 2 dc). Dc in the next ch (3 dc total).
- Ch 2, sk 2 ch, sc in the next ch.
- *Ch 5, sk 4 ch, sc in the next ch.
- Ch 2, sk 2 ch, dc in the next 3 chs.*
- Rep from * to * across the row, until 5 chs remain.
- Ch 2, sk 2 ch, sc in the next ch.
- Ch 2, sk 1 ch, dc in the last 2 chs.
- Turn.
This row creates the large ch-5 arches that will hold the leaf motifs.
Row 2 (WS – Fan Motif Row):
- Ch 3 (counts as 1 dc). Dc in the next dc.
- Dc in the ch-2 sp. Dc in the sc. (4 dc total).
- *Fan (3 dc, ch 1, 3 dc) in the next ch-5 sp.
- Dc in the sc.
- 2 dc in the ch-2 sp. Dc in the next 3 dc.
- 2 dc in the ch-2 sp. Dc in the sc.*
- Rep from * to * across the row, ending with dc in the last 4 sts.
- Turn. (Total stitches will vary slightly but should maintain a wide structure).
This row creates the full, solid Fan motifs, locking the large arches into place.
Row 3 (RS – Mesh Setup Row 2):
- Ch 3 (counts as 1 dc). Dc in the next 3 dc.
- Ch 2, sk 2 dc, sc in the next dc (the one just before the Fan).
- *Ch 5, sk 7 sts (3 dc, ch 1, 3 dc of the Fan + sc), sc in the next dc (the one after the Fan).
- Ch 2, sk 2 dc, dc in the next 5 dc.*
- Rep from * to * across the row, ending with dc in the final 4 sts.
- Turn.
This row begins the offset process. The large ch-5 loop is now centered over the previous row’s Fan motif.
Row 4 (WS – Fan Motif Row 2 – Offset):
- Ch 3 (counts as 1 dc). Dc in the next 2 dc.
- Dc in the ch-2 sp. Dc in the sc.
- Ch 2, sk 2 dc, dc in the next dc.
- Fan (3 dc, ch 1, 3 dc) in the next ch-5 sp.
- Dc in the sc.
- 2 dc in the ch-2 sp. Dc in the next 5 dc.*
- Rep from * to * across the row, ending with dc in the final 4 sts.
- Turn.
This row creates the second row of Fan motifs, placing them directly within the negative space of the previous row, completing the flowing diagonal pattern.
Video Tutorial:
🔄 The Repeat Sequence: Building the Fabric 🔄
The pattern is now fully established! To continue the Willow Leaf Lace, you will repeat Rows 1-4 until your project reaches your desired size.
- Rows 1 and 3 (the Mesh Setup Rows) are structurally similar but offset.
- Rows 2 and 4 (the Fan Motif Rows) are structurally similar but offset.
- The full repeating cycle is Rows 1, 2, 3, and 4.
🚿 Finishing and Blocking: Maximizing the Flow 🚿
For this type of lace, blocking is highly recommended to open up the mesh and allow the fan motifs to lay flat and flow.
- Final Edge: Always end on a Fan Motif Row (Row 2, 4, 6, etc.) to get that beautiful, natural scalloped edge. You can finish with a row of sc or sl st along the top for a tidy edge.
- Wet Blocking: Soak your finished piece in lukewarm water.
- Pin and Stretch: Pin the fabric out onto a blocking mat, stretching it gently to define the large diamond spaces and the points of the fan motifs.
- Dry: Allow the item to dry completely before unpinning.
🌟 Project Inspiration 🌟
- Flowing Shawl or Wrap: The perfect pattern for an elegant garment with amazing drape.
- Table Runner: The repeating motifs create a beautiful central piece.
- Curtain Panels: Airy and delicate for filtering light.
Happy crocheting! I hope you love the beautiful flow of the Willow Leaf Lace!


