

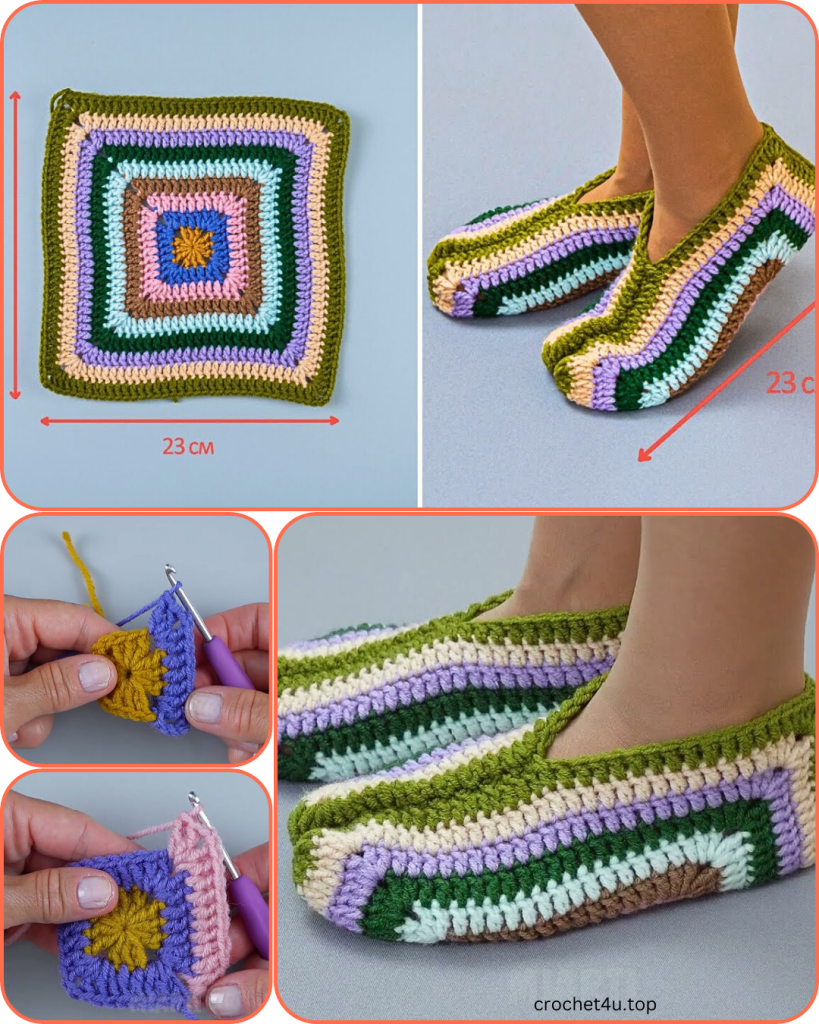
Who would have thought a simple granny square could transform into such a charming and comfortable pair of slippers? Today, we’re diving into a project that’s as clever as it is cozy: the “Granny Square Fold-Up Slippers.” Inspired by the ingenious design in the image you shared, this pattern uses a single, large granny square that’s folded and seamed to create a wonderfully soft and custom-fit slipper.
This project is perfect for using up yarn scraps, practicing your color changes, and creating a truly unique and personalized accessory for your feet. The construction is surprisingly straightforward once you understand the folding technique, making it a satisfying project for both adventurous beginners and seasoned crocheters alike.
Let’s gather our colorful yarns and get ready to stitch up some comfort!
Understanding the Construction:
The magic of these slippers lies in their simplicity. You’ll crochet one large, solid granny square. Once the square is complete, you’ll fold it in a specific way and seam the edges to form the heel and top of the slipper, leaving an opening for your foot. The beauty is that the center of your granny square becomes the toe of the slipper, and the outer rounds form the sides and heel.
Materials You’ll Need:
This is a fantastic stash-buster project, so feel free to get creative with your colors!
- Yarn: Approximately 150-200 yards (137-183 meters) total of a Worsted Weight (Aran/10 ply) yarn. This will be divided among several colors, as seen in the inspiration image. Cotton, acrylic, or a blend would work well. Cotton will give a firmer slipper, while acrylic will be softer and more flexible.
- I’ll refer to colors as C1, C2, C3, etc., but you can use as many as you like!
- Crochet Hook: 5.0 mm (H/8) or size needed to obtain gauge.
- Yarn Needle: For weaving in ends and seaming.
- Scissors: For cutting yarn.
- Stitch Markers (optional but helpful): For marking corners and seams.
Gauge:
Achieving the correct gauge is crucial for these slippers, as the size of your granny square directly translates to the size of your slipper. The pattern for a 23 cm (9-inch) square is given below, which generally fits a women’s US size 7-8 (EU 38-39).
- 15 double crochet (dc) stitches and 8 rows (of dc) = 4 inches (10 cm)
- Your finished granny square should measure approximately 23 cm x 23 cm (9 inches x 9 inches).
Make a small swatch with your chosen yarn and hook to ensure you match the gauge. Adjust your hook size if necessary.
Abbreviations:
- ch: chain
- st(s): stitch(es)
- sl st: slip stitch
- sc: single crochet
- dc: double crochet
- sp: space
- ch-sp: chain space
- C1, C2, C3, etc.: Color 1, Color 2, Color 3, etc.
- FO: fasten off
Pattern Notes:
- This pattern uses a “solid” granny square technique, meaning there are no spaces between the dc clusters, except for the chain-2 corner spaces.
- Each round begins with a ch 3 (counts as first dc) and ends with a sl st to the top of the beginning ch 3.
- Change colors at the end of each round (or as desired) by completing the last yarn over of the final sl st with the new color. FO the old color and weave in ends as you go for a tidier finish.
Part 1: Crocheting the Solid Granny Square (Make 2)
You’ll need one granny square for each slipper.
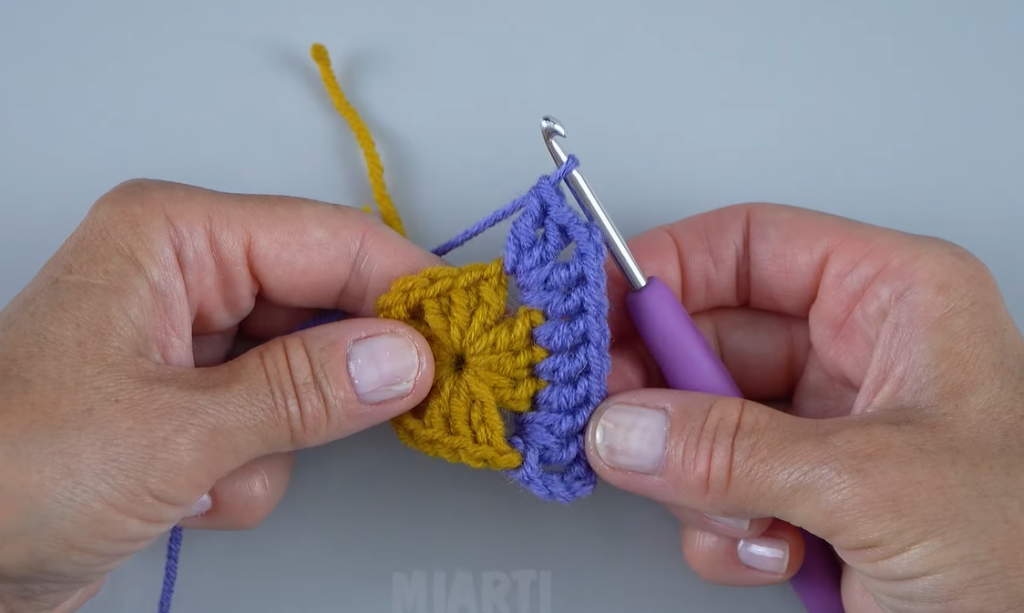
Start (C1 – e.g., yellow/light blue in image): Ch 4, sl st into the first ch to form a ring.
Round 1 (C1): Ch 3 (counts as 1st dc), 2 dc into the ring. (Ch 2, 3 dc into the ring) 3 times. Ch 2, sl st to the top of the beginning ch 3. FO C1, join C2. (12 dc, 4 ch-2 sps)
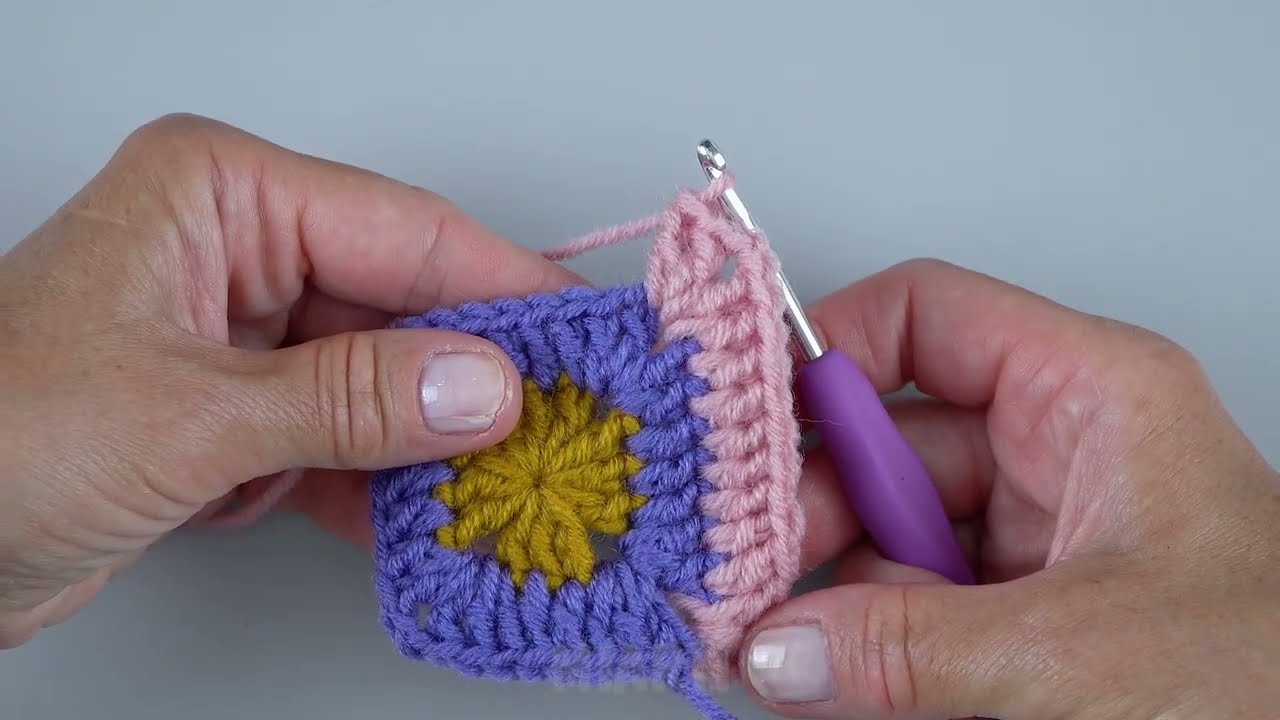
Round 2 (C2 – e.g., pink): Ch 3 (counts as 1st dc), 2 dc in the first ch-2 sp (same space as join). Ch 2, 3 dc in the same ch-2 sp. (3 dc in the next space between dc clusters, 3 dc in the next ch-2 sp, ch 2, 3 dc in the same ch-2 sp) Repeat from * to * 2 more times. 3 dc in the next space between dc clusters. Sl st to the top of the beginning ch 3. FO C2, join C3. (24 dc, 4 ch-2 sps)
Round 3 (C3 – e.g., lavender): Ch 3 (counts as 1st dc), 2 dc in the first ch-2 sp. Ch 2, 3 dc in the same ch-2 sp. (3 dc in each of the next 2 spaces between dc clusters, 3 dc in the next ch-2 sp, ch 2, 3 dc in the same ch-2 sp) Repeat from * to * 2 more times. 3 dc in each of the next 2 spaces between dc clusters. Sl st to the top of the beginning ch 3. FO C3, join C4. (36 dc, 4 ch-2 sps)
Round 4 (C4 – e.g., teal/light green): Ch 3 (counts as 1st dc), 2 dc in the first ch-2 sp. Ch 2, 3 dc in the same ch-2 sp. (3 dc in each of the next 3 spaces between dc clusters, 3 dc in the next ch-2 sp, ch 2, 3 dc in the same ch-2 sp) Repeat from * to * 2 more times. 3 dc in each of the next 3 spaces between dc clusters. Sl st to the top of the beginning ch 3. FO C4, join C5. (48 dc, 4 ch-2 sps)
Continuing Rounds: Continue increasing your granny square by following the pattern established:
- In each corner ch-2 sp: (3 dc, ch 2, 3 dc).
- In each space between the 3-dc clusters along the sides: 3 dc.
- Each round will add 12 dc stitches.
Continue working rounds, changing colors as desired (the image shows a new color for almost every round), until your square measures approximately 23 cm x 23 cm (9 inches x 9 inches). This will be around 11-12 rounds depending on your gauge.
For the slipper in the image, the colors are: C1 (yellow/light blue), C2 (pink), C3 (lavender), C4 (teal/light green), C5 (brown), C6 (dark purple), C7 (light blue), C8 (light green), C9 (dark green). The last few rounds are solid dark green.
Final Round (Border – C9 – e.g., dark green): Once your square is the desired size (approx. 23cm), work one final round of single crochet around the entire square. Ch 1 (does not count as st), sc in each dc around and (sc, ch 1, sc) in each corner ch-2 sp. Sl st to the first sc to join. This gives a nice, clean edge for seaming. FO, leaving a very long tail (at least 30-40 inches / 75-100 cm) for seaming.
Make a second identical granny square.
Part 2: Assembling the Slippers
This is where your granny square magically transforms!
- Prepare for Folding: Lay one granny square flat with the right side facing up.
- Identify the center: The very first round you made is the center of your square. This will become the tip of your slipper’s toe.
- Identify the corners: You have four corners created by the ch-2 spaces.
- Folding Steps:
- Step 1: Fold diagonally. Fold the square in half diagonally, bringing two opposite corners together. This will form a triangle. The point of the triangle will be your slipper’s toe.
- Step 2: Create the top flap. Identify the corner that is now at the very tip of your folded triangle (this is the corner that was one of the two folded inward). Take this corner and fold it back towards the center of the triangle’s base. This forms the top flap of your slipper (the part that covers your foot). Adjust it so it looks like the top of the slipper in the image. You’re basically creating a ‘paper airplane’ type fold.
- Visually, the square starts with 4 corners (A, B, C, D). You fold A to C. Then you take what was originally corner B, which is now pointing away from the base, and fold it back towards the base.
- Refer to the picture for how the top of the slipper is formed. The center of your granny square should be the center of the toe.
- Pinning for Seaming:
- You will have three main edges to seam: the back heel seam and the two side seams that form the top of the slipper.
- Heel Seam: The two edges that meet at the back of the slipper (where your heel will go) should be aligned. Pin them together.
- Top Side Seams: The two sides of the flap you folded down will meet the corresponding edges of the main slipper body. Pin these edges together.
- Leave the opening for your foot unseamed.
- Seaming:
- Using your yarn needle and the long tail you left, begin seaming the edges together. A simple whip stitch or mattress stitch works well here.
- Start with the heel seam: Work from the bottom center of the heel up towards where your foot opening begins. Securely fasten off any remaining tail.
- Then seam the two top edges: Work from the tip of the toe opening down towards the heel on both sides. Be careful to ensure both sides of the slipper’s opening are symmetrical.
- Weave in all remaining ends securely.
Video Tutorial:
Repeat all assembly steps for the second slipper.
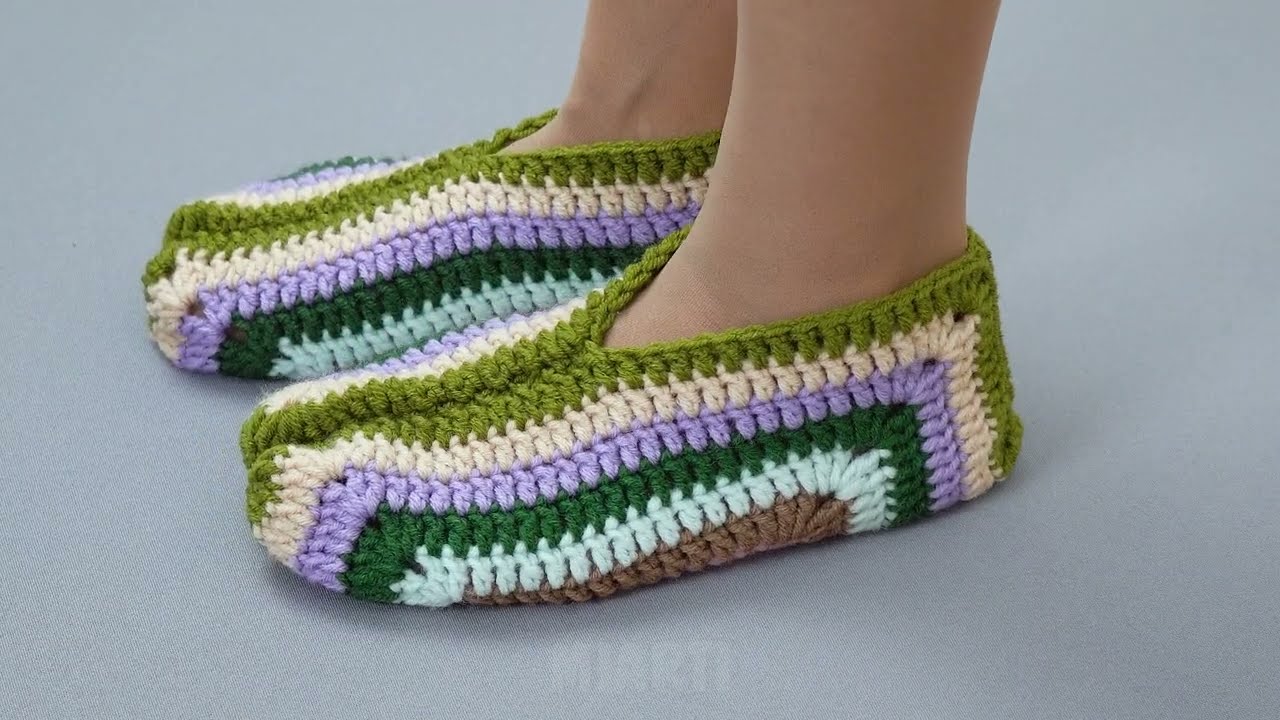
Here’s an example of the finished product

You’ve Done It!
Congratulations! You’ve successfully crocheted a pair of adorable and incredibly clever “Granny Square Fold-Up Slippers.” These unique slippers are not just a treat for your feet but also a wonderful conversation starter, showcasing the versatility of crochet.
Slip them on and enjoy the comfort you’ve created with your own hands. They make fantastic gifts too! Don’t forget to share your colorful creations—we love to see them. Happy crocheting!


