
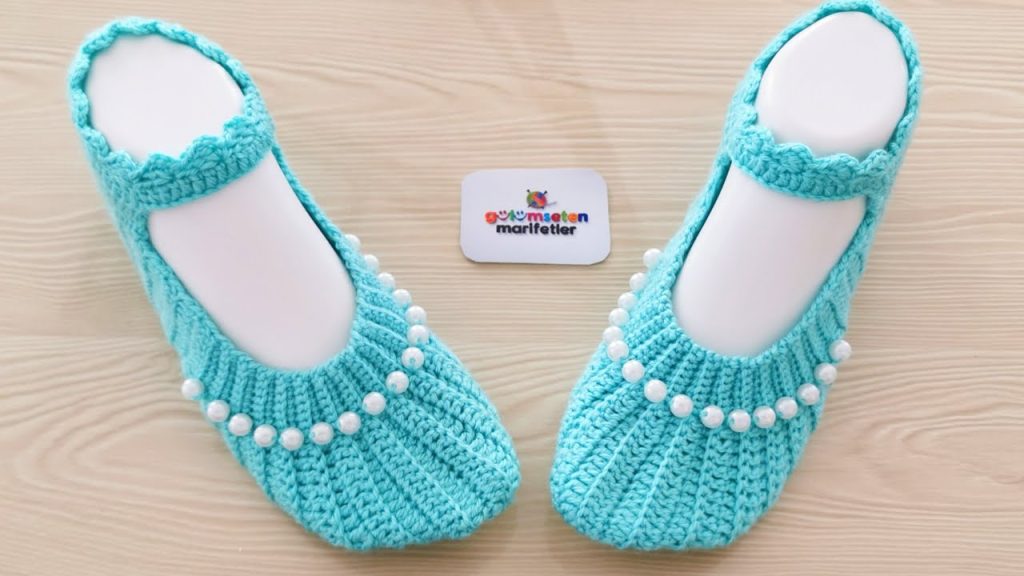
Hello, fellow makers! I’m so excited to share this project with you. There’s a special kind of magic in creating something both beautiful and useful with your own two hands, and these elegant crocheted slippers are the perfect example. Inspired by a popular and timeless design, this pattern will walk you through every step to create a pair of stunning slippers with a delicate beaded strap and a beautiful ribbed texture.
This pattern is designed to fit an average women’s foot (US size 7-8). But don’t worry, I’ll also include detailed instructions on how to adjust the size to get the perfect fit for yourself or for a gift. Grab your hook and your favorite yarn—let’s get started!
Skill Level: Intermediate
Finished Size:
- Approximately 9-9.5 inches long from heel to toe.
- Fits a women’s US shoe size 7-8.
Materials You’ll Need
- Yarn: Approximately 150g of worsted weight yarn in your chosen color. A soft acrylic blend or a wool yarn is perfect for these slippers, as they are both comfortable and durable for everyday wear.
- Crochet Hook: A US size H/8 (5.0 mm) crochet hook. It’s always a good idea to have a couple of different sizes on hand in case you need to adjust to meet the gauge.
- Beads: Approximately 20-30 small pearl beads per slipper. Choose beads that are lightweight and have a hole large enough for your thread to pass through easily.
- Notions:
- A tapestry needle for weaving in ends and seaming.
- A small, strong sewing needle for attaching the beads.
- Matching thread for sewing the beads.
- Scissors.
- A stitch marker to help you keep track of your rounds.
Gauge: Why It’s So Important
For this pattern, getting the correct gauge is crucial. It ensures your slippers will be the right size. If your stitches are too tight, your slippers will be too small. If they are too loose, they will be too big.
Gauge: 14 stitches and 16 rows of single crochet (sc) = 4 inches (10 cm).
How to Check Your Gauge:
- Chain 16.
- Work 18 rows of single crochet.
- Gently lay your swatch on a flat surface and measure a 4-inch square in the middle of your work.
- If you have more than 14 stitches, your tension is too tight. Go up to a larger hook (e.g., US I/9).
- If you have fewer than 14 stitches, your tension is too loose. Go down to a smaller hook (e.g., US G/7).
- Repeat until you have the correct gauge.
Crocheting the Slippers: The Main Pattern
The slipper is worked from the sole up, starting with an oval shape and then building the body of the slipper.
Part 1: The Sole
This is the foundation of your slipper. We’ll start with a chain and work around it to create the oval shape of the foot.
- Chain 22. This forms the base length of the slipper.
- Round 1: Single crochet (sc) in the second chain from the hook and in each of the next 19 chains. You should have 20 stitches along one side. In the very last chain, work 3 sc to create a smooth, rounded end for the toe. Now, turn your work and continue working down the other side of the starting chain. Sc in each of the next 19 chains. In the very last chain, work 2 sc to create the heel turn. (44 total stitches).
- Round 2: Place a stitch marker in the first stitch of this round to mark the beginning. Sc in each of the next 20 stitches. Work 2 sc in the next 3 stitches (3 increases for the toe). Sc in each of the next 20 stitches. Work 2 sc in the next 2 stitches (2 increases for the heel). (49 total stitches).
- Round 3: Sc in each of the next 20 stitches. Work 2 sc in the next 6 stitches (6 increases for the toe). Sc in each of the next 20 stitches. Work 2 sc in the next 3 stitches (3 increases for the heel). (58 total stitches).
- Rounds 4-5: Continue to work in continuous rounds, following the established pattern of increasing at the toe and heel. For each round, work your sc stitches as usual, and place 2 sc in the first 6 stitches of the toe and the first 3 stitches of the heel. (64 total stitches by the end of Round 5).
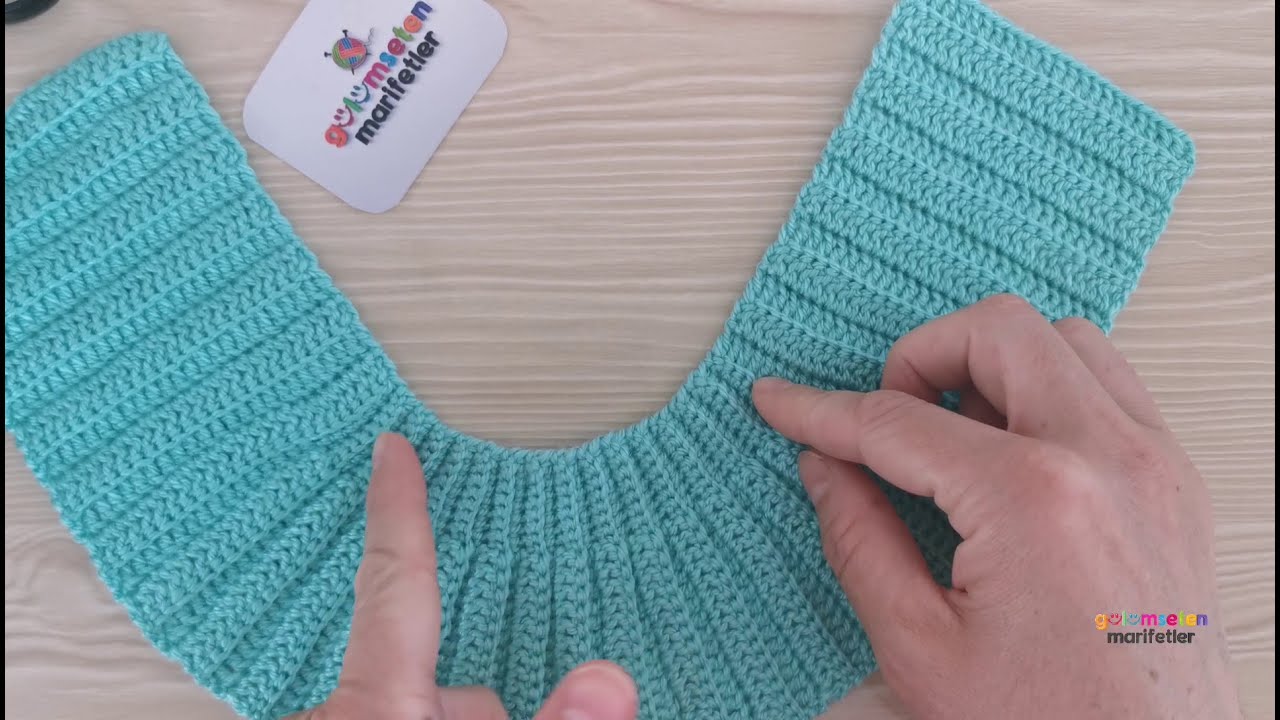
Your sole should now be a nice, flat oval.
Part 2: Building the Body of the Slipper
This section will create the vertical sides of the slipper and the ribbed texture.
- Round 6 (The First Ridge): This round creates the clean line between the sole and the body. Chain 1 (does not count as a stitch), then single crochet in the back loop only (BLO) of each stitch around. Do not join at the end of the round; instead, work in a spiral from now on. (64 stitches).
- Round 7: Single crochet in both loops of each stitch around. (64 stitches).
- Round 8 (The Ribbed Effect): This is the key to that beautiful ribbed texture. Chain 1 (does not count as a stitch), then work single crochet in the front loop only (FLO) of each stitch around. This pushes the unworked back loop forward, creating a horizontal ridge. (64 stitches).
- Rounds 9-14: Repeat Rounds 7 and 8 alternately to continue the ribbed pattern. You will be working two rows of standard single crochet followed by one row of FLO single crochet. You should have 3 horizontal ridges by the end of Round 14.
Part 3: Shaping the Toe
Now we will begin decreasing to form the rounded toe.
- Round 15: Single crochet in the first 25 stitches. Then, work a single crochet decrease over the next two stitches (sc2tog). Repeat this decrease 7 more times. Single crochet in the remaining stitches. (56 stitches).
- Round 16: Single crochet in the first 25 stitches. Then, work a sc2tog. Repeat this decrease 6 more times. Single crochet in the remaining stitches. (49 stitches).
- Round 17: Single crochet in the first 25 stitches. Work a sc2tog. Repeat this decrease 4 more times. Single crochet in the remaining stitches. (44 stitches).
- Round 18: Single crochet in the first 20 stitches. Work a sc2tog. Repeat this decrease 4 more times. Single crochet in the remaining stitches. (39 stitches).
- Round 19: Single crochet in the first 20 stitches. Work a sc2tog. Repeat this decrease 2 more times. Single crochet in the remaining stitches. (36 stitches).
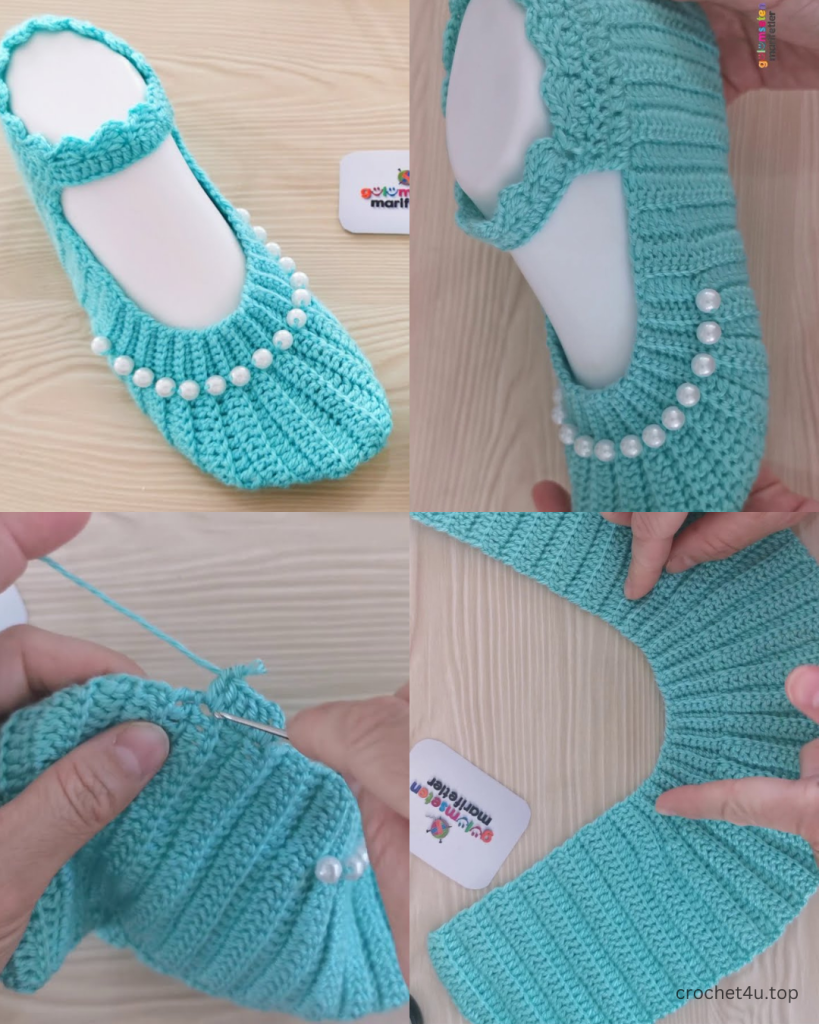
Part 4: Creating the Strap and Finishing
This part brings the slipper together and adds the final details.
- The Straps:
- Row 1: Single crochet in the first 8 stitches. Turn.
- Row 2-15: Chain 1, turn. Single crochet in each stitch across.
- This will create a long, rectangular strap. The length can be adjusted to your preference.
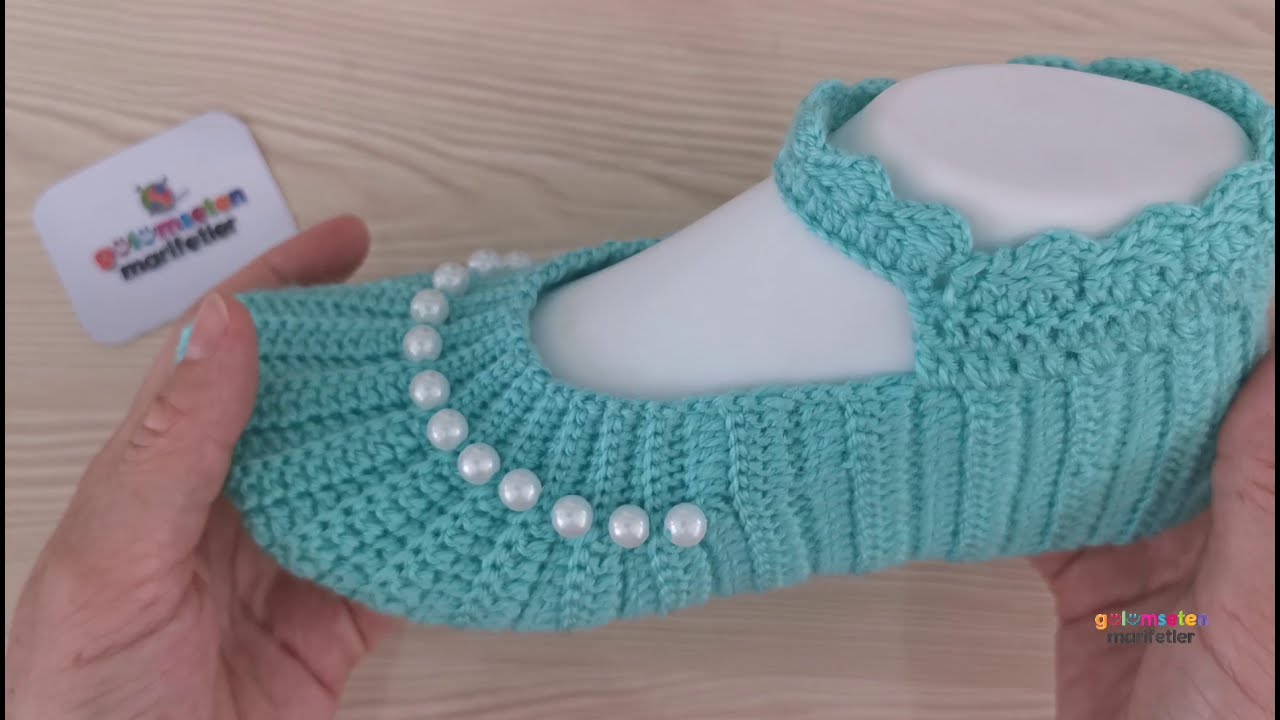
- The Scalloped Edge:
- Join yarn at the back of the heel with a slip stitch.
- *Skip 1 stitch, 3 double crochet (dc) in the next stitch, skip 1 stitch, slip stitch (sl st) in the next stitch*.
- Repeat from * to * all the way around the top opening of the slipper. This creates the lovely decorative scallop.
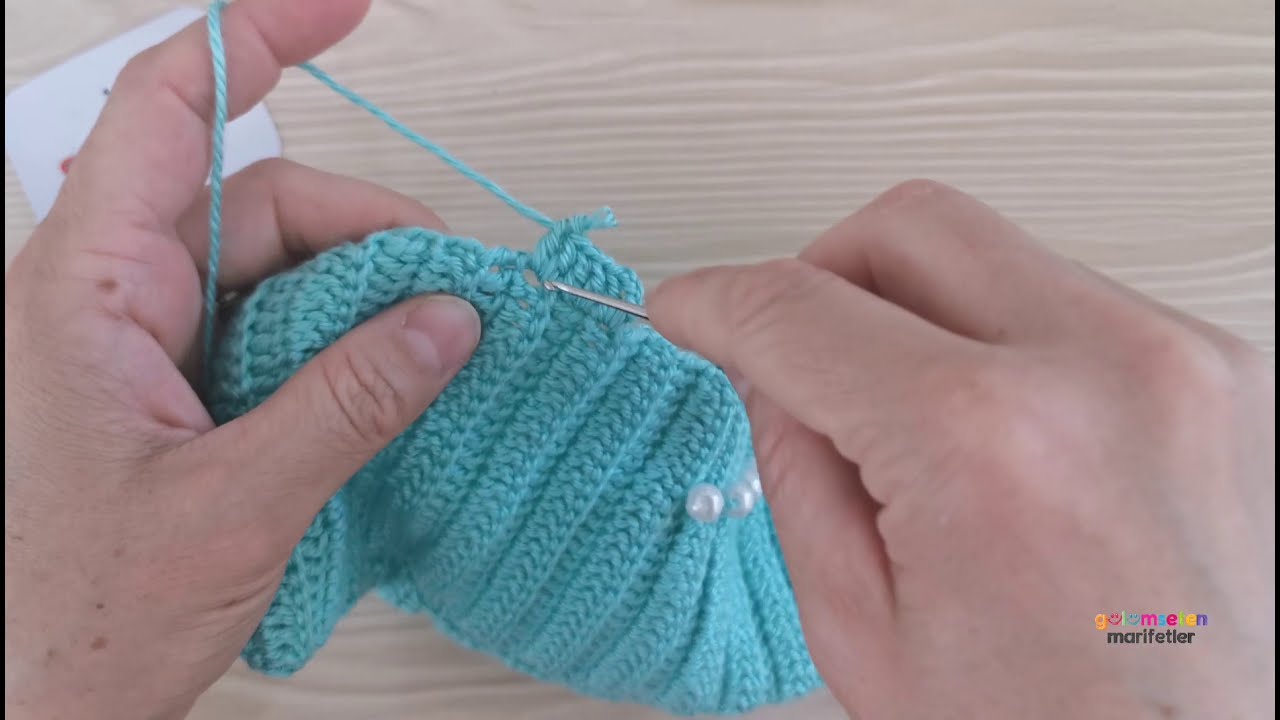
- Attaching the Strap:
- Fold the slipper flat and find the center of the strap and the opposite side of the slipper’s opening.
- Using your tapestry needle, securely sew the end of the strap to the inside of the slipper.
- Adding the Beads:
- Using your small sewing needle and matching thread, sew the pearl beads along the scalloped edge of the strap and the front of the slipper. A simple running stitch on the back of the beads works perfectly.
Video Tutorial:
Troubleshooting Your Slippers
- Slipper is too big/small: If your gauge is correct but the slipper is still not the right size, you can start with a longer or shorter initial chain. Each extra chain stitch will add approximately 1/4 inch to the length.
- The heel is too pointy: If the back of your sole looks too pointed, you can slightly adjust the increases in the heel section to 2 sc in the first 2 stitches instead of 3.
- The seam is visible: Working in a continuous spiral for the body helps to avoid a visible seam. If you’re joining your rounds with a slip stitch, the seam will be visible. For a cleaner look, use a seamless join method.
Happy crocheting! I hope you enjoy every moment of creating these beautiful and comfortable slippers. Once you’ve made your first pair, you’ll want to make them for everyone you know!


