
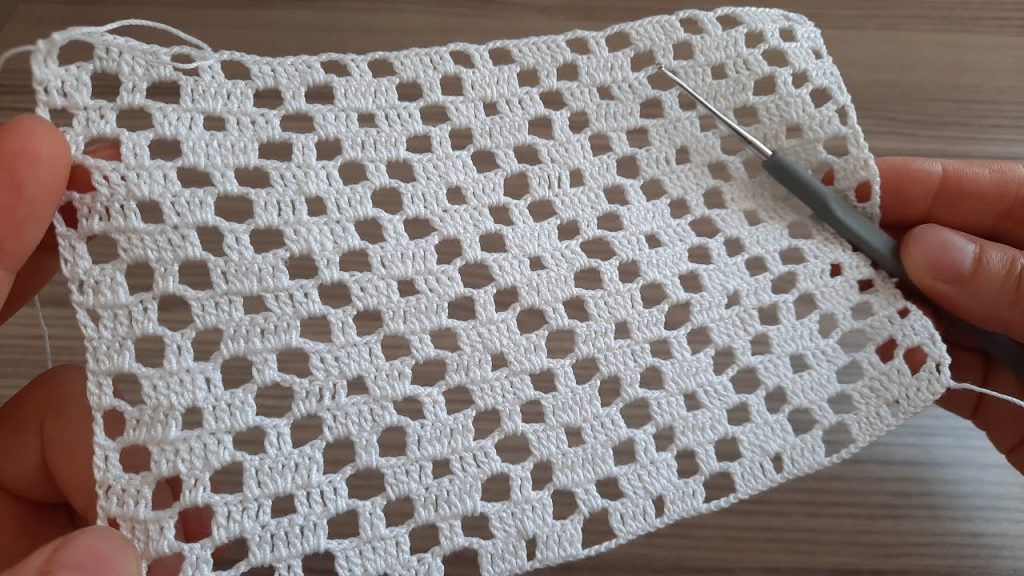
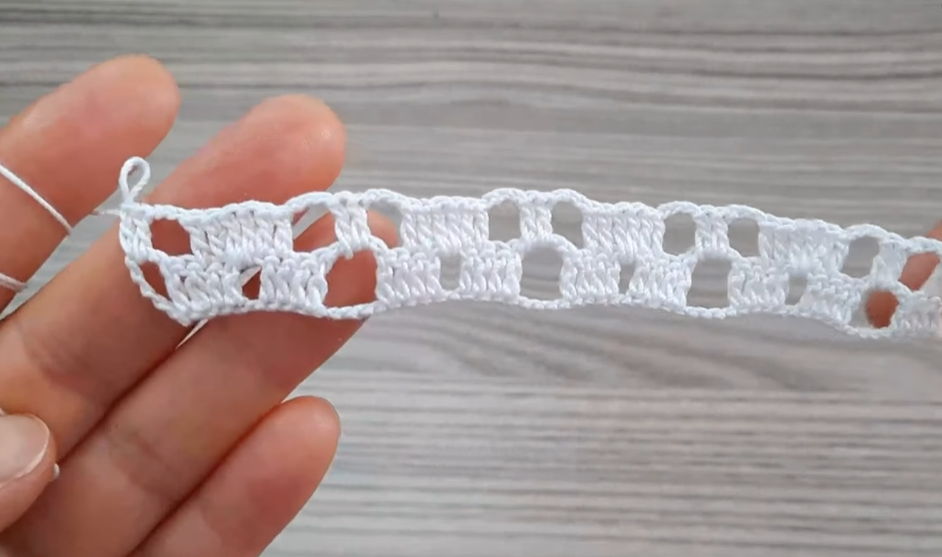
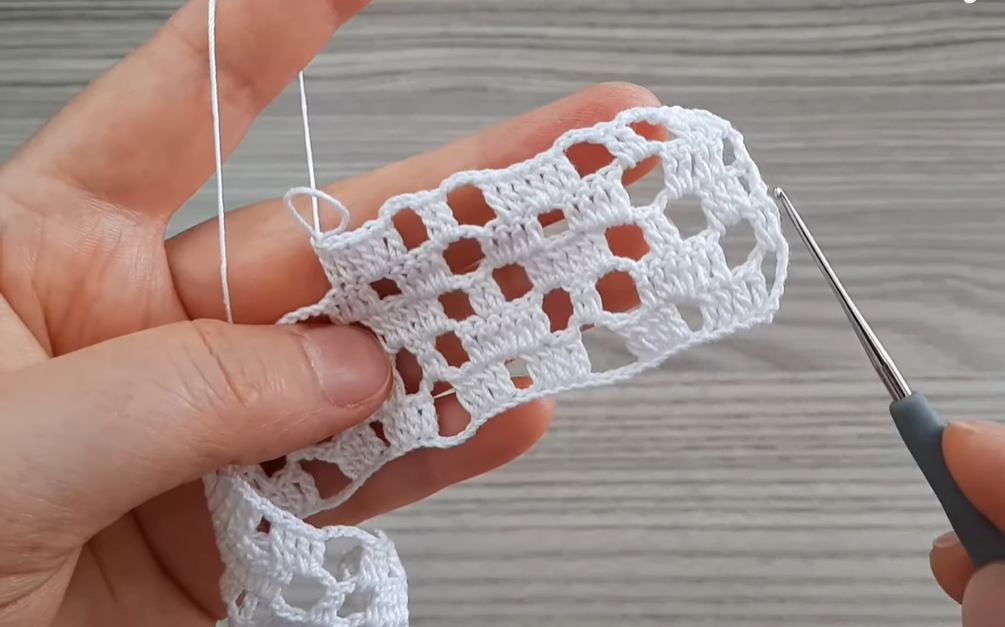
Adorn your projects with the elegant Neptune’s Ribbon Lace! This continuous trim creates a stunning, wide ribbon of fabric, featuring layers of dense shell stitches contrasted with a delicate open net. The scalloped edge is beautifully integrated into the pattern repeat, making it a perfect finishing touch for shawls, curtains, or tablecloths. The bright lime green yarn gives this heirloom-quality lace a fresh, modern appeal.
⭐️ Project Blueprint and Technique Check
| Feature | Detail |
| Skill Level | Intermediate. Requires focused stitch placement, working into specific chain spaces, and consistent shell stitch height. |
| Stitches Used | Chain (ch), Slip Stitch (sl st), Single Crochet (sc), Double Crochet (dc). |
| Construction | Worked flat in rows. The pattern is built upon the shells of the previous row, utilizing a 4-row vertical repeat. |
| Yarn Type | Fine cotton thread is ideal for the crisp shell definition and open net. |
| Pattern Repeat | A 4-row vertical repeat creates the full texture cycle. |
Export to Sheets
🧵 Materials Selection & Precision Gauge
Yarn: Choosing for Crispness
- Weight: Crochet Thread Size 10 or a fine Lace Weight (Category 0) yarn. A highly mercerized cotton is essential for this pattern to ensure the shells hold their fan shape and the net remains crisp.
- Fiber: 100% Mercerized Cotton thread is highly recommended for its excellent drape, stitch definition, and superb blocking capabilities.
- Color: A vibrant Lime Green or a classic Ecru (like the sample) to showcase the complex layering.
- Yardage: Plan for approximately 150 to 200 yards for a 60-inch border length.
Hook: The Right Tool for Detail
- Size: 1.5 mm to 2.0 mm (Steel Hook US 8 or 7). The hook must be small enough to create tight, firm dc stitches that stand tall within the shell structure.
Notions & Blocking
- Tapestry Needle: Fine needle for weaving in ends.
- T-pins and Blocking Mat: Absolutely Mandatory. Blocking will open up the netting and dramatically define the scalloped edges of the shells.

Precision Gauge
Gauge is measured across one full shell repeat horizontally.
- One Horizontal Shell-to-Shell Repeat: Approximately 1.5 inches wide.
- Trim Height: The total height of the trim is approximately 1.75 inches.
- Starting Chain Calculation: The pattern repeats every 8 stitches. Use the formula: 8×(number of repeats)+5 ch
- Example: For 12 repeats across: 8×12+5=ch 101
📝 Pattern Instructions: The Foundation
This row establishes the base net and spacing for the first row of shells.
Row 1 (Foundation Net – RS): Chain the required amount (e.g., ch 101). dc in the 5th ch from the hook (counts as dc and ch 1).
- ch 1, sk 1 ch, dc in the next ch. Repeat the sequence ch 1,sk 1 ch,dc in next ch across the entire chain. You will end with a dc in the last ch.
- Turn.
🐚 The 4-Row Textured Repeat
This sequence of four rows builds the solid shell and the subsequent lace segments.
Row 2 (Shell Creation – WS): ch 1 (sc in first dc).
- ch 2, sc in the next ch 1 space.
- Full Shell: Work 5 dc in the next ch 1 space. sc in the next ch 1 space.
- V-Net: ch 3, sk 3 dc below, sc in the next ch 1 space. ch 3. Repeat the sequence sc in ch 1 space, 5 dc in ch 1 space, sc in ch 1 space, ch 3,sc in ch 1 space, ch 3 across the row.
- End with a sc in the last ch 1 space, ch 2, sc into the top of the turning chain ch 4 from Row 1.
- Turn.
Row 3 (Shell Expansion – RS): ch 3 (counts as dc). Work 1 dc in the first ch 2 space.
- 1 dc in the next sc.
- Expanding Shell: Work 2 dc in the first dc of the shell. 1 dc in the next 3 dc. 2 dc in the last dc of the shell. (7 dc shell).
- 1 dc in the next sc.
- Diamond Net: ch 3, sc in the center ch of the ch 3 loop. ch 3.
- 1 dc in the next sc. Repeat the sequence 7 dc shell, 1 dc in sc,ch 3,sc,ch 3,1 dc in sc across the row.
- End with 1 dc in the last sc, 2 dc in the ch 2 space, 1 dc in the last sc.
- Turn.
Row 4 (Open Netting – WS): ch 1 (sc in sl st join).
- ch 2, sk 1 dc, sc in the next dc.
- Shell Arch: ch 3, sc in the center 4th dc of the 7 dc shell. ch 3.
- sc in the next dc. ch 2.
- Diamond Top: dc in the sc below. ch 2.
- sc in the next dc. Repeat the sequence ch 3,sc in shell center, ch 3,sc in dc,ch 2,dc in sc,ch 2,sc in dc across the row.
- End with ch 2, sk 1 dc, sc in the top of the turning ch 3.
- Turn.
Row 5 (Scalloped Edge/New Shell Base – RS): ch 3 (counts as dc). 2 dc in the first ch 2 space.
- sc in the next ch 2 space.
- Scallop Peak: In the ch 3 loop, work 5 dc,ch 2,5 dc.
- sc in the next ch 3 loop.
- New Shell Base: 3 dc in the next ch 2 space. sc in the next ch 2 space. Repeat the sequence 5 dc,ch 2,5 dc in ch 3 loop, sc in ch 3 loop, 3 dc in ch 2 space, sc in ch 2 space across the row.
- End with 3 dc in the last ch 2 space, 1 dc in the top of the turning ch 1.
Continue repeating Rows 2 through 5 for the full length of your project, noting that Row 2 will now begin by working into the ch 2 spaces and sc stitches of Row 5.
💡 Troubleshooting and Pattern Mastery
| Issue | Cause | Solution |
| Edge Ruffles/Waves | Shells are too wide, or connecting chains are too short. | Ensure Row 3 only increases by 2 dc total. Check your ch 2 count in Row 5; you might need to increase to ch 3 between the dc groups. |
| Lack of Definition | Yarn is too fuzzy or soft. | Switch to a crisp, high-twist mercerized cotton thread. Blocking will also dramatically improve definition. |
| Difficulty Counting | The pattern relies heavily on working into the center of groups. | Use stitch markers to mark the 4th dc of the shell in Row 3 and the sc in the middle of the diamond net for easier anchoring. |
| Want a Denser Fabric | The lattice work is too open. | Replace ch 2 spaces in the net rows with ch 1 or replace the dc stitches in Row 5 with sc stitches. |
Video Tutorial:
🔨 Finishing and Textile Blocking
Blocking is absolutely essential for the Neptune’s Ribbon Lace to ensure the ribbon is straight and the scallops are defined.
- Preparation: Weave in all loose ends securely.
- Soak: Submerge the piece in cool water. For a very formal, stiff finish, add liquid starch. Gently press out excess water.
- Tension Pinning: Lay the damp fabric on a blocking mat. Using rust-proof T-pins:
- Pin the straight, top edge taut and straight.
- Pin the peak (ch 2 space) of every single large scallop along the bottom edge to open them into perfect fans.
- Pin the corners of the small diamond net sections to emphasize the open geometry.
- Dry: Allow the piece to dry completely flat for 12−24 hours.
Your stunning Neptune’s Ribbon Lace is now complete! Will you use it as a standalone scarf or attach it as an elegant border to a woven blanket?


