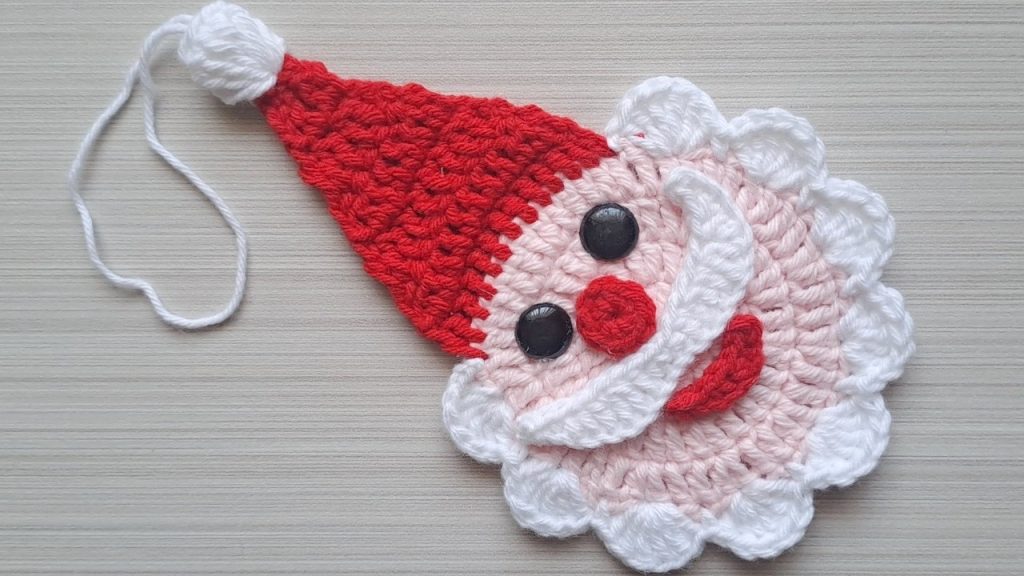
✨ Introduction: A Piece of Holiday Cheer
Get ready to deck the halls with a truly adorable, handmade touch! This detailed tutorial guides you through crocheting a charming Santa Claus Face Ornament, inspired by the beautiful amigurumi style shown in the video. This project is perfect for using up yarn scraps and makes a wonderful gift tag or tree decoration.
We will start with the main face piece and then move on to the hat, beard, and facial details before assembling them.
📌 Pattern Notes & Abbreviations
This pattern is worked primarily in Double Crochet (DC) rounds for the face base and then changes to form the hat. It uses standard US crochet terminology.
Abbreviations (US Terms)
| Abbreviation | Meaning |
| ch | Chain |
| st(s) | Stitch(es) |
| sl st | Slip Stitch |
| sc | Single Crochet |
| dc | Double Crochet |
| inc | Increase (2 stitches in the same st) |
| FO | Fasten Off |
| MR | Magic Ring (or adjustable ring) |
| DCtog | Double Crochet Together (standard decrease) |
Materials
- Yarn: Light Worsted Weight (Weight 3) or DK yarn in the following colors:
- Skin Tone: (e.g., Pale Pink/Palo Rosa, Cream)
- Red: For the hat and mouth.
- White: For the beard, trim, and pompom.
- Hook: A smaller hook is often preferred for amigurumi to ensure tight stitches. The video uses a 1.75 mm hook, but a B/1 (2.25 mm) or C/2 (2.75 mm) hook will work well for most DK yarns.
- Embellishments:
- Small pair of safety eyes or beads.
- Fabric glue or hot glue/silicone (as shown in the video) for assembly.
- Tools: Tapestry needle, scissors.
🪡 Part 1: The Face Base (Skin Tone)
The face is worked in the round, using Double Crochet (DC), creating a circular base.
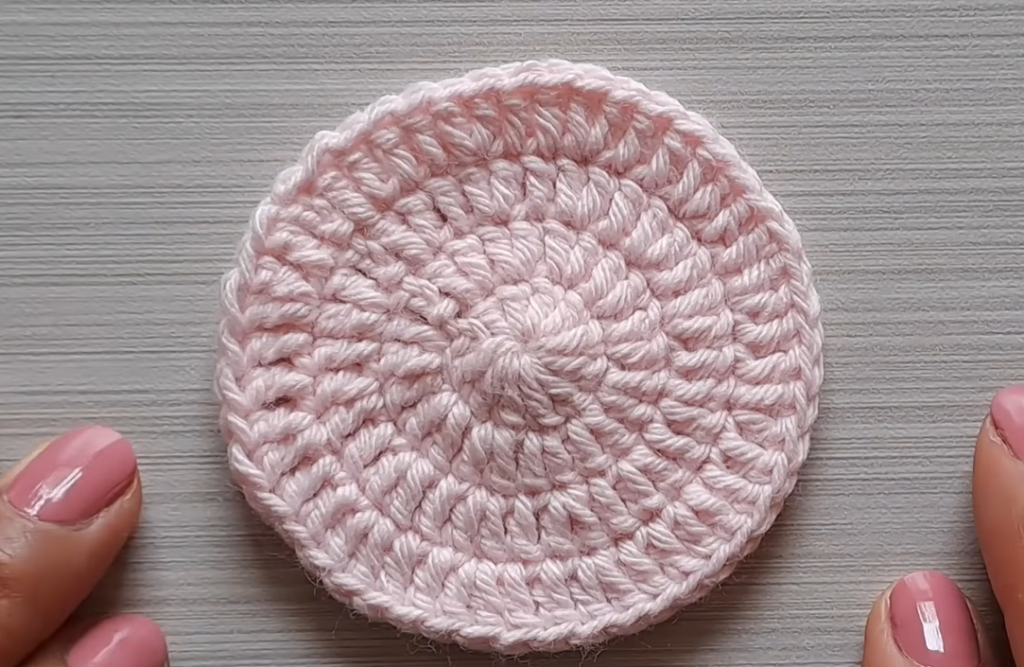
Color: Skin Tone
Round 1: Start with a MR. Ch 3 (counts as first dc), work 11 dc into the ring. Join with sl st to the top of the starting ch-3. (12 sts)
([00:50] – [01:35])
Round 2 (Increase Round): Ch 3, dc in the same st (first inc). Inc in every st around. Join with sl st to the top of the starting ch-3. (24 sts)
([02:03] – [03:24])
Round 3 (Increase Round): Ch 3, dc in the next st. [Inc in the next st, dc in the next st] Rep around. Join with sl st. (36 sts)
([03:31] – [04:58])
Pattern Note: The increase sequence is: 1 DC, [INC, 1 DC] repeated 12 times.
Round 4 (Increase Round): Ch 3, dc in the next 2 sts. [Inc in the next st, dc in the next 2 sts] Rep around. Join with sl st. (48 sts)
([05:07] – [06:31])
Pattern Note: The increase sequence is: 2 DC, [INC, 2 DC] repeated 12 times.
Round 5 (FO): Sl st to secure, FO and weave in the tail. The face circle is now complete.
([06:40] – [07:05])
❄️ Part 2: The Beard and Hat Trim (White)
The beard and lower hat trim are worked directly into the face piece.

Color: White
- Attach Yarn: Locate the stitches where you began the last two single DC repeats in Round 4 of the face piece. You will attach the white yarn on the first of the two single DCs, on the right side of the face piece.([07:11] – [07:39])
- Initial Chain: Ch 1 (counts as first sc).
- The Shell/Fan Stitch: This is where the long beard stitch is placed.
- Count: Sk 2 sts on the face base.
- In the 3rd st: Work a DC.
- Work 4 DTR (Double Treble Crochet—yarn over 3 times) in the same st.
- Work a DC in the same st.
- (This creates a 6-stitch “Shell/Fan” in one spot)([07:50] – [08:58])
- Anchor: SC into the 3rd st of the face base (skipping 2 sts).([09:55] – [10:03])
- Repeat: Repeat the sequence [Sk 2 sts, (DC, 4 DTR, DC) in the next st, Sk 2 sts, SC in the next st].
- Continue this fan/anchor sequence for a total of 9 Shell/Fan motifs across the lower half of the face.([10:03] – [12:22])
- FO and weave in tails.
🔺 Part 3: The Hat (Red)
The hat is worked in rows across the top of the face circle, starting from the last stitch of the white trim on one side to the last stitch on the other.
Color: Red
Row 1 (Foundation):
- Attach Yarn: Sl st the red yarn into the SC stitch on the right side of the face (where the white trim ended).
- Ch 3 (counts as first dc). DC in each of the next 11 sts (The stitches across the top of the face, above the white trim).
- DC in the last SC stitch of the white trim. (13 sts total)([13:07] – [15:02])
Row 2 (Decrease Row): Ch 3 (counts as first dc), turn.
- DCtog over the next 2 sts.
- DC in the next $7 \text{ sts}$.
- DCtog over the next 2 sts.
- DC in the last st (the top of the turning ch-3). (11 sts)([15:12] – [16:29])
Row 3 (Decrease Row): Ch 3, turn.
- DCtog over the next 2 sts.
- DC in the next $5 \text{ sts}$.
- DCtog over the next 2 sts.
- DC in the last st. (9 sts)([16:40] – [17:33])

Row 4 (Decrease Row): Ch 3, turn.
- DCtog over the next 2 sts.
- DC in the next $3 \text{ sts}$.
- DCtog over the next 2 sts.
- DC in the last st. (7 sts)([17:47] – [18:31])
Row 5 (Decrease Row): Ch 3, turn.
- DCtog over the next 2 sts.
- DC in the next $1 \text{ st}$.
- DCtog over the next 2 sts.
- DC in the last st. (5 sts)([18:36] – [19:10])
Row 6 (Solid Row): Ch 3, turn.
- DC in each of the next 4 sts. (5 sts)([19:14] – [19:30])
Row 7 (SC Border): Ch 1, turn.
- SC in each of the 5 sts. (5 sts)
- FO and weave in ends.([19:35] – [20:01])
☁️ Part 4: The Pompom (White)
The pompom is a small puff of DTR stitches attached to the tip of the hat.
Color: White
- Attach Yarn: Join the white yarn at the center stitch of Row 7 (the tip of the hat).
- Ch 4.
- Work 7 DTR (Double Treble Crochet) into the same center st. (8 stitches total, including the ch-4).([20:33] – [21:47])
- Closing the Pom: Remove the hook from the last loop. Insert the hook into the top of the starting ch-4. Pick up the dropped loop and pull it through the top of the ch-4 to close the puff stitch.
- FO and weave in tails, shaping the pompom neatly.([21:54] – [22:25])
🔴 Part 5: The Nose and Mouth
These small pieces are worked separately and later glued onto the face.

The Nose (Red)
Round 1: Start with a MR. Ch 1 (does not count as st), work $10 \text{ sc}$ into the ring. Join with sl st to the first sc. (10 sts)
([22:42] – [24:00])
FO and pull the tail to close the MR tightly.
The Mouth (Red)
- Ch 8.
- Sl st in the 3rd ch from hook.
- SCtog (SC over the next two chains).
- SCtog (SC over the next two chains).
- Sl st in the last ch.
- FO and leave long tails to attach or tie off.([24:49] – [26:15])
The Mustache/Beard Trim (White)
This piece is used for the mustache and beard trim.
- Ch 24.
- Starting in the 3rd ch from the hook:
- Sl st in the 3rd ch.
- Work a SCtog over the next 2 chs.
- Work a HDCtog (Half Double Crochet Together) over the next 2 chs.
- Work a DC in the next st.
- Work a DCtog over the next 2 chs.
- Work a DC in the next st.
- Work a HDC in the next st.
- Work a SC in the next st.
- Work a Sl st in the next st.
- Repeat the above sequence in reverse to mirror the shape.
- FO and weave in ends. Shape this piece into a mustache/trim shape.([26:46] – [30:15])
🛠️ Part 6: Assembly (The Final Touches)
This is the fun part where Santa comes to life!
- Eyes: Position the eyes (safety eyes or beads) above the white beard trim, centered horizontally over the face.
- Nose: Glue the red nose directly below the eyes.
- Mustache: Position the white mustache/trim piece so it covers the lower part of the nose and the top of the largest white beard shells. Glue into place.
- Mouth: Position the red mouth piece directly below the mustache, creating a smile. Glue into place.
Your Jolly Santa Face Ornament is now complete and ready to bring holiday cheer to your tree!