✨ Introduction: The Alluring Motif Garment
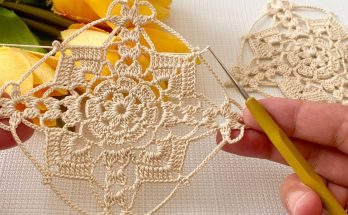
Welcome to the pattern for the stunning Starlight Blossom Blouse or Vest, a beautiful, motif-based garment inspired by the gorgeous piece featured in the video. This project is constructed by crocheting individual lacy square motifs and then joining them together to create a light, open, and stylish piece perfect for layering in warm weather or dressing up for a special occasion.
The centerpiece of this design is the intricate, square motif, which features a lovely balance of floral elements and geometric openwork. While it looks complex, the motif is built upon simple chain spaces and double crochet clusters, making it a rewarding project for adventurous beginners and intermediate crocheters alike.

Key Features of the Starlight Blossom Motif
- Delicate Texture: The combination of chain spaces and clusters creates a highly decorative, lacy texture.
- Clean Join: The final round of the motif is structured for easy joining, resulting in a continuous, elegant fabric.
- Customizable Sizing: The final garment size is determined by the number of motifs used, making it easily adaptable to any body shape.
Design Guidance
This pattern provides the guide for the individual motif. The garment is constructed by joining motifs into a grid. For sizing, typically:
- Vest (Small/Medium): 4-5 motifs wide for the front and 4-5 motifs wide for the back.
- Blouse (Longer/Larger): More motifs in both width and length, with sleeves built from a few motifs or simple edging.
- Fit: The motifs provide natural stretch and drape, so measure your width (across the bust/back) and height (shoulder to desired hem) in motifs before starting.
📚 Abbreviations & Terminology
| Abbreviation | Meaning |
| ch | Chain |
| st(s) | Stitch(es) |
| sl st | Slip Stitch |
| sc | Single Crochet |
| dc | Double Crochet |
| tr | Treble Crochet (Yarn over twice) |
| sk | Skip |
| ch-sp | Chain space |
| rep | Repeat |
🧶 Materials & Tools
- Yarn: Light Worsted Weight (Category 3/DK) or Fine Weight (Category 2) cotton or cotton blend yarn. A smooth yarn is recommended to highlight the stitch definition.
- The video suggests a thin yarn for a light drape.
- Hook: A hook size appropriate for your yarn weight.
- 3.5 mm or 4.0 mm is a good starting point for DK/Light Worsted.
- Tools: Scissors and a tapestry needle for weaving in ends.
📏 Gauge & Sizing
- Gauge: Not critical for a motif-based garment, but vital for consistency.
- One Finished Motif should measure approximately 4 to 5 inches (10–12.5 cm) depending on your yarn and tension.
- Sizing Guideline: To determine the total motifs needed:
- Measure the width of one finished motif.
- Measure your bust circumference and divide by 2 (for the front or back panel).
- Divide your panel width (from step 2) by the motif width (from step 1). Round up to the nearest whole number. This is the number of motifs wide for the front and back.
- Motifs are generally joined in a simple grid (e.g., 4 x 5, 5 x 6, etc.).
⭐️ Part 1: The Starlight Blossom Motif
This pattern creates a square motif that can be joined as you go (JAYG) or seamed after all are made.

Round 1: Foundation Ring and Center Points
- Make a Magic Ring (MR) or Chain 4 and sl st to first ch to form a ring.
- Ch 3 (counts as 1 DC). Work 11 DC into the ring. (Total 12 DC).
- Sl st to the top of the beg Ch 3 to join.
- [12 DC]
Round 2: Establishing the Lace
- Ch 1. SC in the same st.
- Ch 5. Sk next 2 DC.
- *SC in the next DC. Ch 5. Sk next 2 DC.* Rep from * 3 times.
- Join with sl st to the first SC.
- [4 SC, 4 Ch-5 loops] (This forms the foundation for the four sides).
Round 3: Squaring the Motif
- Sl st into the first Ch-5 loop.
- First Corner: Ch 3 (counts as 1 DC). Work 3 DC, Ch 3, 4 DC into the same Ch-5 loop.
- First Side: Ch 3. SC in the next SC st. Ch 3.
- Second Corner: Work (4 DC, Ch 3, 4 DC) into the next Ch-5 loop.
- Rep Steps 3 and 4 twice more.
- Rep Step 3 once more.
- Sl st to the top of the beg Ch 3 to join.
- [4 corners: 8 DC groups with Ch-3 sp, 4 sides: SC with Ch-3 sp]

Round 4: Final Edging (Ready for Joining)
- Ch 1. SC in the same st (top of joining st).
- SC in the next 3 DC.
- Corner: Work (2 SC, Ch 2, 2 SC) into the Ch-3 corner space.
- SC in the next 4 DC.
- Side: Ch 3. SC in the next SC st. Ch 3.
- SC in the next 4 DC.
- Rep Steps 3 through 6 twice more.
- Rep Steps 3 and 4 once more.
- Omit the final SC in the joining st and sl st to the first SC to join.
- [This round should create 4 neat corners with Ch-2 spaces and straight sides.]
🔗 Part 2: Joining the Motifs
You should make one complete motif first. Then, you can join the rest as you go (JAYG) during their final round (Round 4). The JAYG method is highly recommended for a seamless finish.

Joining as You Go (JAYG)
When working Round 4 of the second (and subsequent) motif, you will replace the Ch 2 corner and the Ch 3 side spaces with Sl St or SC joins to the corresponding chain spaces of the finished motif.
Joining a Corner
- When you reach the Ch-2 corner of the new motif:
- Work 2 SC into the corner space.
- Ch 1. Remove hook from loop.
- Insert hook into the Ch-2 corner space of the finished motif.
- Reinsert hook into the loop and pull through (Sl st join).
- Ch 1.
- Work 2 SC into the same corner space of the new motif.
Joining a Side
- When you reach a Ch-3 side space of the new motif:
- Ch 1. Remove hook from loop.
- Insert hook into the Ch-3 side space of the finished motif.
- Reinsert hook into the loop and pull through (Sl st join).
- Ch 1.
- Continue to the next SC on the new motif.
Building the Garment
- Front and Back Panels: Join your motifs into two large rectangles or squares based on your sizing needs (e.g., 4×5 grid).
- Shoulders: Join the front and back panels along the top edge, connecting two to three motifs on each side, leaving a space in the center for the neck opening.
- Sides: Join the front and back panels along the side edges, leaving the top section unjoined for the armholes (sleeves).
👚 Part 3: Garment Edging & Finishing
Once all motifs are joined and the shoulder/side seams are complete, you will work an edging around all openings (neckline, armholes, and hem) to create a neat, finished look.

Neckline Edging
- Join yarn with a sl st anywhere on the neckline edge.
- Round 1: Ch 1. Work SC evenly around the entire neckline opening. Work 1 SC into each SC st and 1 or 2 SC into each chain space or side of a DC. The goal is a flat, even edge. Sl st to first SC.
- Round 2: Ch 1. SC in each SC around. Sl st to first SC.
- Optional: Add a Round of Sl St for a clean, tight border.
Armhole Edging (Sleeves)
Repeat the Neckline Edging steps around both armholes, ensuring the stitch count is consistent for both sides.
Hem Edging
The hem usually requires a more decorative finish to complement the lacy body.
- Join yarn with a sl st anywhere on the hem.
- Round 1 (Foundation): Work SC evenly around the entire hemline. Sl st to first SC.
- Round 2 (Shell Stitch Edge): Ch 3 (counts as 1 DC). Work 2 DC in the same st. Sk 2 SC.
- *SC in the next SC. Sk 2 SC. 5 DC in the next SC. Sk 2 SC.* Rep from * around.
- Join with sl st to the top of the beg Ch 3.
- Round 3 (Picot Edge): Ch 1. SC in the same st.
- *Work (SC, Ch 3, Sl st into the first ch) in the next 3 DC. SC in the next DC. Sk 1 DC. SC in the next SC (from the previous round).* Rep from * around.
- Sl st to the first SC to join.
Video Tutorial:
🧺 Part 4: Final Touches
- Weaving: Use your tapestry needle to carefully weave in any remaining yarn ends on the inside (wrong side) of the garment. Ensure they are secured firmly to prevent unraveling.
- Blocking: Blocking is highly recommended for motif-based garments.
- Gently soak the finished garment in lukewarm water with a small amount of wool wash.
- Squeeze out excess water (do not wring).
- Pin the garment flat to a mat or towel, gently stretching the motifs into their perfect square shape.
- Allow to dry completely before unpinning and wearing.
Your beautiful Starlight Blossom Blouse or Vest is now ready to shine!


