
Welcome back to the blog, fellow yarn enthusiasts!
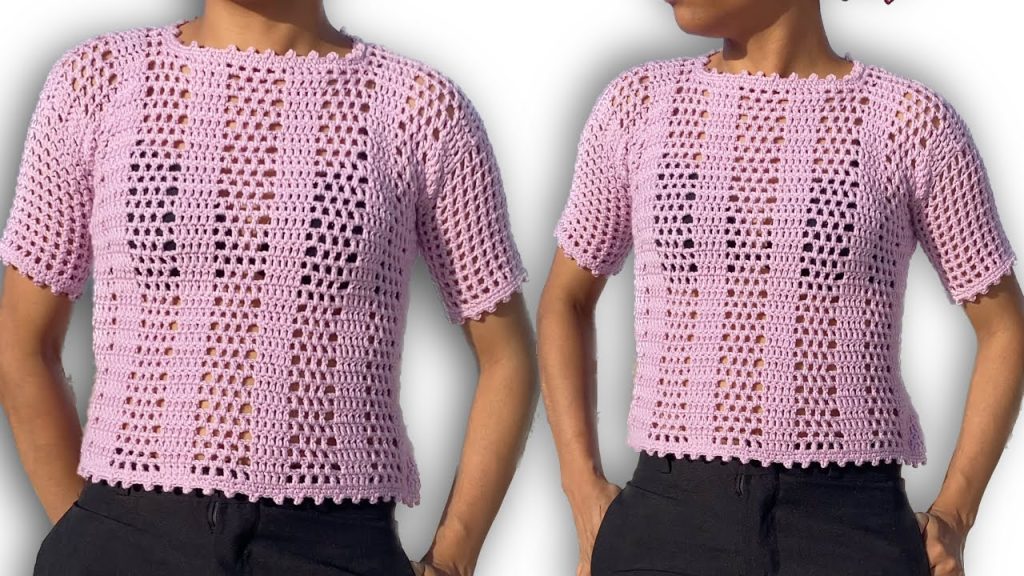
Today, we are thrilled to share the pattern for a versatile and lightweight top, crafted using a gorgeous stitch we’re calling the “Solid Block and Open Mesh”. This beautiful, airy texture is quick to work up and creates a fabric with fantastic drape, perfect for a breezy summer blouse or a layering piece.
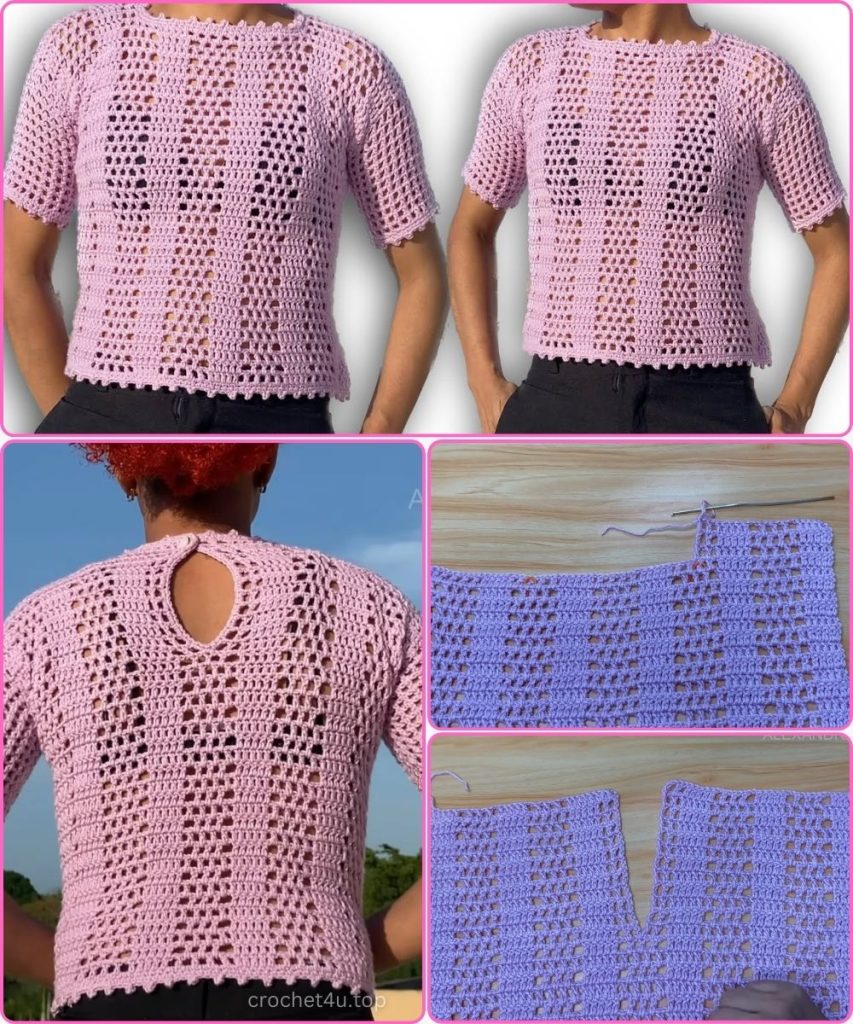
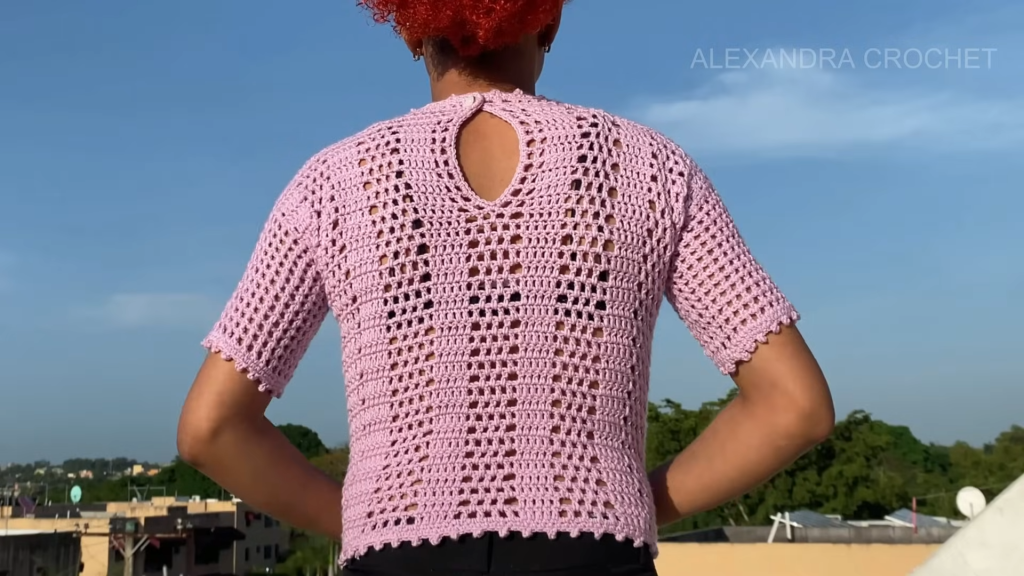
The design of this blouse is wonderfully clever, built from two main panels and featuring a thoughtful back slit for easy wear and a neat, finished look. If you can double crochet, you can master this pattern!
Let’s grab our hooks and get started on this easy and fast project!
🧶 Materials & Sizing
This blouse is designed to be customizable based on your unique body measurements. Take these key measurements before beginning your project!
- The Yarn:Lightweight or DK Weight (Weight 3).
- Recommendation: A smooth, anti-pilling acrylic or a cotton blend will showcase the stitch definition beautifully and provide excellent drape.
- The Hook: A size that achieves a soft, drapey fabric with your chosen yarn, typically 4.0mm to 4.5mm.
- Tools:
- Measuring Tape (Crucial for following the custom-fit instructions).
- Stitch Markers (To mark armhole openings and neck slit split).
- Tapestry Needle for seaming.
Custom Sizing Guide:
- Bust Circumference: Measure around the fullest part of your bust.
- Starting Width: Divide your Bust Circumference measurement by two. This is the finished width required for each of your two panels (front and back).
- Total Length: Measure from your shoulder to where you want the hem to fall.
- Neck/Shoulder Depth: Measure from the base of your neck to the top of your shoulder (this determines the size of the shoulder “straps”).
- Armhole Depth: Measure the circumference of your upper arm and divide by two (this is the vertical opening you will leave unseamed at the sides).
📚 Abbreviations & Key Terms (US Terminology)
- Ch: Chain
- St(s): Stitch(es)
- Sl St: Slip Stitch
- SC: Single Crochet
- DC: Double Crochet
- Sk: Skip
- Ch-sp: Chain Space
- Picot St: Chain 3, Sl St into the first chain. (Used for the final decorative edging).
- M.P.: Mesh Point (Refers to the single DC in a Ch-1 space in the Mesh sections).
✏️ The “Solid Block and Open Mesh” Stitch Pattern
This pattern is a simple two-row repeat, built upon a chain multiple that ensures you start and end with the solid, structural block section.
- Chain Multiple: Start with a number of chains that is a Multiple of 14, PLUS 5 (for turning/anchor and foundation chain balance).
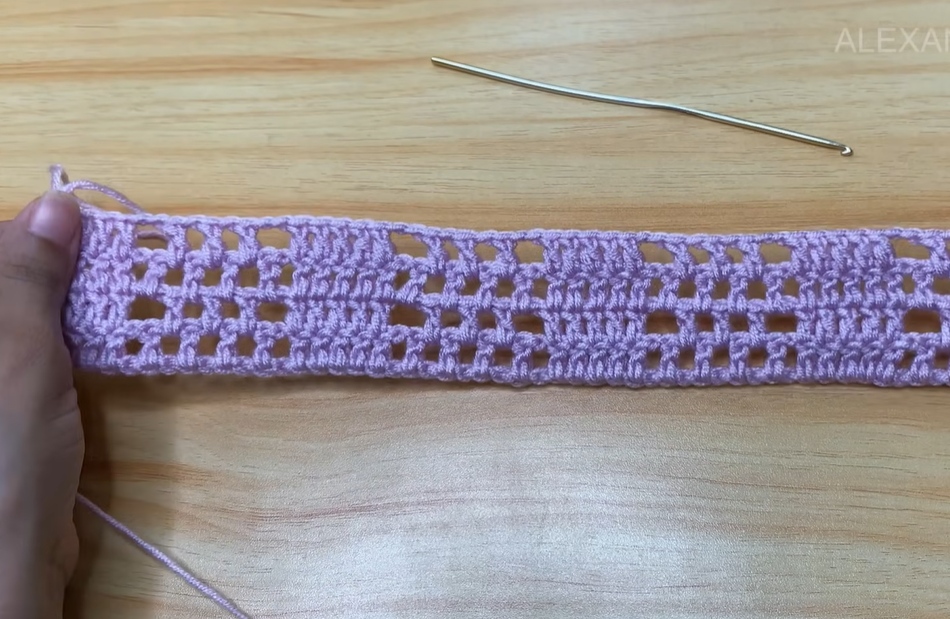
Row 1 (The Open Mesh Foundation):
- Foundation: Ch your calculated length, then Ch 3 (counts as first DC).
- Solid Block Start: DC into the 4th chain from the hook, and DC into the next 3 chains (Total 5 DC, including the Ch 3 turn).
- Mesh Section: [Ch 1, Sk 1 chain, DC in the next chain]. Repeat the sequence in the brackets 4 times. (You should have 4 open squares/boxes).
- Repeat: Ch 1, Sk 1 chain, 5 DC in the next 5 chains.
- Repeat Step 3 and 4 across the row. The row should end with a 5 DC block.
- Turn.
Row 2 (The Concentrated Mesh Row):
- Solid Block: Ch 3 (counts as first DC), DC in the next 4 DC below (Total 5 DC).
- Concentrated Mesh Setup: Ch 2. Sk the first Ch-1 space and the first DC of the Mesh Section.
- Work [DC in the next Ch-1 space, Ch 1]. Repeat twice (Total 3 DCs separated by Ch 1 spaces).
- Connect: Ch 2. Sk the last DC of the Mesh Section and the final Ch-1 space.
- Repeat: DC in the next 5 DC block.
- Repeat Steps 2-5 across the row. The row should end with a 5 DC block.
- Turn.
Row 3 (Repeat of Open Mesh Foundation):
- Solid Block: Ch 3 (counts as first DC), DC in the next 4 DC below (Total 5 DC).
- Mesh Section: Ch 1, DC into the first Ch-2 space. [Ch 1, DC in the next Ch-1 space]. Repeat twice. Ch 1, DC into the next Ch-2 space. (You should again have 4 open spaces/boxes).
- Repeat: Ch 1, DC in the next 5 DC block.
- Repeat Steps 2-3 across the row. The row should end with a 5 DC block.
- Turn.
Continue repeating Row 2 and Row 3 until you reach the desired length for the main body of the blouse, before the shoulder shaping begins.

👚 Garment Panel Construction
You will create two main panels: a Front Panel (full width, full length, with a neck opening) and a Back Panel (full width, split for head entry).
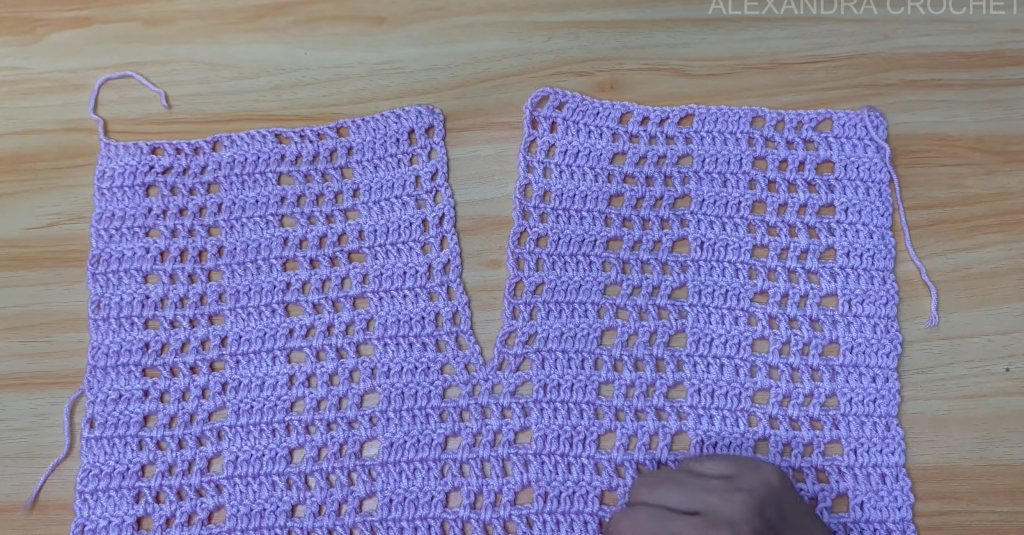
1. The Front Panel
- Body: Work the pattern (repeating Rows 2 & 3) until you reach the necessary length for the blouse body (e.g., 35 cm in the video).
- Shoulder Shaping (Neckline Creation):
- Find the center of your work and place markers to indicate the width of your neck opening. Ensure the remaining width on either side matches your desired shoulder strap width (e.g., 11 cm in the video).
- Continue working the pattern across only one shoulder strap (the stitches up to the neck marker). Leave the rest of the row unworked.
- Work back and forth on this strap for 3-5 rows (or until you reach your full desired length, e.g., 40 cm). Fasten off.
- Attach yarn to the beginning of the other strap and repeat the process, working the same number of rows.
- The unworked central section forms the front neckline opening.
2. The Back Panel (With Slit)
- Body: Work the pattern until you reach a point where you want the back slit to start (e.g., 26 cm in the video).
- Slit Split: Find the center of the panel and place a stitch marker. The slit must be wide enough to allow the garment to slip easily over the head (measure your head circumference for reference).
- Working the Halves:
- Work the pattern across the first half of the panel up to the center marker. Turn.
- Work back and forth on this first half only until you reach the required full length of the front panel (e.g., 40 cm). Fasten off.
- Attach yarn to the center edge of the second half of the panel and work back and forth until it reaches the same length. Fasten off.
- Note: In the video, the creator adds a final DC row at the top edge of the slit for stability to potentially add a button closure, though this is optional.
🧵 Assembly, Seaming, and Slit
Once both panels are complete, it’s time to join them into the garment shape.
- Shoulder Seams: Align the front and back pieces, right sides together (or preferred seaming side). Using a tapestry needle and a running stitch or whip stitch, seam the shoulder straps together. Secure the yarn tightly.
- Side Seams: Using your measured armhole depth (e.g., 13 cm in the video), place a marker at the bottom of the desired armhole opening.
- Align the side edges and seam the sides together from the bottom hem up to the armhole marker. Secure and weave in ends.
✨ Sleeve and Final Edging
The final steps involve finishing the raw edges for a polished look.
1. Sleeve Edging (Mesh Repeat)
- Foundation Round (SC): Join yarn at the underarm seam. Ch 1. Work a round of SC evenly around the armhole opening (approximately 2 SC per DC row and 1 SC per SC row edge). Sl St to the first SC.
- Mesh Rounds:
- Round 1: Ch 4 (counts as DC + Ch 1). [Sk 1 SC, DC in the next SC, Ch 1]. Repeat the bracketed sequence around. Sl St to the 3rd chain of the starting Ch 4.
- Subsequent Rounds: Ch 4 (counts as DC + Ch 1). [DC in the next DC below, Ch 1]. Repeat around. Sl St to the 3rd chain of the starting Ch 4.
- Repeat these rounds until the sleeve reaches the desired length (e.g., 12 rounds in the video).
- Final Sleeve Picot Edge:
- Foundation: Ch 1, SC in every DC and Ch-1 space around. Sl St to join.
- Picot Finish: Ch 1. [SC in the next 3 SC, Picot St (Ch 3, Sl St into the first chain)]. Repeat the bracketed sequence around. Sl St to join. Fasten off.
2. Neckline and Hem Edging
Apply the Picot Edging finish to the remaining raw edges:
- Neckline/Back Slit: Join yarn at the bottom of the back slit. Work an even round of SC around the entire back slit and front neckline opening. Sl St to join. Follow this with the Picot Finish ([SC in 3 SC, Picot St]).
- Bottom Hem: Join yarn at the bottom hem. Work an even round of SC along the bottom edge. Follow this with the Picot Finish ([SC in 3 SC, Picot St]).
Once all your ends are woven in, your beautiful Solid Block and Open Mesh Blouse is complete and ready to wear! Enjoy the flattering drape and the charming texture of this elegant garment.


