
Hello, cherished members of the crochet community! Today, we are diving into a truly exquisite project that combines delicate lacework with a striking floral centerpiece. This motif, which I call the Blooming Lace Hexagon, is designed to be visually stunning yet surprisingly simple to master. It works up into a beautiful hexagonal shape that is later squared off, making it perfect for creating lightweight, airy blankets, throws, or even lacy scarves. Get ready to transform your yarn into a masterpiece of texture and light!
✨ Project At A Glance
| Skill Level | Intermediate |
| Finished Size | Approximately 5.5 inches (14 cm) across after squaring |
| Construction | Worked in the round from the center out |
| Yarn Recommendation | DK (Light Worsted/Size 3) or Worsted (Medium/Size 4) weight yarn. Cotton or a cotton blend is highly recommended for stitch definition. |
🧶 Materials and Preparation
This pattern is a fantastic way to play with color—you can use one color for a classic look or three contrasting shades to emphasize the central flower and the lace detail.
- Yarn:
- Color A (Center/Flower): Approx. 10 yards
- Color B (Lace/Squaring): Approx. 15 yards
- Hook: Size G/6 (4.0 mm) or size required to achieve gauge.
- Notions: Yarn needle for weaving in ends, scissors.
📖 Essential Stitch Abbreviations (US Terms)
It’s always a good idea to review your abbreviations before starting!
- Ch: Chain
- Sl St: Slip Stitch
- Sc: Single Crochet
- Hdc: Half Double Crochet
- Dc: Double Crochet
- Tr: Treble Crochet (Yarn over twice)
- St(s): Stitch(es)
- Sp: Space
- Sk: Skip
- Beg: Beginning
- Picot: Ch 3, Sl St into the first chain.
- Shell: 3 Dc in the same stitch or space.
- Puff St: [Yo, insert hook into St, Yo, pull up a loop] 4 times in the same stitch (9 loops on hook). Yo, pull through all 9 loops. Ch 1 to secure.
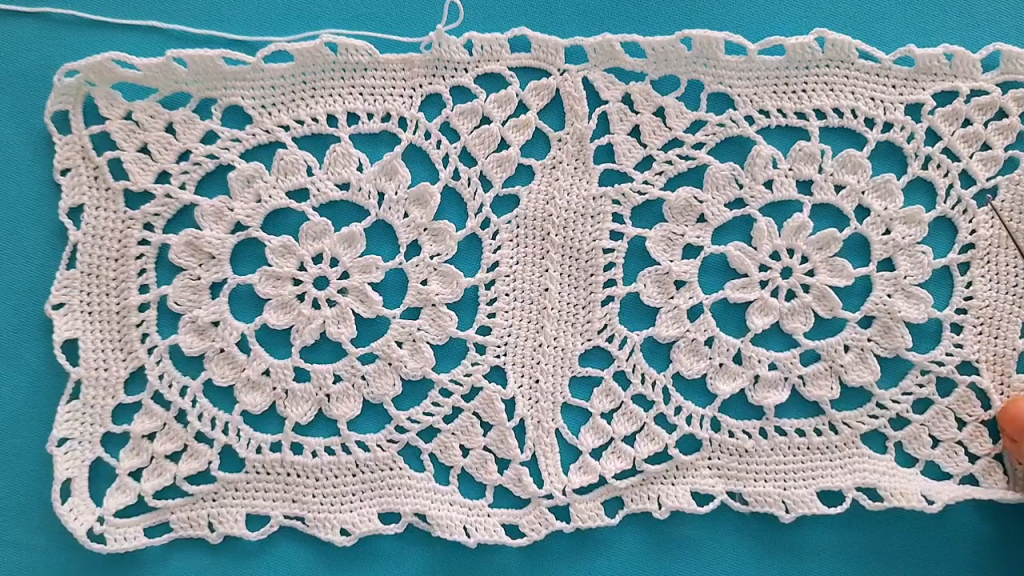
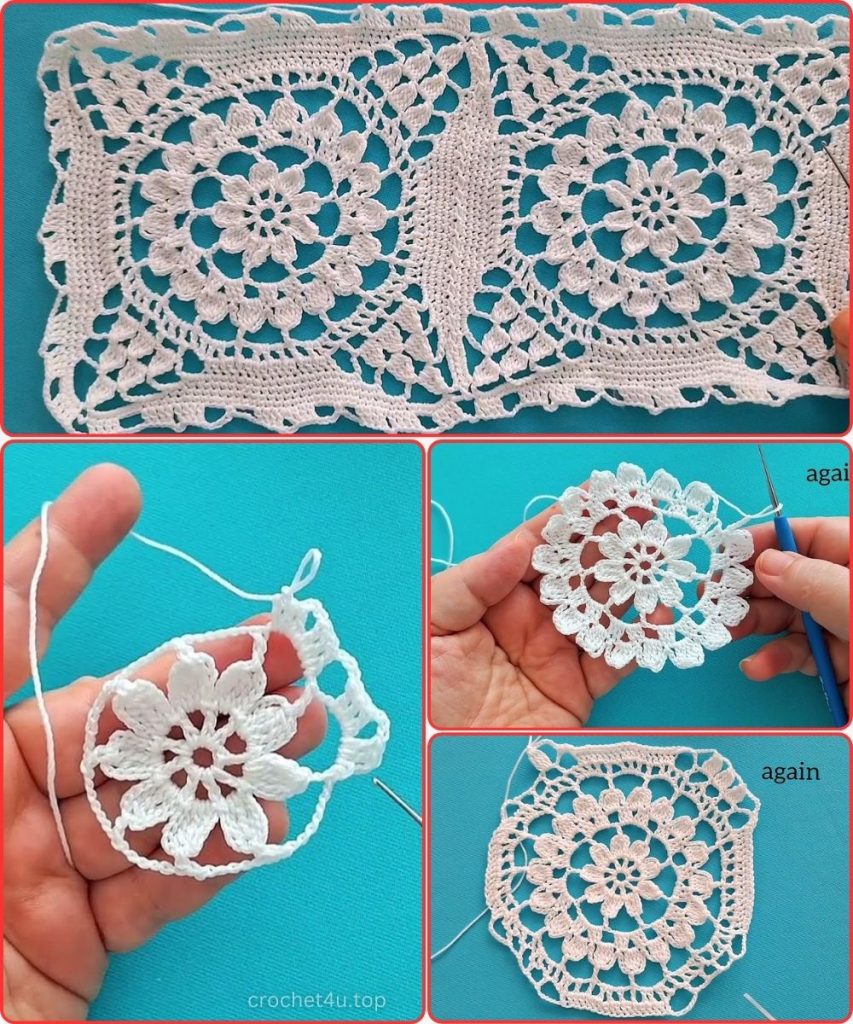
🌸 The Blooming Lace Hexagon Motif Pattern
This motif is worked in 5 rounds, starting with the floral center and ending with a squared border.

Start: Using Color A (Flower Color).
Magic Ring (or Ch 4, Sl St to first Ch to form a ring).
Round 1: Center Foundation
Ch 2 (does not count as a St), 12 Hdc into the ring. Join with a Sl St to the first Hdc. (12 Hdc)
Round 2: First Petal Layer
Ch 1 (does not count as a St). (1 Sc in the first St, Ch 5, Sk 1 St) 6 times. Join with a Sl St to the first Sc. (6 Sc, 6 Ch-5 loops)
Fasten off Color A.

This round creates the foundation loops for the puffy petals.
Round 3: The Blooming Petals
Join Color B (Lace Color) in any Ch-5 loop with a Sl St.
Ch 1 (does not count as a St). In the same Ch-5 loop: (Sc, Hdc, Puff St, Hdc, Sc).
(In the next Ch-5 loop: Sc, Hdc, Puff St, Hdc, Sc). Repeat from * to * 5 more times. Join with a Sl St to the first Sc. (6 Petals made of 1 Puff St and 4 supporting stitches)
This round establishes the beautiful 6-sided flower shape.
Round 4: Creating the Lace Boundary (The Hexagon)
Ch 1 (does not count as a St), 1 Sc in the first St.
Ch 3, Sk the next Hdc, 1 Dc in the top of the Puff St, Ch 3, Sk the next Hdc and Sc, 1 Sc in the next Hdc.
Repeat from * to * 5 more times, ending the last repeat with a Sl St join to the first Sc. (12 Dc, 12 Sc, 12 Ch-3 Sps)
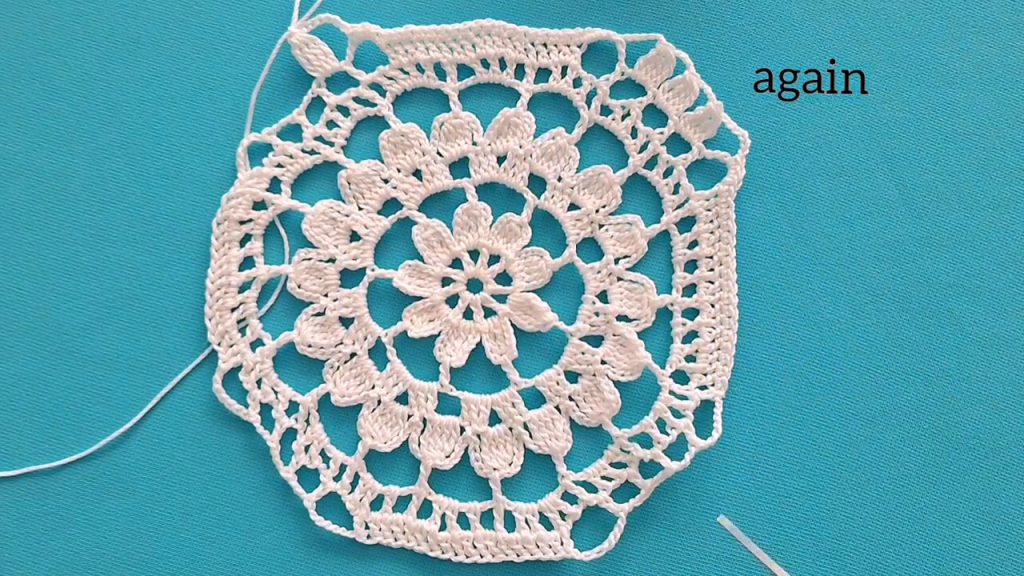
You now have a delicate, lacy hexagon shape.
Round 5: Squaring the Motif
We will now use the Dc and Ch-3 spaces from Round 4 to create the square shape.
Sl St into the first Ch-3 Sp. Ch 3 (counts as first Dc).
In the same Ch-3 Sp, work 2 Dc (Shell made).
In the next Dc, work 1 Dc. In the next Ch-3 Sp, work (3 Tr, Picot, 3 Tr) – This is a Corner. In the next Sc, work 1 Dc. In the next Ch-3 Sp, work 3 Dc (Shell made).
Repeat from * to * 3 more times.
The first side is worked after the first Shell: 1 Dc in the next Dc, 3 Dc (Shell made) in the next Ch-3 Sp.
The final corner sequence should bring you back to the beginning: 1 Dc in the next Dc, (3 Tr, Picot, 3 Tr) in the next Ch-3 Sp (Corner), 1 Dc in the next Sc. Join with a Sl St to the top of the beginning Ch 3.
Fasten off Color B.
This round is the longest and most crucial, as it transforms the hexagonal shape into a perfect square with clear, defined corners.

🤝 Joining Your Motifs
If you are creating a larger project, you will need to join your finished squares. The Seam-As-You-Go method offers a clean, professional finish.
- Preparation: Complete your first motif fully. For all subsequent motifs, complete them only up to the end of Round 4.
- Joining on Round 5: As you work Round 5 of the second motif, you will replace certain Chain stitches with a slip stitch into the corresponding space on the first motif.
- Joining on Sides: When you reach a space where you would normally
Ch 1(or have a chain separating shells), replace it with:Ch 1, Sl St into the corresponding Ch-1 Sp of the joined motif, Ch 1. - Joining at Corners: When working the (3 Tr, Picot, 3 Tr) corner, replace the Picot:
3 Tr, Ch 1, Sl St into the Picot of the completed motif, Ch 1, 3 Tr. This secures the corners perfectly.
- Joining on Sides: When you reach a space where you would normally
Video Tutorial:
🛀 Finishing and Care
You’re almost done! A beautiful handmade item deserves a beautiful finish.
- Weaving: Use your yarn needle to securely weave in all ends on the back side of the work. Take care not to pull the yarn too tightly, which can distort the edges.
- Blocking: Blocking is essential for this lacy motif! It opens up the delicate lacework and ensures that all your squares are uniform in size and shape, which is critical for a smooth final join.
- Process: Wet the motif thoroughly or steam lightly. Gently stretch the square and pin all four corners and the centers of the sides to a foam blocking mat, ensuring the motif is perfectly square.
- Patience: Let the motif dry completely before unpinning.
Enjoy your beautiful new Blooming Lace Hexagon project!


