
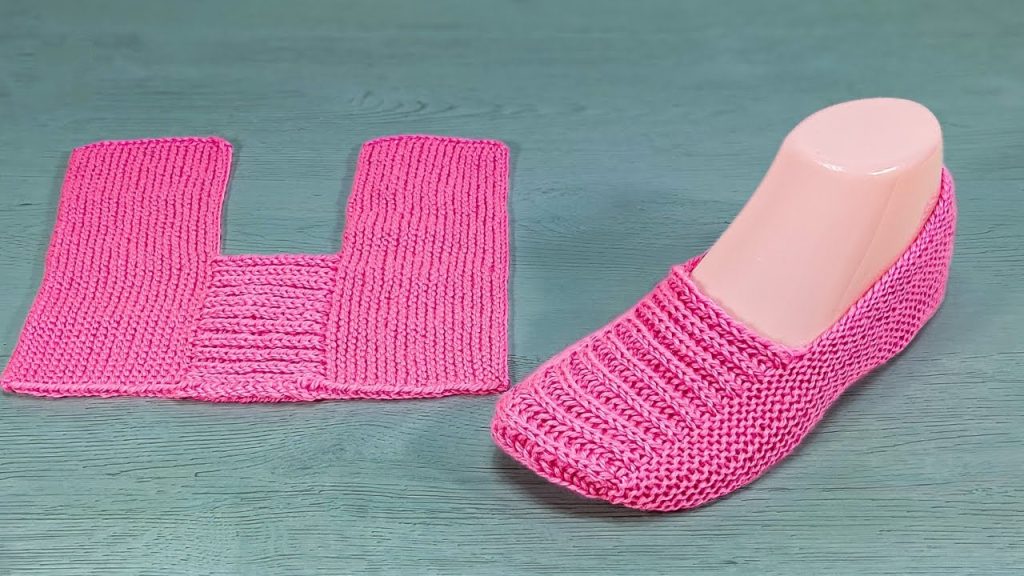
Hello, fellow knitters! Meet the Foldover Cozy Slipper, a project that proves you don’t need complicated shaping or short rows to create a perfectly fitting, comfortable shoe. The brilliant design pictured above uses a single, flat, T-shaped piece that simply folds and seams into a plush slipper with a tidy heel and a snug toe.
This pattern is written for Adult Medium (Women’s US size 7-9 / EU 38-40), primarily using the easy-to-master Garter Stitch (knit every row) for maximum cushion and durability.
🛠️ Materials Needed
- Yarn: Approximately 150 – 180 yards (135 – 165 meters) of a soft, bulky Worsted weight (Aran/10-ply) yarn.
- The bright pink yarn in the photo looks like a smooth acrylic or a resilient wool blend.
- Needles: A pair of US size 8 (5.0 mm) straight knitting needles.
- Using a slightly larger needle helps create a softer, thicker fabric ideal for slippers.
- Notions:
- Tapestry Needle with a blunt tip for robust seaming.
- Sharp Scissors.
- Measuring tape.
📏 Gauge (Essential for Foot Length)
- Gauge: 16 stitches and 32 rows (16 garter ridges) equals 4 inches (10 cm) in Garter Stitch.
- Tip: Getting the correct gauge ensures the finished length (the distance from the toe to the heel) is accurate. Knit a swatch to confirm your tension before beginning.
ℹ️ Key Techniques & Abbreviations
The pattern is worked entirely flat, with simple increases and decreases.
- K = Knit
- P = Purl
- st(s) = Stitch(es)
- RS = Right Side
- WS = Wrong Side
- K2tog = Knit two stitches together (a decrease).
- M1L = Make 1 Left (a left-leaning increase).
- M1R = Make 1 Right (a right-leaning increase).
- Garter Stitch: Knit every row.
- Stockinette Stitch: Knit on RS rows, Purl on WS rows.
👣 The Pattern: Foldover Cozy Slipper (Adult M)
This pattern is worked in three main sections: the Side Panel (which becomes the cuff and heel), the Foot/Sole Panel (which becomes the sole and toe), and the Second Side Panel.
1️⃣ First Side Panel (Start)
This panel will become the side of the heel and the top cuff edge.
| Step | Instructions | Stitch Count |
| Cast On | Cast on 10 stitches. | 10 sts |
| Rows 1–20 | Work in Garter Stitch (Knit every row) for 20 rows (about 5 inches / 12.5 cm). This length forms the back heel. | 10 sts |

2️⃣ The Foot and Sole Panel (The Wide Section)
We now increase stitches to create the main, wide section that wraps under the foot.
| Row | Instructions | Stitch Count |
| Row 21 (RS) | K 10 sts. Cast on 24 stitches using the knitted cast-on or cable cast-on method. Turn. | 34 sts |
| Row 22 (WS) | Knit all 34 stitches. | 34 sts |
| Rows 23–34 | Continue working in Garter Stitch for 12 more rows (or 6 garter ridges). This establishes the width of the foot base. | 34 sts |

3️⃣ The Toe Section (The Ribbed Instep)
This section creates the textured top of the foot and the final toe shaping, utilizing Garter and Stockinette for the stripe effect seen in the photo.
| Row | Instructions | Stitch Count |
| Row 35 (RS) | K 10 sts. P 14 sts. K 10 sts. | 34 sts |
| Row 36 (WS) | K 10 sts. K 14 sts. K 10 sts. | 34 sts |
| Row 37 (RS) | K 10 sts. P 14 sts. K 10 sts. | 34 sts |
| Row 38 (WS) | K 10 sts. K 14 sts. K 10 sts. | 34 sts |
| Rows 39–54 | Repeat Rows 35–38 for a total of 4 repeats (16 rows total). This length covers the instep and toe. Adjust by adding/subtracting repeats to change foot length. | 34 sts |
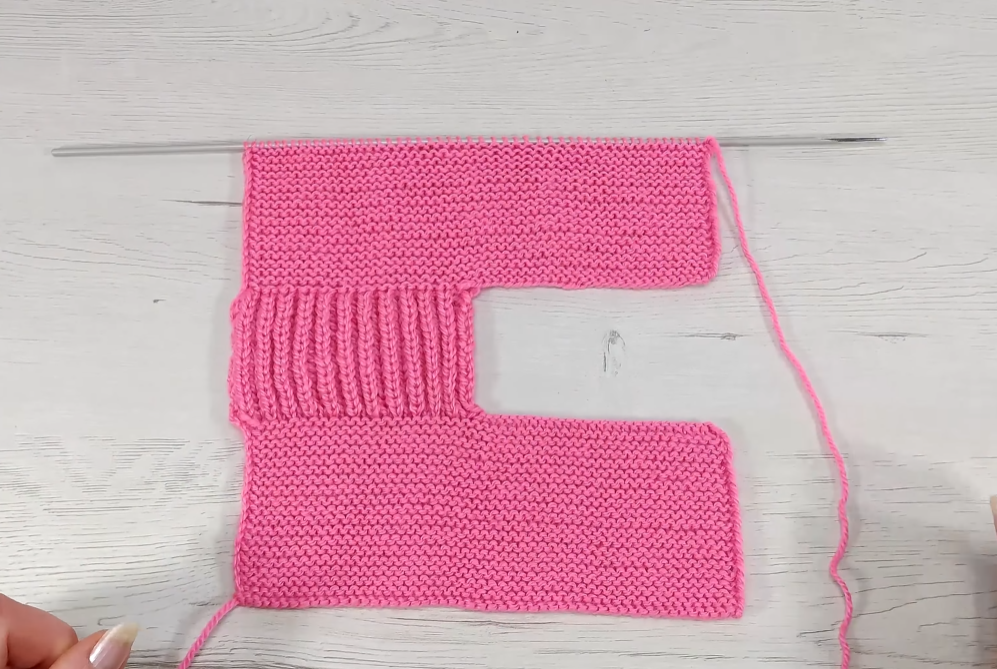
4️⃣ Second Side Panel (End)
We now decrease back down to the original 10 stitches to create the opposing side panel.
| Row | Instructions | Stitch Count |
| Row 55 (RS) | K 10 sts. K2tog twice. K 6 sts. K2tog twice. K 10 sts. | 30 sts |
| Row 56 (WS) | Knit all 30 stitches. | 30 sts |
| Row 57 (RS) | K 10 sts. K2tog twice. K 2 sts. K2tog twice. K 10 sts. | 26 sts |
| Row 58 (WS) | Knit all 26 stitches. | 26 sts |
| Row 59 (RS) | K 10 sts. K2tog twice. K2tog twice. K 10 sts. | 22 sts |
| Row 60 (WS) | Knit all 22 stitches. | 22 sts |
| Row 61 (RS) | Bind off 12 stitches (this forms the opening for the top of the foot). K the remaining 10 stitches. | 10 sts |
| Rows 62–81 | Work in Garter Stitch (Knit every row) for 20 rows. This matches the length of the first side panel. | 10 sts |
| Last Row | Bind off all 10 stitches loosely. FO, leaving a long tail (at least 30 inches / 75 cm) for seaming. | Bind Off |

🧵 Finishing and Seaming (The Fold)
This is the magic step! The T-shape folds into the perfect slipper form.
- Fold: Fold the piece so the long, wide section is centered, and the two 10-stitch side panels fold up and meet each other.
- Seam the Heel:
- Using the long tail, begin by seaming the two short edges of the side panels (Rows 20 and 62) together. This forms the back heel seam.
- Seam the Top of the Foot:
- Continue the seam down the center back, but stop when you reach the Bound Off Edge (from Row 61).
- Seam the Sole and Toe:
- Now, use the same working yarn to seam the two long, raw edges of the wide center section together. This seam runs from the back of the heel, under the foot, and curves up to meet the toe tip.
- Use the mattress stitch or a secure whipstitch for the sole. When you reach the toe tip, cinch the seam tight for a neat, rounded toe.
- Final Touches: Secure all seams firmly and weave in all yarn ends.
- The Second Slipper: Repeat the entire pattern for the second slipper.
Video Tutorial:
✨ Customization and Sizing
Adjusting Foot Length (Size)
The slipper length is controlled by the number of rows in the Foot and Sole Panel (Rows 35–54).
- For Size S/M (US 5-6): Reduce the number of repeats in Section 3 by one repeat (4 fewer rows).
- For Size L/XL (US 10-11): Increase the number of repeats in Section 3 by one or two repeats (4 or 8 more rows).
Adjusting Width (Girth)
- For a wider foot: Increase the number of stitches cast on in Row 21 by 4 stitches (cast on 28 instead of 24). This increases the width of the sole.
- For a narrower foot: Decrease the number of stitches cast on in Row 21 by 4 stitches (cast on 20 instead of 24).
Enhancing Comfort and Wear
- Non-Slip Soles: Since Garter Stitch is stretchy, apply a protective, non-slip base. Use liquid latex or non-slip fabric paint in dots or stripes on the sole once the slipper is finished and completely dry.
- Cuff Finish: For a more defined edge around the ankle opening, pick up stitches after seaming and work two rows of Seed Stitch (K1, P1) on smaller needles before binding off.


