

Welcome, crochet enthusiasts! Get ready to hook a motif that is an absolute showstopper. This square is designed to have a captivating depth, starting with a dense floral center that blossoms out into intricate lacework and finishes with a sharp, geometric frame. It’s the perfect size and complexity for an heirloom-quality blanket, pillow, or wall hanging.
This pattern is written using U.S. Crochet Terminology.
✨ Materials & Gauge
| Icon | Item | Notes |
| 🧶 | Yarn | Approx. 75–100 yards of a lightweight cotton or acrylic yarn (fingering, sport, or light worsted weight). Cotton thread (Size 10) can also be used for a smaller, more delicate doily square. |
| 鉤 | Crochet Hook | A hook size appropriate for your yarn. I recommend a 3.0 mm to 3.5 mm hook for a standard size or a 1.75 mm steel hook for thread. |
| ✂️ | Tools | Tapestry needle for weaving in ends, and scissors. |
| 📏 | Gauge | The finished square should measure approximately 6′′×6′′ after blocking. The dense floral center (after Rnd 3) should measure about 1.5′′ across. |
Export to Sheets
📚 Stitches & Special Techniques
Mastering these stitches and abbreviations will ensure your square looks perfect:
| Stitch | Abbreviation | Description |
| Chain | ch | Yarn over, pull through loop on hook. |
| Slip Stitch | sl st | Insert hook, yarn over, pull through work and loop on hook. |
| Single Crochet | sc | Standard single crochet. |
| Double Crochet | dc | Standard double crochet. |
| Treble Crochet | tr | Standard treble crochet (yarn over twice). |
| Picot | P | ch 3, sl st into the first ch made. |
| Standing Stitch | StSC/StDC | A method to start a new round without a slip stitch and chain. (Start with a sl knot on hook, insert hook, complete stitch). Use if preferred, otherwise use ch-3 for dc. |
Export to Sheets
🌸 Part 1: The Floral Medallion Center (Rounds 1–5)
We begin working in the round to create the solid, textured core.
Foundation:
- ch 4, sl st into the first ch to form a ring.
Round 1:
- ch 1 (does not count as a stitch).
- Work 12 sc into the ring.
- sl st to the first sc to join. (12 sc)
Round 2 (Petal Bases):
- ch 1.
- sc in the first st.
- ch 4.
- Skip 1 st.
- sc in the next st.
- Repeat from ** around.
- End with ch 4. sl st to the first sc to join. (6 ch-4 loops)
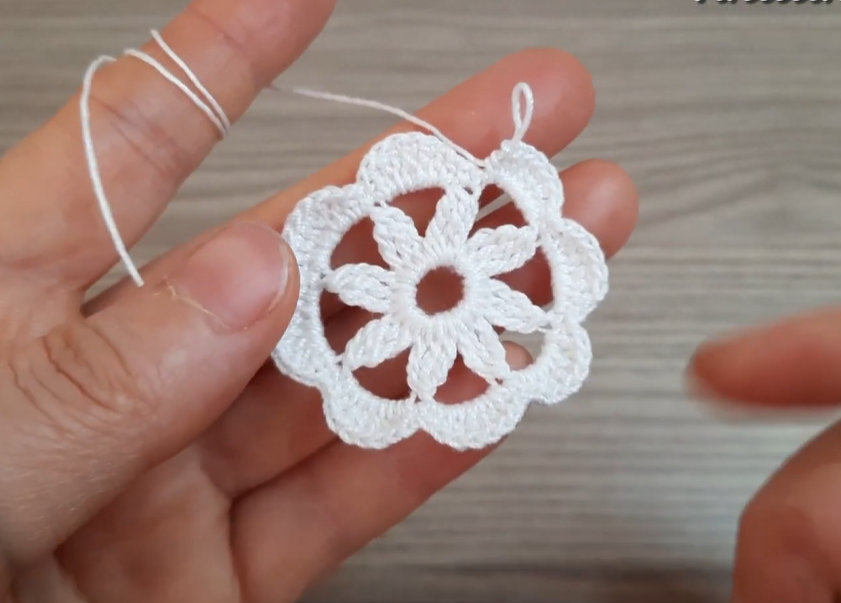
Round 3 (Petals):
- sl st into the first ch-4 space.
- ch 3 (counts as first dc).
- Work 3 dc, ch 1, 4 dc in the same ch-4 space. (This is a Petal).
- sc in the next sc.
- Work 4 dc, ch 1, 4 dc in the next ch-4 space.
- sc in the next sc.
- Repeat from ** around.
- sl st to the top of the starting ch-3 to join. (6 Petals)

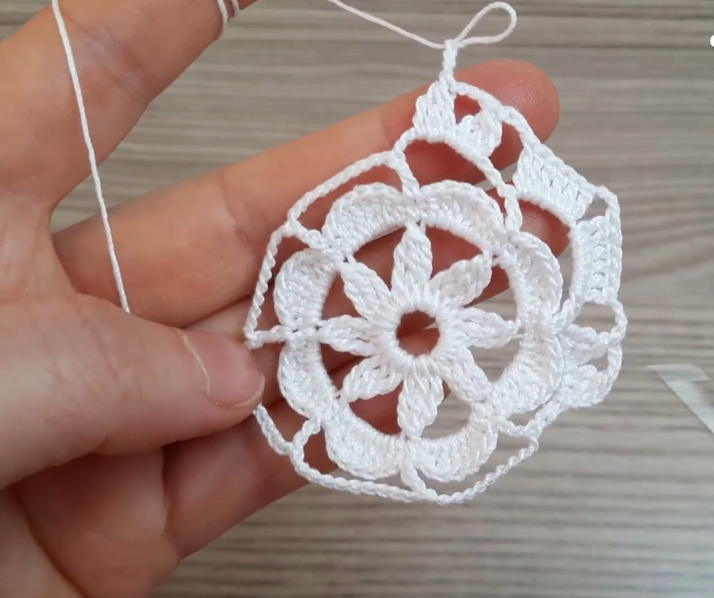
Round 4 (Lace Webbing):
- ch 1.
- sc in the first dc.
- ch 5.
- sc in the ch-1 space at the peak of the petal.
- ch 5.
- sc in the 4th dc of the same petal.
- sc in the sc between petals.
- Repeat from ** around.
- sl st to the first sc to join. (12 ch-5 loops)
Round 5 (Defining the Star):
- sl st into the first ch-5 space until you reach the center (3rd ch).
- ch 1.
- sc in the center of the ch-5 space.
- ch 5.
- In the next sc (the one at the petal peak), work (tr, ch 2, tr) (this forms the Star Point).
- ch 5.
- sc in the center of the next ch-5 space.
- Repeat from ** around.
- sl st to the first sc to join. (6 Star Points, 6 sc, 12 ch-5 loops)
📐 Part 2: Squaring the Star (Rounds 6–8)
This section transitions the circular/star shape into the foundation for the square border.
Round 6:
- ch 3 (counts as first dc).
- 4 dc in the starting ch-5 space.
- 5 dc in the next ch-5 space.
- Corner: In the ch-2 space of the Star Point, work (3 tr, ch 2, 3 tr).
- 5 dc in the next ch-5 space.
- 5 dc in the next ch-5 space.
- Corner: In the ch-2 space of the next Star Point, work (3 tr, ch 2, 3 tr).
- Repeat the Side (2 x 5 dc blocks) and Corner pattern twice more.
- sl st to the top of the starting ch-3 to join. (4 Corners, 4 Sides)
Round 7 (The Star Points):
- ch 1.
- sc in each of the first 5 dc.
- ch 3.
- Skip 4 dc.
- sc in the last 5 dc before the corner.
- Corner: In the ch-2 space, work (sc, ch 5, sc).
- Repeat from ** around.
- sl st to the first sc to join.
Round 8 (Diagonal Mesh):
- ch 5 (counts as dc + ch 2).
- Skip 2 sc. dc in the next sc.
- ch 2.
- dc in the center (2nd ch) of the ch-3 space.
- ch 2.
- Skip 2 sc. dc in the next sc.
- ch 2.
- Skip 2 sc. dc in the next sc.
- Corner: In the ch-5 space, work (dc, ch 2, dc, ch 2, dc).
- Repeat from ** around, ending with ch 2 and sl st to the 3rd ch of the starting ch-5.
💎 Part 3: The Geometric Border (Rounds 9–10)
This final section adds the geometric lacework and the small decorative clusters that frame the motif.

Round 9 (Small Flower/Cluster Edging):
- ch 1.
- sc in the first dc.
- ch 3.
- In the next ch-2 space, work (3 dc, P, 3 dc) (this creates the Clover Cluster).
- ch 3.
- sc in the next dc.
- ch 3.
- sc in the next dc.
- ch 3.
- Corner: In the center ch-2 space of the corner, work (tr, ch 3, tr).
- ch 3.
- Repeat from ** around.
- sl st to the first sc to join.
Round 10 (Final Square Frame):
- sl st into the ch-3 space.
- ch 5 (counts as tr + ch 1).
- tr in the same ch-3 space.
- ch 1.
- sc in the P of the Clover Cluster.
- ch 1.
- tr in the next ch-3 space.
- ch 3.
- tr in the next ch-3 space.
- ch 1.
- sc in the ch-3 space.
- ch 1.
- Corner: In the corner ch-3 space, work (tr, ch 5, tr).
- Repeat from ** around, replacing the starting ch 5 with a ch 2 and sl st to the 3rd ch of the starting ch-5 to join the last corner.
Video Tutorial:
📌 Finishing and Blocking
- Secure Ends: Fasten off your yarn, leaving a tail long enough to weave in securely. Use your tapestry needle to carefully weave in all loose ends on the back side of your work.
- Blocking (Crucial!): To make sure the star points and the final geometric frame are crisp and straight, blocking is non-negotiable.
- Dampen your square thoroughly (a gentle soak works best).
- Carefully pin the square to a flat, padded surface, pulling gently but firmly on the four outermost chain-5 corner spaces and the side points. Ensure all four sides are perfectly straight and the corners form 90∘ angles.
- Allow the motif to dry completely before unpinning.
You now have a magnificent Starflower Lace Mandala Square! What incredible project will you create by joining these exquisite motifs?


