
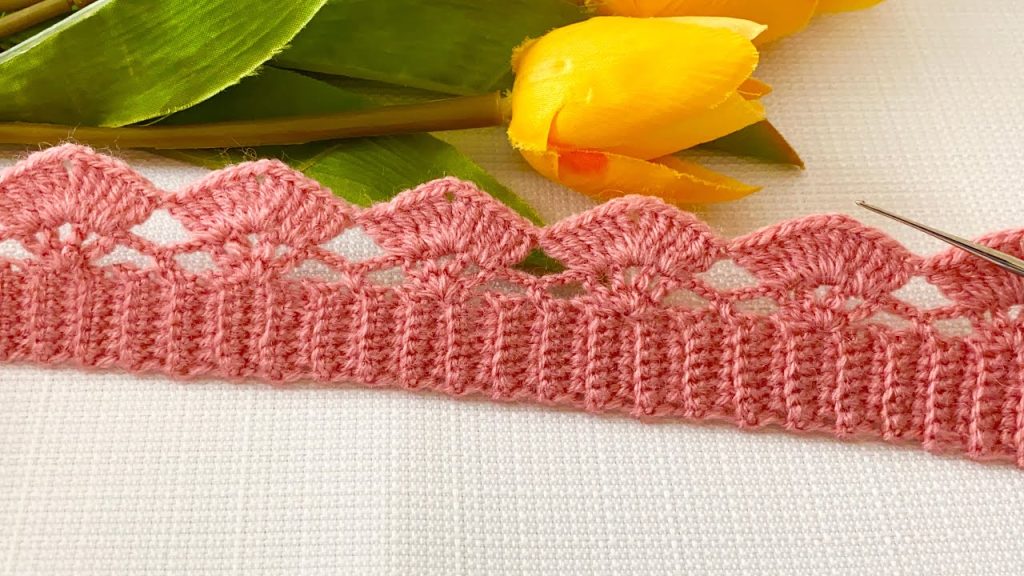
Step into the world of heirloom lace with the Sunset Shell Weave! This intricate pattern creates a luxurious, dense fabric composed of cascading shells and an elegant diamond net border. The gorgeous coral pink yarn highlights the rhythmic texture, making it look far more complicated than the simple 2-row repeat suggests. This fabric is ideal for stunning table runners, delicate shawls, or as a wide, scalloped edging for blankets.
⭐️ Project Blueprint and Advanced Techniques
| Feature | Detail |
| Skill Level | Advanced Intermediate. Requires focused counting and precise placement of stitches within chain spaces. |
| Stitches Used | Chain (ch), Slip Stitch (sl st), Single Crochet (sc), Double Crochet (dc), Treble Crochet (tr). |
| Construction | Worked flat in rows. The pattern is built upon the ch-spaces of the previous row, forming an interlocking structure. |
| Yarn Type | Fingering or Lace Weight cotton blend is best for achieving the crisp shell shape and open netting. |
| Pattern Repeat | The main texture repeats every two rows. |
Export to Sheets
🧵 Materials Selection & Precision Gauge
Yarn: Selecting for Definition
- Weight: Crochet Thread Size 10 or a Fingering Weight (Category 1) yarn. The sample appears to use a slightly thicker thread than standard Size 10, giving it a rich texture. Using a finer yarn is crucial for defining the individual dc stitches within the shells.
- Fiber: 100% Cotton or a high-quality Cotton/Bamboo blend is recommended. This fiber type will accept blocking well and provide excellent drape.
- Color: The beautiful Coral Pink shown in the sample, or any vibrant, solid color to showcase the texture.
- Yardage: Plan for 200−300 yards for a small runner or scarf, and 800+ yards for a full-sized shawl or throw.
Hook: The Precision Tool
- Size: 1.75 mm to 2.25 mm (Steel Hook US 7 to B/1). Use the smallest hook size that still allows you to work comfortably. Tight tension is key to preventing the shells from becoming floppy.
Notions & Blocking
- Tapestry Needle: For seamless weaving in of ends.
- T-pins and Blocking Mat: Absolutely Essential for lace. Blocking transforms the wrinkled fabric into a flat, elegant textile, opening up the net and defining the shell scallops.
Precision Gauge
Gauge is measured across two shell repeats.

- Shell Repeat Size: Two full shell sections should measure approximately 3 inches wide ×1.25 inches tall (measured at the top of the ch 4 arch).
- Starting Chain Calculation: The pattern repeats every 10 chains. Use the formula: 10×(number of shell repeats)+3 ch
- Example: For 8 shells across: 10×8+3=ch 83
📝 Pattern Instructions: The Foundation
This row establishes the first line of the open diamond net, which serves as the base for the solid shells.
Row 1 (Foundation Net – RS): Chain the required amount (e.g., ch 83 for 8 shell repeats). dc in the 4th ch from the hook (counts as dc and ch 1).
- ch 1, sk 1 ch, dc in the next ch. Repeat the sequence ch 1,sk 1 ch,dc in next ch across the entire chain. You will end with a dc in the last ch.
- Turn.
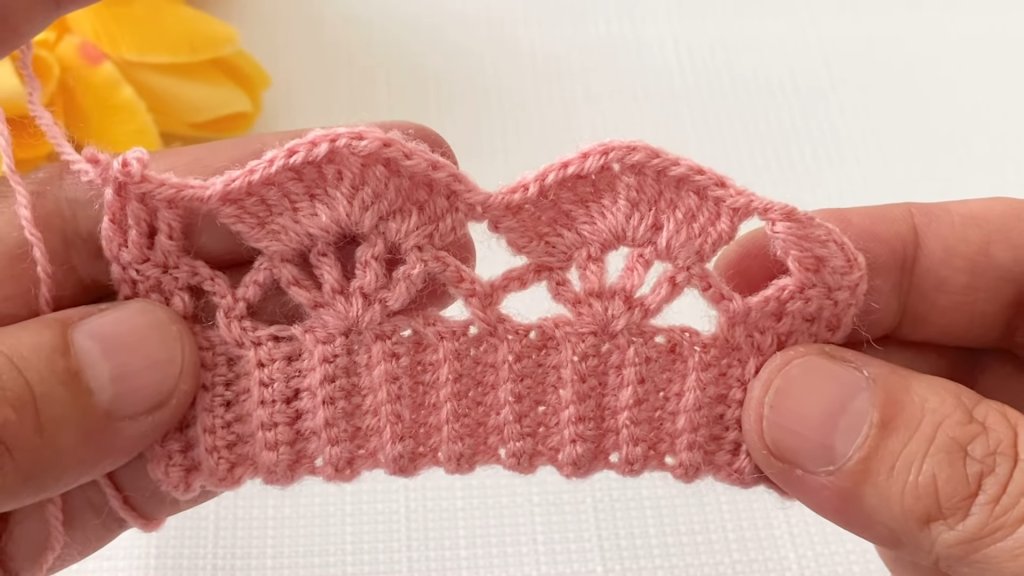
The 2-Row Repeating Pattern

Row 2 (Shell Creation – WS): ch 3 (counts as dc). 2 dc into the first ch 1-space. sc into the next ch 1-space.
- 7 dc into the next ch 1-space (This is the Full Shell). sc into the next ch 1-space.
- 7 dc into the next ch 1-space. sc into the next ch 1-space. Repeat the sequence 7 dc in ch 1-space, sc in ch 1-space across the row.
- End by placing 3 dc into the last ch 1-space, dc into the top of the turning chain from Row 1.
- Turn.
Row 3 (Connecting Net – RS): ch 5 (counts as dc and ch 2). sc into the center 4th dc of the first Full Shell.
- ch 4 (forms the connecting arch).
- sc into the sc from the previous row. ch 4.
- sc into the center 4th dc of the next Full Shell. Repeat across the row. You will end by placing sc in the center of the last Full Shell.
- ch 2, dc into the top of the turning chain ch 3 from Row 2.
- Turn.
Row 4 (Shell Offset – WS): ch 3 (counts as dc). 3 dc into the first ch 2-space. sc into the center ch of the next ch 4 arch.
- 7 dc into the ch 4 arch that sits over the sc of Row 2. sc into the center ch of the next ch 4 arch.
- 7 dc into the next ch 4 arch. sc into the center ch of the next ch 4 arch. Repeat the sequence 7 dc in ch 4 arch, sc in center ch of ch 4 arch across the row.
- End by placing 4 dc into the ch 5 arch (the turning chain) from Row 3.
- Turn.
Row 5 (Connecting Net Offset – RS): ch 5 (counts as dc and ch 2). sc into the sc from the previous row.
- ch 4. sc into the center 4th dc of the next Full Shell. ch 4.
- sc into the sc from the previous row. Repeat the sequence ch 4,sc in center 4th dc,ch 4,sc in sc across the row.
- End with ch 2, dc into the top of the starting ch 3 from Row 4.
- Turn.
Continue repeating Rows 2-5 for the length of your project. Note that Rows 2 and 3 build the original shell pattern, while Rows 4 and 5 offset the shells, creating the characteristic staggered weave.

💡 Troubleshooting and Advanced Notes
| Issue | Cause | Solution |
| Fabric ruffles/curls | Connecting chains (ch 4 in Net rows) are too loose or too long. | Reduce the connecting chain length to ch 3 or ch 2 until the piece lays flat. |
| Fabric pulls/tightens | Shells are too dense or chain length is too short. | Increase the shell size to 9 dc and/or increase the connecting chain length to ch 5. |
| Shells sag/are undefined | Tension is too loose. | Go down 0.5 mm in hook size to tighten the density. |
| Seamless Joining | Creating a wide tablecloth. | Join-As-You-Go: Work two strips and join them by replacing the center ch 4 of the Net Row (Row 3 or 5) with ch 2,sl st into the corresponding arch of the finished strip, ch 2. |
Video Tutorial:
🔨 Finishing and Legacy Blocking
Blocking is critical for the Sunset Shell Weave; it ensures the shell scallops are perfectly rounded and the diamond netting is crisp and geometric.
- Preparation: Weave in all loose ends.
- Soak and Sizing: Submerge the piece in cool water. For a very formal, stiff finish, add liquid starch. Gently press out excess water without twisting.
- Tension Pinning: Lay the damp fabric on a blocking mat. Using rust-proof T-pins:
- Pin the top and bottom edges straight.
- Pin the peak (4th dc) of every shell along both the straight and scalloped edges to open up the fans.
- Pin the center of the connecting ch arches to define the diamond net shape.
- Dry: Allow the piece to dry completely flat for 12−24 hours.
Your stunning Sunset Shell Weave is complete! What elegant heirloom will you create with this beautiful fabric?


