

Hello, stitch lovers! Today, we’re diving into a beautiful, open-work crochet pattern that combines delicate chain arches with pretty shell scallops. This creates a fabric that is both airy and structured, making it an excellent choice for light accessories like scarves or elegant curtains. The design is a simple two-row repeat that you’ll memorize quickly!
⚙️ Project Overview & Materials
- Finished Size (Swatch): Approximately 6 inches wide by 4 inches tall.
- Skill Level: Advanced Beginner / Intermediate. Requires basic stitches and working into chain spaces.
- Yarn: A fingering or sport weight cotton or cotton blend yarn is ideal for achieving the crisp, lacy look of the sample.
- Hook: A hook appropriate for your yarn. For the open lace in the image, try a hook one size larger than recommended for your yarn. A 3.0 mm to 3.5 mm hook is a good starting point for sport weight yarn.
- Notions: Tapestry needle for weaving in ends, scissors.
📖 Stitches & Abbreviations
- ch: chain
- sl st: slip stitch
- sc: single crochet
- dc: double crochet
- V-st: V-stitch (dc, ch 1, dc) in indicated stitch or space.
- Shell: 5 dc in the indicated stitch or space.
- sk: skip
- st(s): stitch(es)
- sp: space
📐 Gauge and Pattern Repeat
- Pattern Repeat: The stitch pattern repeats over a multiple of 12 chains, plus 2 for the starting chain.
- Gauge: For a light fabric, Row 3 should measure approximately 1.5 inches tall.
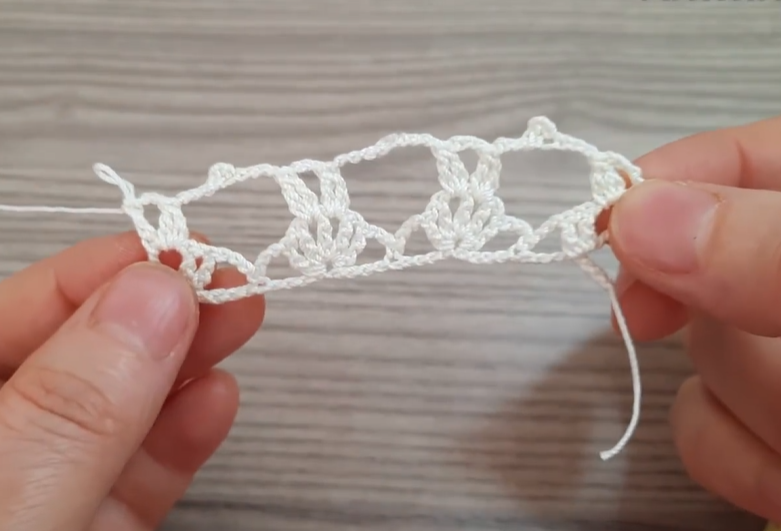
📝 The Scalloped Lace Panel Pattern
This pattern is worked in rows. For our swatch, we will create a width of two main repeating units.
Starting Chain
Ch 26 (2×12=24, plus 2).
Row 1: Foundation Mesh
This row sets up the base for the scalloped and arched pattern.
- Sc in the 2nd ch from the hook.
- Ch 5, sk 5 ch.
- V-st (dc, ch 1, dc) in the next ch. (This forms the center anchor for the scallop).
- Ch 5, sk 5 ch, sc in the next ch.
- Ch 5, sk 5 ch, V-st in the next ch.
- Ch 5, sk 5 ch, sc in the last ch.
- Turn.
Count check: You should have 2 V-stitches and 4 large ch-5 loops.
Row 2: Scallop Row (Texture)
This row works the decorative scallops (shells) and creates the open-work center.
- Ch 1, sc in the first sc.
- Ch 3, sc in the first ch-5 sp.
- Shell (5 dc) in the ch-1 sp of the next V-st.
- Sc in the next ch-5 sp.
- Ch 5, sc in the ch-5 sp on the other side of the central sc. (This forms the large, open arch).
- Shell (5 dc) in the ch-1 sp of the next V-st.
- Sc in the next ch-5 sp.
- Ch 3, sc in the last sc.
- Turn.

Count check: You should have 2 full Shells and 1 large ch-5 arch in the middle. The edges have ch-3 spaces.
Row 3: Connecting Arch Row (Mesh)
This row connects the shells and sets up the V-stitches for the next row’s shells.
- Ch 5 (counts as tr, ch 2).
- V-st in the third dc (the center dc) of the next Shell.
- Ch 3, sc in the ch-5 sp (the large arch from Row 2).
- Ch 3, V-st in the third dc (the center dc) of the next Shell.
- Ch 2, tr in the last sc.
- Turn.
Count check: You should have 2 V-stitches in the center of the shells and tr/ch 2/V-st anchors on the ends.
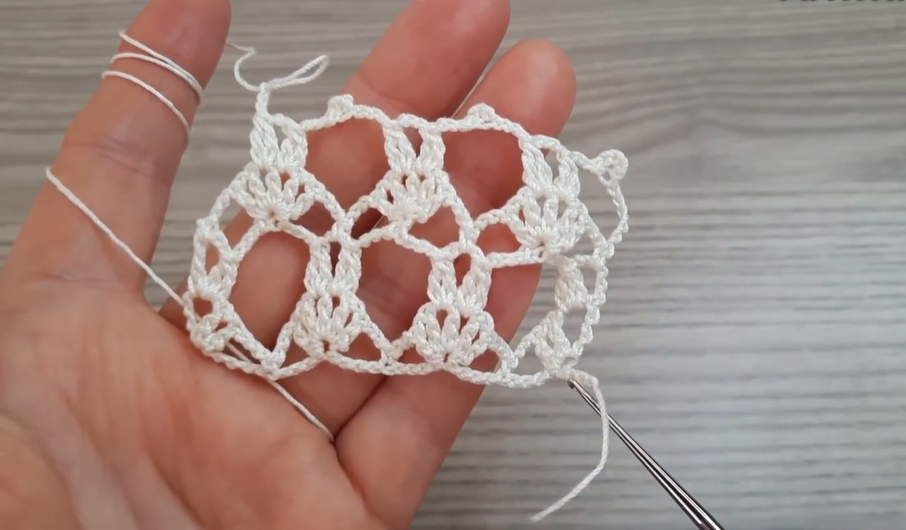
Row 4: Scallop Row (Texture)
This row works a new set of scallops, centered over the previous arch.
- Ch 1, sc in the first tr.
- Ch 3, sc in the ch-2 sp.
- Shell (5 dc) in the ch-1 sp of the next V-st.
- Sc in the next ch-3 sp.
- Ch 5, sc in the next ch-3 sp. (The new large arch).
- Shell (5 dc) in the ch-1 sp of the next V-st.
- Sc in the ch-2 sp.
- Ch 3, sc in the 3rd ch of the starting ch-5.
- Turn.
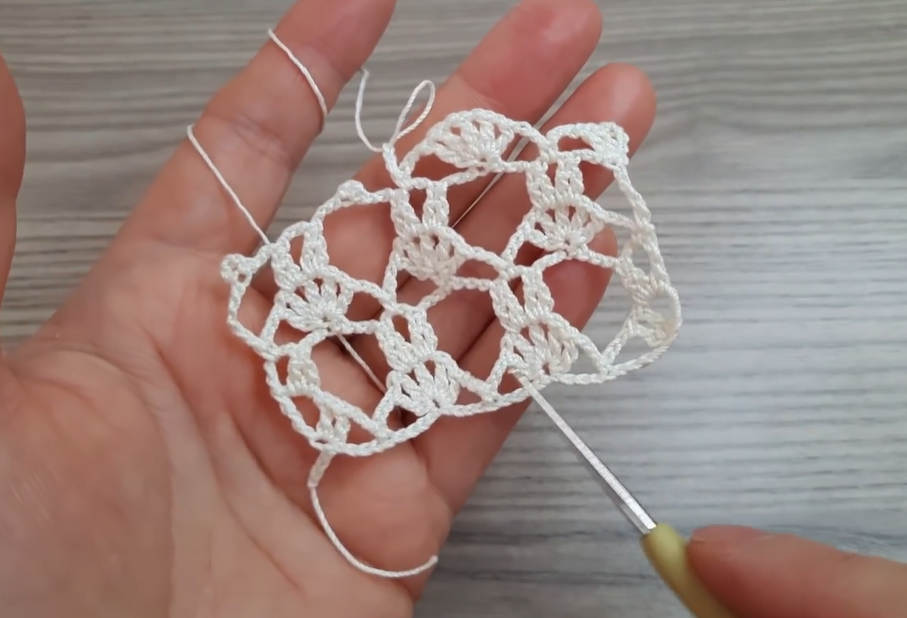
Count check: 2 full Shells, 1 large ch-5 arch. This row essentially mirrors Row 2, but the scallops are offset.
Video Tutorial:
🔄 Repeating the Pattern
To continue your panel, you will now alternate between two rows:
- Next Row: Repeat Row 3 (Connecting Arch Row). This row sets the V-stitches over the center of the shells.
- Following Row: Repeat Row 2 (Scallop Row). This row places the shells into the V-stitches.
Repeat Row 3 and Row 2 until your project reaches the desired length, ending with a Row 2 repeat.
🖼️ Edging Suggestion
The pattern naturally creates a beautiful scalloped edge on the top and bottom (the rows with the shells). For a neat finish on the sides, you can add a simple edging.
- Side Edging: Do not fasten off after your last row.
- Ch 1, sc evenly down the side edge of the panel, working 2 or 3 sc into the side of each tr/dc row and 1 sc into the side of each sc row. This will make your counts slightly different, so focus on keeping the edge flat.
- When you reach the starting chain edge, work the following: (sc, ch 3, sc) into the corner.
- Work sc across the starting chain foundation, then work the corner again.
- Sc up the final side edge. Sl st to the first sc to join.
- Optional Final Scallop Border (Top and Bottom): If you want a more uniform look, work this simple shell border along the top and bottom:
- Ch 1, sc in the first sc. Skip 1 st, Shell (5 dc) in the next st, skip 1 st, sc in the next st. Repeat along the edge.
Fasten off and weave in all ends securely. A light blocking will help open up the lace and define those beautiful scallops!
What project are you envisioning with this elegant lace design? A shawl or perhaps a delicate curtain panel?


