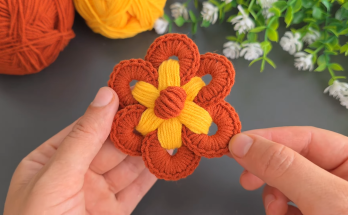
✨ Introduction: A Festive Floral Masterpiece
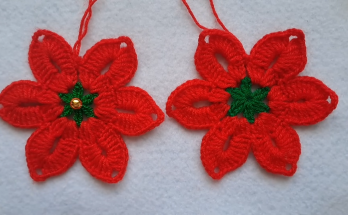
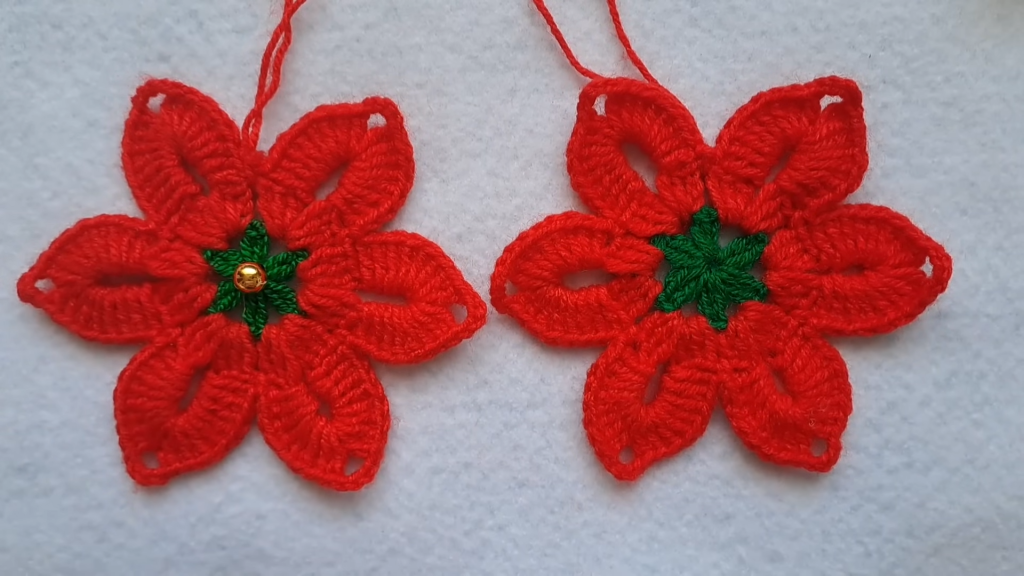
Welcome to the pattern for the gorgeous Crochet Poinsettia Christmas Flower! As the signature bloom of the holiday season, this flower makes a stunning ornament, appliqué, or garland motif. The design captured in the video combines the traditional green base with the iconic red petals to create a dimensional, elegant piece that is both fast to work up and wonderfully effective.
This pattern is constructed in two simple stages: first, creating a hexagonal green base that serves as a sturdy foundation. Second, working large, bold red petals into the chains of the base to give the flower its characteristic star shape and rich texture. This is an excellent project for using up leftover yarn scraps in your holiday colors!
Why You’ll Love This Poinsettia
- Dimensional Design: The petals are worked over chains, allowing them to stand out beautifully from the green center, creating a realistic, layered look.
- Sturdy Base: The initial green section provides a firm foundation that helps the flower maintain its shape without excessive blocking.
- Quick to Finish: With only two rounds per color and simple Double Crochet (DC) stitches, you can create a collection of these flowers in no time.
- Versatile Sizing: Easily adaptable by changing the hook size or yarn weight—use thread for tiny embellishments or bulky yarn for large wall hangings.
Suggested Uses
| Application | Notes |
| Christmas Tree Ornament | Add a gold cord hanging loop to the back. |
| Gift Topper/Appliqué | Glue or sew onto wrapped gifts, stockings, or bags. |
| Garland | String several flowers together with a chain stitch in a contrasting color. |
| Centerpiece Embellishment | Glue onto a wreath or attach to the stems of faux pine branches. |
📌 Pattern Notes & Structure
This motif is worked in the round, starting with a small central ring. The final result is a six-petaled flower structure. The pattern uses simple stitch groups and chain loops for ease and speed.
Terminology
This pattern is written in U.S. Crochet Terms.
Gauge (Approximate)
Gauge is not critical for an ornament, but for the yarn weight shown (fine sport/DK) and a 2.0 mm hook, the finished flower should measure approximately 4 to 5 inches from petal tip to petal tip.
📚 Abbreviations & Materials
| Abbreviation | Meaning |
| ch | Chain |
| st(s) | Stitch(es) |
| sl st | Slip Stitch |
| dc | Double Crochet |
| MR | Magic Ring (or Chain Circle) |
| rep | Repeat |
🧶 Materials
- Yarn: Sport or DK (Light Worsted/8-ply) weight yarn in:
- Color A: Green (for the center).
- Color B: Red (or White, for the petals).
- Hook: A hook size appropriate for your yarn; a 2.0 mm hook is used in the video.
- Tools: Scissors, tapestry needle, and optional gold/yellow bead or pearl for the flower center.
🟢 Part 1: The Green Hexagonal Base
This section establishes the 6 anchor points for the petals.
Start: Using Color A (Green). Make a Magic Ring (MR) or Chain 4 and join with sl st to form a ring.

Round 1: DC Groups and Chain Spaces
- Ch 3 (counts as 1 DC). Work 1 DC into the ring. (2 DC total)
- Corner Chain: Ch 3.
- Repeat: [Work 2 DC into the ring. Ch 3.] Rep from * 5 more times. (You will have 6 groups of 2 DC and 6 Ch-3 spaces.)
- Pull the MR tail tightly to close the center hole.
- Join with sl st to the top of the beg Ch 3.
- [6 DC groups, 6 Ch-3 spaces]
Finish Green Center
- Cut Color A yarn, leaving a short tail. Fasten off. Use the tapestry needle to weave the tail into the back of the work.
🔴 Part 2: The Red Petals
The petals are worked directly into the Ch-3 spaces of the green base.
Start: Join Color B (Red) with a sl st into any Ch-3 space from the previous round.
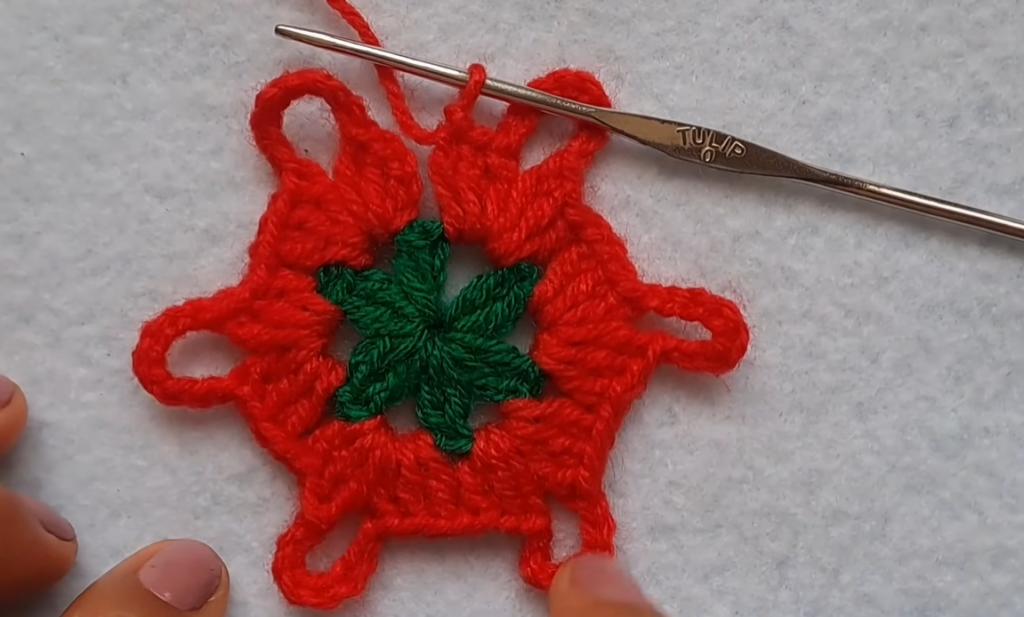
Round 2: The Large Petal Arches
- Ch 3 (counts as 1 DC). Work 2 DC into the same Ch-3 space. (3 DC total).
- Petal Arch: Ch 8.
- Work 3 DC into the same Ch-3 space. (This completes the first half-shell, creating a large arch for the petal to be worked over later.)
- Separation: Ch 1.
- Repeat: [Work 3 DC into the next Ch-3 space. Ch 8. Work 3 DC into the same Ch-3 space. Ch 1.] Rep from * 5 more times.
- Join with sl st to the top of the beg Ch 3.
- [6 Petal Arches (Ch 8), 6 Ch-1 separating chains]

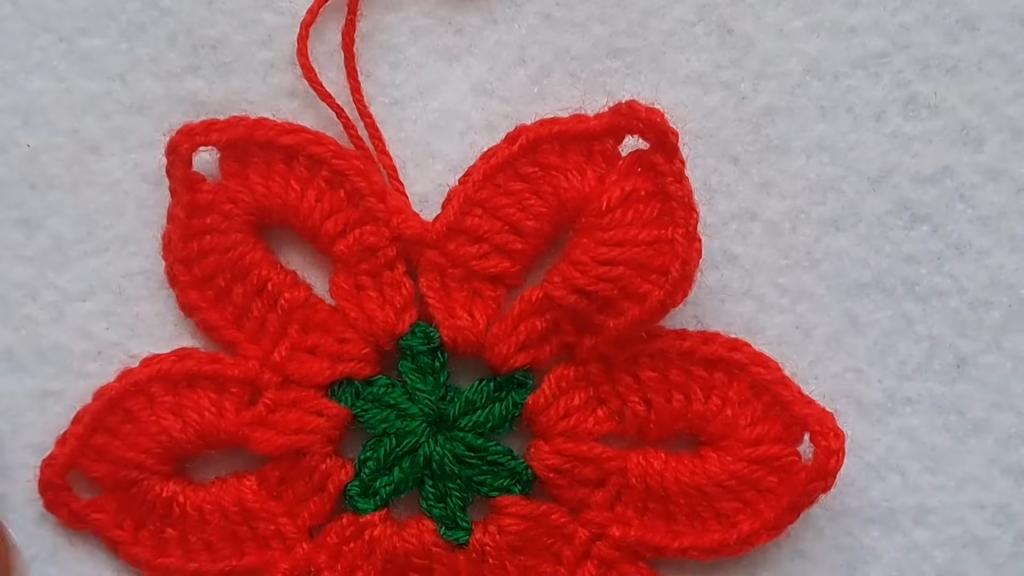
Round 3: The Full Petals
In this round, you will work the stitches over the Ch-8 arches to create the dense, rounded petals.
- Sl st into the next 2 DC stitches, then sl st into the first Ch-8 arch space. (This positions you at the start of the first petal arch.)
- Work Petal 1: Ch 3 (counts as 1 DC). Work 7 DC over the Ch-8 arch. (8 DC total).
- Corner: Ch 4.
- Work 8 DC over the same Ch-8 arch. (This completes the first petal!)
- Anchor: Work 1 SC into the next Ch-1 separating space.
- Repeat: [Work 8 DC over the next Ch-8 arch. Ch 4. Work 8 DC over the same Ch-8 arch. Work 1 SC into the next Ch-1 separating space.] Rep from * 5 more times.
- Join with sl st to the top of the beg Ch 3.
- [6 full petals, 6 SC anchors]
Video Tutorial:
✂️ Finishing Touches
Fasten Off
- Cut Color B yarn, leaving a 6-inch tail.
- Fasten off and use a tapestry needle to weave the tail into the back of the corresponding red stitches, ensuring a neat finish.
The Center
The center of the poinsettia is often decorated with small stamens or a decorative bead.
- Bead Option (Recommended): Use a small pearl, gold bead, or cluster of tiny yellow beads. Thread a piece of embroidery floss or thin yarn onto a needle. Bring it up from the back of the center ring, thread the bead(s), and secure them by stitching back down through the center and knotting the yarn firmly at the back.
- Stamen Option (Crocheted): If you prefer a crocheted center, join yellow yarn to the center ring. Ch 3, sl st back into the ring. Repeat this 6 times to create small loops that mimic the stamen. Fasten off.
Stiffening (Optional)
For an ornament that will hold its shape perfectly year after year, especially if using soft yarn, a light stiffening is recommended.
- Application: Use spray starch or a light solution of white craft glue and water. Lightly spray or dab the solution onto the entire flower.
- Shaping: Pin the flower to a blocking mat or flat surface, gently stretching the outer tips of the 6 petals until they are evenly spaced.
- Drying: Allow the flower to dry completely before unpinning.
Your beautiful, dimensional Poinsettia is now complete and ready to bring holiday cheer to your home!