
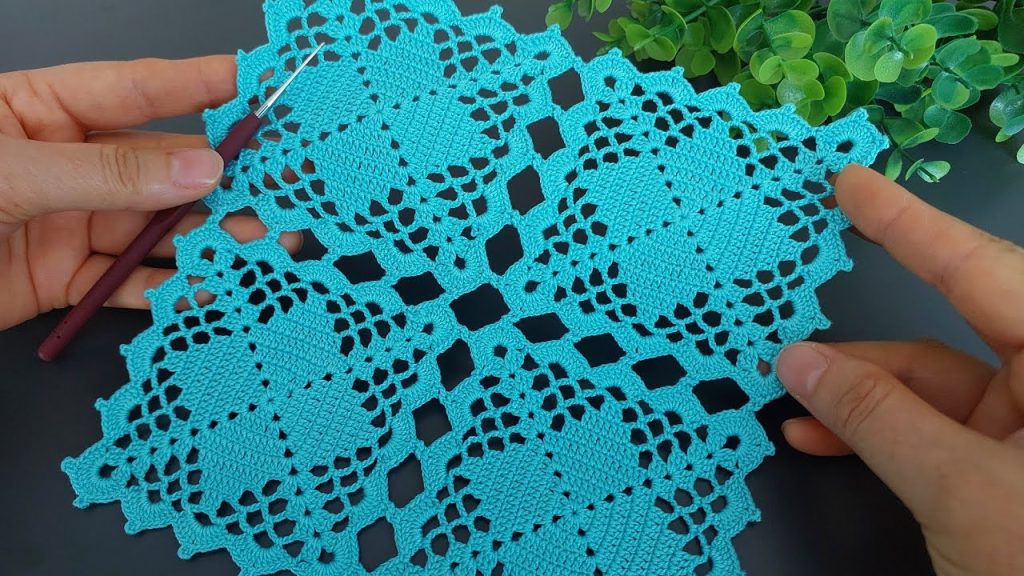
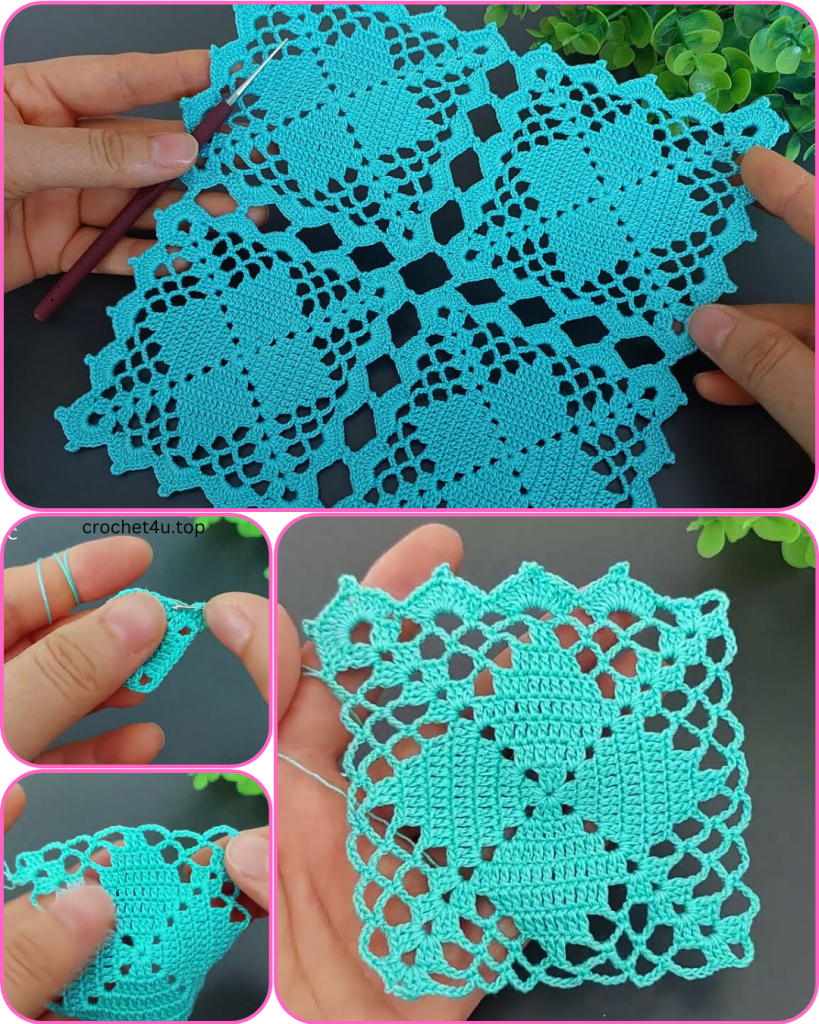
Welcome, crocheters, to a project that is a true work of art! This “Royal Lace” Doily Square is an intricate and rewarding piece to crochet, combining solid stitch work with delicate lace and a beautiful scalloped border. Its symmetrical design makes it a fantastic meditative project, and the finished square can be used in so many ways—as a coaster, a decorative doily, or as a motif in a larger project like a table runner or afghan.
This pattern is designed to be comprehensive and detailed, breaking down each round to ensure you can create this stunning piece with confidence. Get ready to dive into the world of fine crochet and create a truly beautiful heirloom piece.
Materials You’ll Need:
- Yarn: Approximately 50-75 yards of sport weight (Category 3) or cotton thread. A fine, mercerized cotton yarn will give you the best stitch definition for the lacy details.
- Crochet Hook: A size E/4 (3.50 mm) hook, or the size needed to obtain the correct gauge.
- Scissors
- Yarn Needle: For weaving in ends.
Abbreviations (US Terms):
- ch: chain
- sl st: slip stitch
- sc: single crochet
- dc: double crochet
- tr: treble crochet
- st(s): stitch(es)
- sp: space
- rep: repeat
- Rnd: round
- Picot: ch 3, sl st to the first ch
- Shell: 5 dc in the same stitch or space
- Corner Shell: (2 tr, ch 2, 2 tr) in the same space
Gauge:
- The finished square will measure approximately 8 inches by 8 inches after blocking.
Part 1: The Solid Center
We will begin with a solid square center, working in the round from the center out.
Starting with your yarn and E/4 hook:
- Rnd 1: Create a magic ring. Ch 3 (counts as 1st dc). Work 11 more dc into the ring. Sl st to the top of the beginning ch 3 to join. (12 dc)
- Rnd 2: Ch 3 (counts as 1st dc). Dc in the same st. Ch 2. Sk 2 sts, (2 dc, ch 2) in the next st. Rep from * to * two more times. Sl st to the top of the beginning ch 3 to join. (8 dc, 4 ch-2 spaces)
- Rnd 3: Ch 3 (counts as 1st dc). Dc in the next st. (2 dc, ch 2, 2 dc) in the next ch-2 sp. Dc in the next 2 sts. Rep from * to * three more times. Sl st to the top of the beginning ch 3 to join. (24 dc, 4 ch-2 spaces)
- Rnd 4: Ch 3 (counts as 1st dc). Dc in the next 3 sts. (2 dc, ch 2, 2 dc) in the next ch-2 sp. Dc in the next 4 sts. Rep from * to * three more times. Sl st to the top of the beginning ch 3 to join. (40 dc, 4 ch-2 spaces)

Part 2: The Lacy Body
Now we will transition to the lacy pattern, creating the beautiful openwork and star-like shape.
- Rnd 5: Sl st into the next 2 sts. Ch 3 (counts as 1st dc). 2 dc in the same st. Ch 1, sk 3 sts. (3 dc, ch 2, 3 dc) in the next ch-2 sp. Ch 1, sk 3 sts. 3 dc in the next st. Ch 1, sk 3 sts. (3 dc, ch 2, 3 dc) in the next ch-2 sp. Ch 1, sk 3 sts. Rep from * to * two more times. Sl st to the top of the beginning ch 3 to join.
- Rnd 6: Sl st into the next st and into the sp. Ch 3 (counts as 1st dc). 2 dc in the same sp. Ch 1. (3 dc, ch 2, 3 dc) in the next ch-2 sp. Ch 1. Rep from * to * around, working 3 dc clusters in the small sps and the large corner sps. Sl st to the top of the beginning ch 3 to join.
- Rnd 7: Sl st into the sp. Ch 3 (counts as 1st dc). 2 dc in the same sp. Ch 1, 3 dc in the next sp. Rep from * to * around, working (3 dc, ch 2, 3 dc) in the corner sps. Sl st to the top of the beginning ch 3 to join.
- Rnd 8: Sl st into the sp. Ch 1. Sc in the same sp. Ch 3, sc in the next sp. Rep from * to * around, working (sc, ch 3, sc) in the corner sps. Sl st to the first sc to join.

Part 3: The Intricate Border
This final section adds the beautiful, detailed edge to your square.
- Rnd 9: Sl st into the ch-3 sp. Ch 3 (counts as 1st dc). 2 dc in the same sp. Ch 1. Work a Shell (5 dc) in the next ch-3 sp. Ch 1, 3 dc in the next sp. Rep from * to * around. In the corners, work a Corner Shell. Sl st to the top of the beginning ch 3 to join.
- Rnd 10: Ch 1. Sc in each st around, working 2 sc into the ch-1 sps and 3 sc into the ch-2 corner sps. Sl st to the first sc to join.
- Rnd 11: Ch 1. Sc in the first 2 sts. Ch 3, sk 3 sts, sc in the next 3 sts. Rep from * to * around. Work (sc, ch 3, sc) in each corner. Sl st to the first sc to join.
- Rnd 12 (Final Round): Sl st into the ch-3 sp. Ch 1. Sc in the same sp. Work (2 dc, Picot, 2 dc) in the next ch-3 sp. Sc in the next ch-3 sp. Work (2 dc, Picot, 2 dc) in the next ch-3 sp. Rep from * to * around. Sl st to the first sc to join.

Video Tutorial:
Finishing Touches:
- Fasten off and weave in all loose ends.
- Blocking: This is a crucial step for a lacy project. Wet your finished square and gently stretch it to its proper shape. Pin the edges to a foam blocking board, ensuring all points and scallops are symmetrical. Let it dry completely.
Your beautiful “Royal Lace” doily square is now complete! It’s a testament to the beauty of crochet and your skill as a maker.What are some other projects I could use this square for?Can you explain the blocking process in more detail?Are there any variations of this pattern?


