
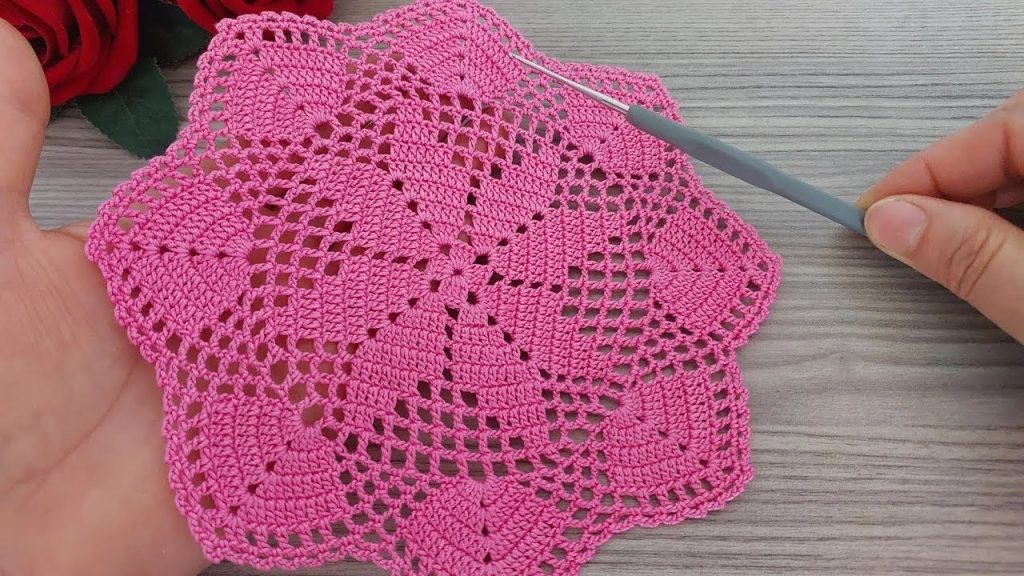
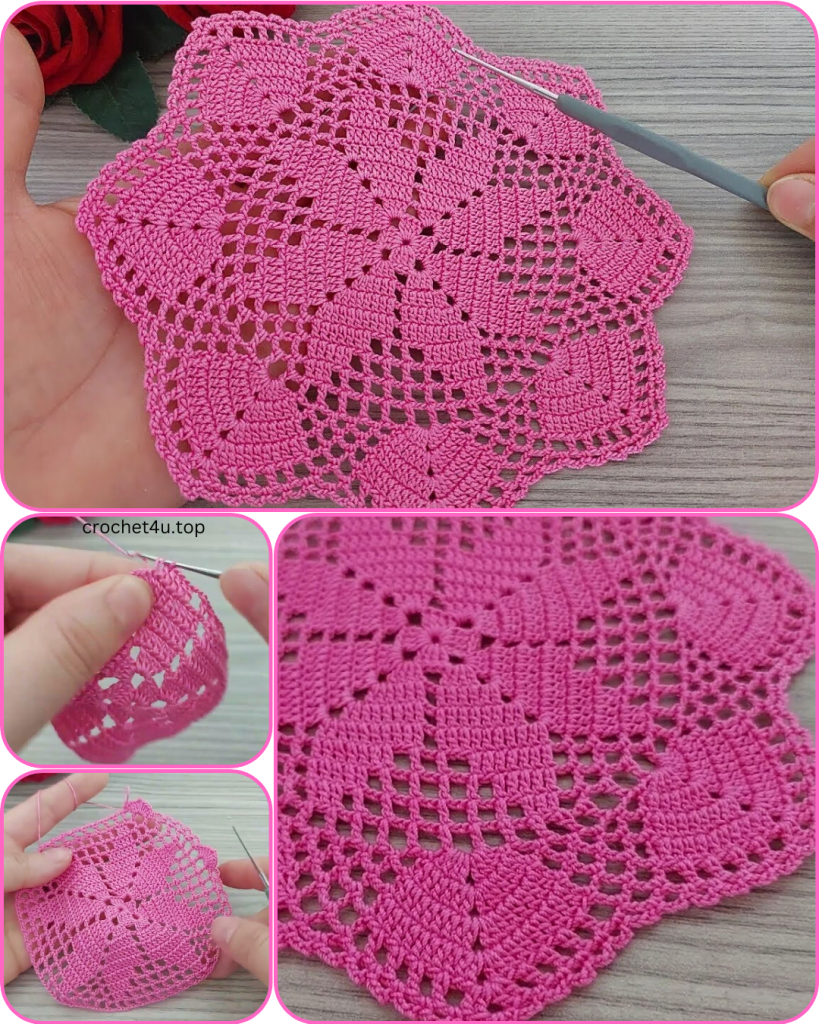
Welcome, fellow crafters! Today, we’re diving into a project that’s all about creating something truly special. This pattern, which I’ve named the Seraphina Doily, is a testament to the timeless beauty of thread work. It’s designed to be a bit challenging, but the result is a stunning, star-shaped piece with beautiful texture and an intricate lace border. If you’re ready to create a heirloom-quality item for your home or as a gift, let’s begin.
This pattern uses US crochet terminology. I recommend using a fine or fingering weight yarn or crochet thread for the best results. A size 1.5 mm to 2.25 mm crochet hook (or a hook that gives you the desired drape for your yarn) is ideal.
Materials
- Yarn: Fine or fingering weight cotton yarn or crochet thread (about 50-75 yards)
- Hook: 1.5 mm to 2.25 mm crochet hook
- Scissors
- Tapestry Needle for weaving in ends
- Stitch Markers (optional, but helpful for marking the beginning of rounds or specific stitches)
Special Stitches
- Cluster (Cl): (Yarn over, insert hook into stitch, yarn over, pull up a loop, yarn over, pull through 2 loops) 3 times in the same stitch. You should have 4 loops on your hook. Yarn over, pull through all 4 loops.
- Picot: Chain 3, slip stitch into the first chain.
- Front Post Double Crochet (FPdc): Yarn over, insert hook from front to back around the post of the specified stitch, yarn over, pull up a loop. (Yarn over, pull through 2 loops) twice.
Pattern Instructions
Note: The doily is worked in the round. Join each round with a slip stitch unless otherwise instructed. Chain-3 at the beginning of a round counts as a double crochet (dc).

Center Section
Round 1: Make a magic ring. Chain 3, then make 11 dc in the ring. Join with a sl st to the top of the beginning ch-3. (12 dc)
Round 2: Chain 3. Dc in the same stitch. 2 dc in the next stitch. Repeat from * to * around. Join with a sl st to the top of the beginning ch-3. (24 dc)
Round 3: Chain 3. Dc in the next stitch. 2 dc in the next stitch, dc in the next 2 stitches. Repeat from * to * around, ending with 2 dc in the last stitch. Join with a sl st to the top of the beginning ch-3. (32 dc)
Round 4: Chain 1 (does not count as a stitch). Sc in the same stitch. Chain 3, skip 3 stitches, sc in the next stitch. Repeat from * to * 7 more times. Chain 3, skip 3 stitches, join with a sl st to the first sc. You should have 8 chain-3 spaces.
Creating the Points

Round 5: Slip stitch into the first chain-3 space. Chain 3. (Dc, ch 2, 2 dc) in the same space. Chain 1. In the next chain-3 space, make (2 dc, ch 2, 2 dc). Repeat from * to * around. Chain 1, join with a sl st to the top of the beginning ch-3. (8 “petals” or “points”)
Round 6: Slip stitch into the next dc and into the next ch-2 space. Chain 3. (Dc, ch 2, 2 dc) in the same space. Chain 1. FPdc around the ch-1 space from the previous round. Chain 1. In the next ch-2 space, make (2 dc, ch 2, 2 dc). Repeat from * to * around. Chain 1, FPdc around the last ch-1 space from the previous round. Chain 1, join with a sl st to the top of the beginning ch-3.
Round 7: Slip stitch into the next dc and into the next ch-2 space. Chain 3. (Dc, ch 2, 2 dc) in the same space. Chain 1. Dc in the next ch-1 space. Chain 1. FPdc around the next FPdc. Chain 1. Dc in the next ch-1 space. Chain 1. In the next ch-2 space, make (2 dc, ch 2, 2 dc). Repeat from * to * around. Join with a sl st to the top of the beginning ch-3.
Round 8: Slip stitch into the next dc and into the next ch-2 space. Chain 3. (Dc, ch 2, 2 dc) in the same space. Chain 1. Dc in the next ch-1 space. Chain 1. Dc in the next FPdc. Chain 1. Dc in the next ch-1 space. Chain 1. FPdc around the next FPdc. Chain 1. Dc in the next ch-1 space. Chain 1. In the next ch-2 space, make (2 dc, ch 2, 2 dc). Repeat from * to * around. Join with a sl st to the top of the beginning ch-3.
Lace and Final Border

Round 9: Slip stitch into the next dc and into the next ch-2 space. Chain 3. (Dc, ch 2, 2 dc) in the same space. Chain 1. Dc in each ch-1 space and dc from the previous round. Chain 1. In the next ch-2 space, make (2 dc, ch 2, 2 dc). Repeat from * to * around. Join with a sl st to the top of the beginning ch-3.
Round 10: Slip stitch into the next dc and into the next ch-2 space. Chain 3. (Dc, ch 3, 2 dc) in the same space. Chain 1. Skip the next ch-1 space. In the next stitch, make a Cluster. Chain 3. In the same stitch, make a Picot. Chain 3. Make a Cluster in the next stitch. Chain 1. Skip the next ch-1 space. In the next ch-2 space, make (2 dc, ch 3, 2 dc). Repeat from * to * around. Join with a sl st to the top of the beginning ch-3.
Round 11: Slip stitch into the next dc and into the ch-3 space. Chain 1 (does not count as a stitch). 3 sc in the same space. *Chain 3. Sc in the top of the next Cluster. Chain 3. Sc in the next Picot. Chain 3. Sc in the top of the next Cluster. Chain 3. 3 sc in the next ch-3 space. * Repeat from * to * around. Join with a sl st to the first sc.
Round 12: Slip stitch into the first sc. Chain 1. Sc in the same stitch. Chain 5, sc in the next ch-3 space. Repeat Chain 5, sc in the next ch-3 space, 3 more times. Chain 5, sc in the middle sc of the next 3-sc group. Repeat from * to * around, ending with a sl st to the first sc.
Round 13: Slip stitch into the first ch-5 space. Chain 3. (2 dc, ch 2, 3 dc) in the same space. Chain 3. In the next ch-5 space, make (3 dc, ch 2, 3 dc). Repeat from * to * around. Join with a sl st to the top of the beginning ch-3.
Round 14: Slip stitch into the next 2 dc and into the ch-2 space. Chain 3. (2 dc, ch 3, 3 dc) in the same space. Chain 1. Sc in the next ch-3 space. Chain 1. In the next ch-2 space, make (3 dc, ch 3, 3 dc). Repeat from * to * around. Join with a sl st to the top of the beginning ch-3.
Round 15: Slip stitch into the next 2 dc and into the ch-3 space. Chain 1. (Sc, Picot, sc) in the same space. Chain 3. Sc in the next ch-1 space. Chain 3. Sc in the next sc. Chain 3. Sc in the next ch-1 space. Chain 3. (Sc, Picot, sc) in the next ch-3 space. Repeat from * to * around. Join with a sl st to the first sc.
Fasten off and weave in all ends securely.
Video Tutorial:
Finishing Your Doily
After you’ve finished the last round and woven in your ends, your doily may look a little ruffled or uneven. This is completely normal and can be fixed with blocking.
Blocking is the process of shaping and setting your crochet piece. To block your doily, wet it thoroughly with cool water or use a spray bottle until it’s damp. Gently squeeze out the excess water. Place the doily on a blocking mat or a foam board and pin each of the points of the star shape, gently stretching it to its final desired size and shape. Make sure all points are evenly spaced. Let the doily air dry completely, which may take a day or two. Once it’s dry, unpin it, and you’ll have a perfectly flat, beautiful, and professional-looking finished piece.
I hope you enjoy making the Seraphina Doily! It’s a wonderful project that results in a piece you can be proud of for years to come. If you have any questions along the way, don’t hesitate to reach out! Happy crocheting!Can you show me how to do the magic ring?What are some other doily patterns?


