
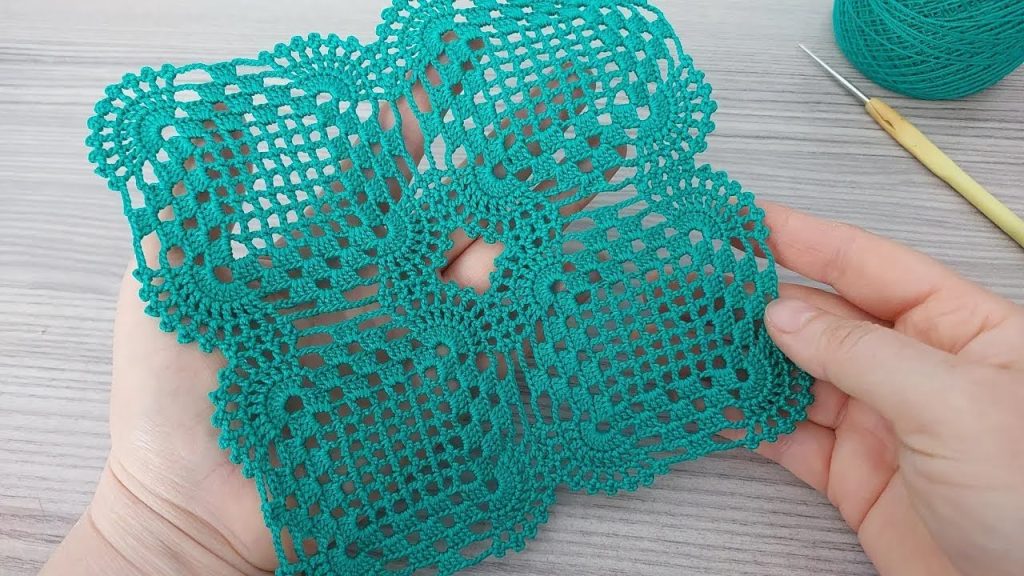
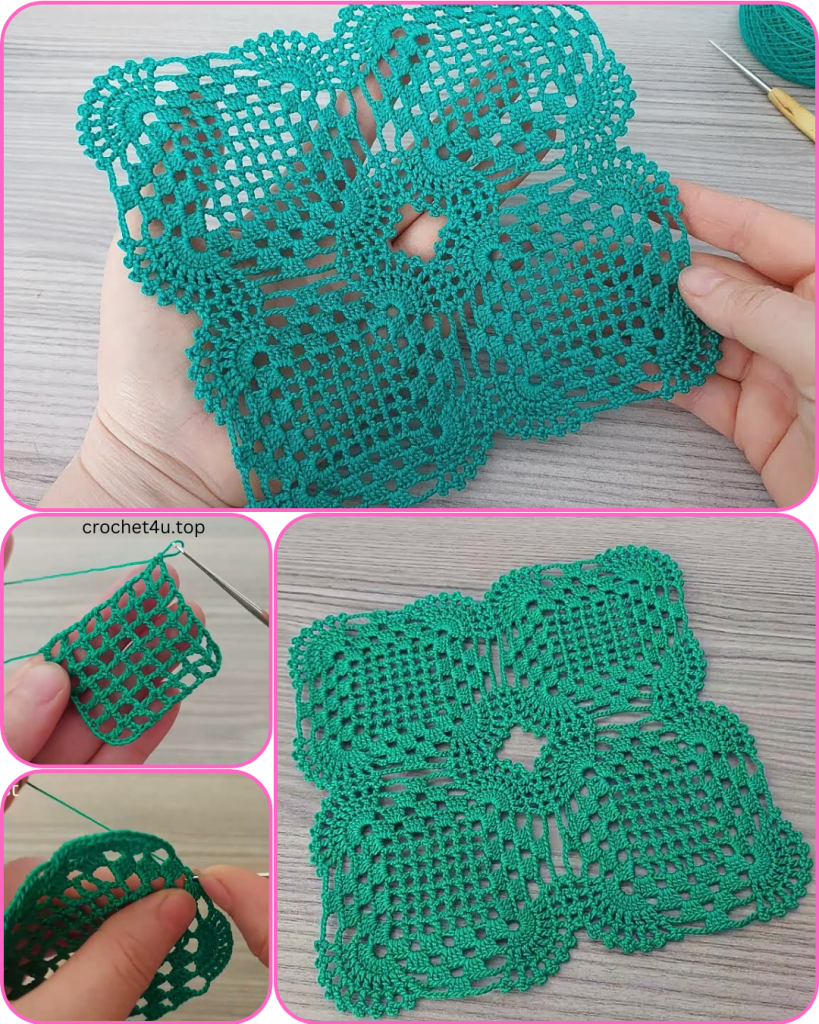
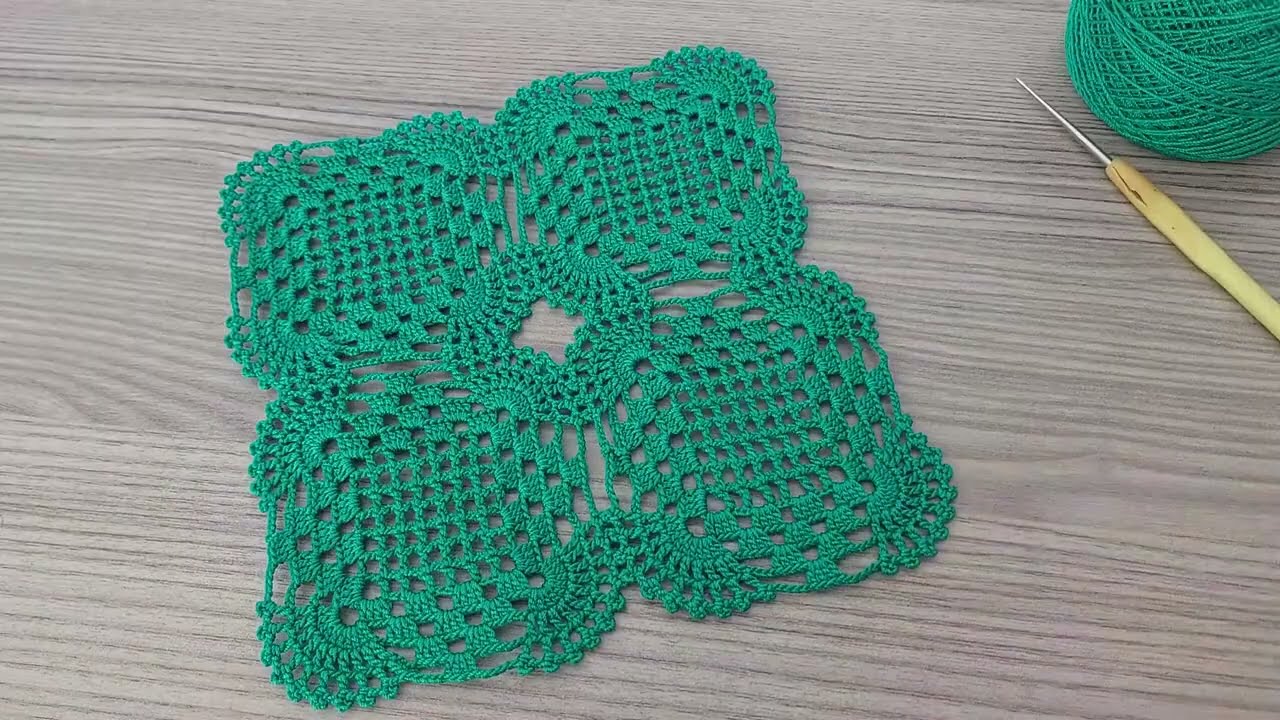
Hello, crochet enthusiasts! Are you ready to embark on a journey of stitches to create a truly exquisite piece? Today, I’m thrilled to share an original pattern for the Emerald Lattice Doily. This design features a solid, textured square center that transitions into a beautiful openwork lattice, culminating in a delicate scalloped edge. It’s a project that promises both a rewarding challenge and a stunning finished item that will bring elegance to any space.
For this pattern, we will be using US crochet terminology. I recommend using a fine or fingering weight cotton yarn or crochet thread for the best definition and drape. A hook size ranging from 1.5 mm to 2.25 mm will work wonderfully, depending on your chosen yarn and tension.
Materials
- Yarn: Fine or fingering weight cotton yarn or crochet thread (approximately 60-80 yards)
- Hook: 1.5 mm to 2.25 mm crochet hook
- Scissors
- Tapestry Needle for weaving in ends
- Stitch Markers (optional, but highly recommended for marking corners)
Special Stitches
- Beginning Popcorn (BPop): Ch 3 (counts as first dc), make 4 dc in the specified stitch. Remove hook from loop, insert hook into the top of the beginning ch-3, then insert hook back into the active loop. Yarn over, pull through both loops on hook.
- Popcorn (Pop): Make 5 dc in the specified stitch. Remove hook from loop, insert hook into the top of the first dc of the 5-dc group, then insert hook back into the active loop. Yarn over, pull through both loops on hook.
- V-Stitch (V-st): (Dc, ch 1, dc) in the same stitch or space.
- Shell: (2 dc, ch 1, 2 dc) in the same stitch or space.
Pattern Instructions
Note: The doily is worked in the round, forming a square. Join each round with a slip stitch unless otherwise instructed. Chain-3 at the beginning of a round counts as a double crochet (dc).
Solid Square Center

Round 1: Make a magic ring. Chain 3, make 2 dc in the ring. (Ch 2, 3 dc in the ring) 3 times. Chain 2, join with a sl st to the top of the beginning ch-3. (12 dc, 4 ch-2 spaces)
Round 2: Chain 3. Dc in the next 2 stitches. (2 dc, ch 2, 2 dc) in the ch-2 space (this forms a corner). Dc in the next 3 stitches. Repeat from * to * 3 more times, omitting the last 3 dc on the final repeat. Join with a sl st to the top of the beginning ch-3. (28 dc, 4 ch-2 spaces)
Round 3: Chain 3. Dc in each stitch until you reach the corner ch-2 space. (2 dc, ch 2, 2 dc) in the ch-2 space. Dc in each stitch until you reach the next corner ch-2 space. Repeat from * to * 3 more times, omitting the last dc group on the final repeat. Join with a sl st to the top of the beginning ch-3. (44 dc, 4 ch-2 spaces)
Rounds 4-5: Repeat Round 3. You should have 60 dc (Round 4) and 76 dc (Round 5) plus the 4 ch-2 corner spaces.
Transition to Lattice
Round 6: Chain 1 (does not count as a stitch). Sc in the same stitch. Sc in each of the next 4 stitches. Chain 3, skip 3 stitches, sc in the next 5 stitches. In the corner ch-2 space, make (sc, ch 3, sc). Sc in the next 5 stitches. Repeat from * to * 3 more times, omitting the last 5 sc on the final repeat. Join with a sl st to the first sc.
Round 7: Slip stitch into the next 2 sc. Chain 3. (Dc, ch 2, 2 dc) in the corner ch-3 space. Chain 1. Skip 1 sc. V-st in the next sc. Chain 1. Skip 1 sc. (2 dc, ch 2, 2 dc) in the next corner ch-3 space. Repeat from * to * 3 more times, omitting the last corner on the final repeat. Join with a sl st to the top of the beginning ch-3. (You’ll now be working into the V-st and ch-1 spaces, not directly into the sc stitches of the previous round’s sides).
Lattice Formation

Round 8: Slip stitch into the next dc and into the ch-2 space. Chain 3. (Dc, ch 2, 2 dc) in the same space. Chain 1. V-st in the next ch-1 space. Chain 1. V-st in the next ch-1 space. Chain 1. (2 dc, ch 2, 2 dc) in the next corner ch-2 space. Repeat from * to * 3 more times, omitting the last corner on the final repeat. Join with a sl st to the top of the beginning ch-3.
Round 9: Slip stitch into the next dc and into the ch-2 space. Chain 3. (Dc, ch 2, 2 dc) in the same space. Chain 1. Sc in the ch-1 space before the V-st. Chain 3. Sc in the ch-1 space of the V-st. Chain 3. Sc in the ch-1 space after the V-st. Chain 1. (2 dc, ch 2, 2 dc) in the next corner ch-2 space. Repeat from * to * 3 more times, omitting the last corner on the final repeat. Join with a sl st to the top of the beginning ch-3.
Round 10: Slip stitch into the next dc and into the ch-2 space. Chain 3. (Dc, ch 2, 2 dc) in the same space. Chain 1. Sc in the next ch-1 space. Chain 3. Sc in the next ch-3 space. Chain 3. Sc in the next ch-3 space. Chain 3. Sc in the next ch-1 space. Chain 1. (2 dc, ch 2, 2 dc) in the next corner ch-2 space. Repeat from * to * 3 more times, omitting the last corner on the final repeat. Join with a sl st to the top of the beginning ch-3.
Popcorn Edging
Round 11: Slip stitch into the next dc and into the ch-2 space. BPop in the same space (this will act as your first corner popcorn). Chain 3. Popcorn in the next ch-1 space. Chain 3. Popcorn in the next ch-3 space. Chain 3. Popcorn in the next ch-3 space. Chain 3. Popcorn in the next ch-3 space. Chain 3. Popcorn in the next ch-1 space. Chain 3. Popcorn in the next corner ch-2 space. Repeat from * to * 3 more times, omitting the last corner on the final repeat. Join with a sl st to the top of the beginning BPop.
Round 12: Chain 1 (does not count as a stitch). Sc in the top of the BPop. (3 sc in the next ch-3 space, sc in the top of the next Popcorn) until you reach the last ch-3 space before the next corner Popcorn. 3 sc in that ch-3 space. Sc in the top of the corner Popcorn. Repeat from * to * around. Join with a sl st to the first sc.
Scalloped Border
Round 13: Chain 1 (does not count as a stitch). Sc in the same stitch. Skip 2 stitches, make a Shell (2 dc, ch 1, 2 dc) in the next stitch. Skip 2 stitches, sc in the next stitch. Repeat from * to * around. You should end with an sc in a corner stitch, or close to it. Adjust counts slightly if needed to make the repeat work around the square. Join with a sl st to the first sc.
Round 14: Slip stitch into the next dc. Chain 1 (does not count as a stitch). Sc in the ch-1 space of the Shell. Picot. Sc in the same ch-1 space. Chain 3. Sc in the next sc. Chain 3. In the ch-1 space of the next Shell, make (sc, Picot, sc). Repeat from * to * around. Join with a sl st to the first sc.
Fasten off and weave in all remaining ends with your tapestry needle.
Video Tutorial:
Finishing Touches: Blocking for Perfection
Once you’ve completed all the rounds and neatly hidden all your yarn tails, your Emerald Lattice Doily might not look perfectly flat or square. This is where the magic of blocking comes in!
Blocking is essential for lace and openwork crochet. It allows your stitches to relax, opens up the intricate patterns, and helps your doily achieve its intended shape and size.
Here’s how to block your doily:
- Wet it: Gently immerse your doily in cool water (you can add a tiny bit of wool wash if desired) until it’s completely saturated. Alternatively, you can generously spray it with water using a spray bottle until it’s thoroughly damp.
- Remove excess water: Gently squeeze the water out, being careful not to wring or twist the doily, which could distort your stitches. You can roll it in a clean towel to absorb more moisture.
- Shape and pin: Lay your damp doily on a flat, soft surface suitable for pinning (like a foam blocking mat, an ironing board, or even a thick towel). Gently stretch and shape the doily to the desired square dimensions, ensuring all the little points and scallops of the border are neat and even. Use rust-proof pins to secure the doily in place. Pay special attention to the corners and the points of the scalloped edge.
- Dry: Leave the doily pinned until it is completely dry. This could take anywhere from a few hours to a day or two, depending on your climate and the thickness of your yarn.
- Unpin: Once totally dry, carefully remove the pins. You’ll be amazed at how beautifully the pattern has opened up and how crisp the edges have become!
Your Emerald Lattice Doily is now ready to adorn your table, brighten a shelf, or be cherished as a thoughtful handmade gift. I hope you’ve enjoyed crocheting this piece as much as I enjoyed designing it for you. Happy crafting!


