
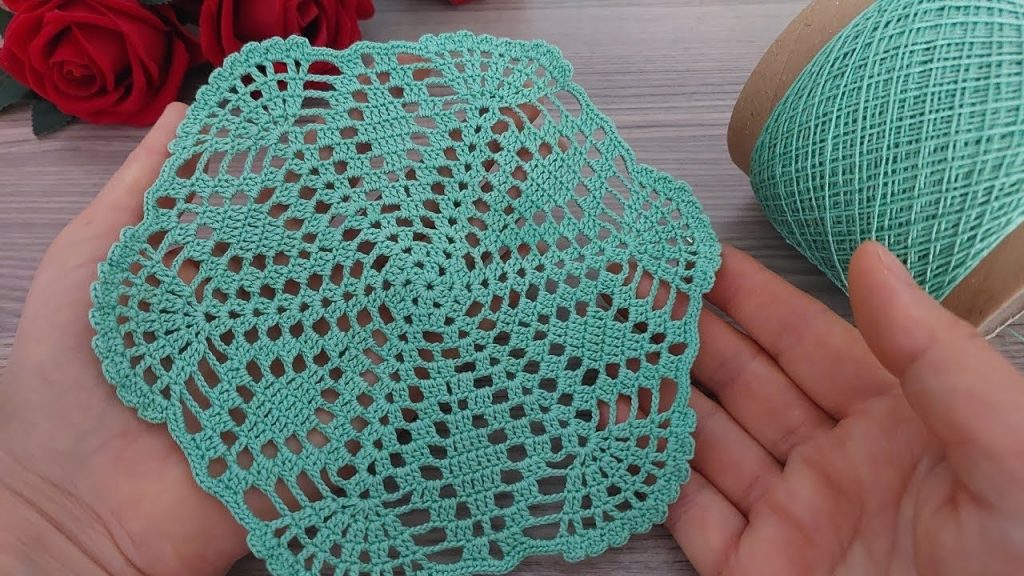
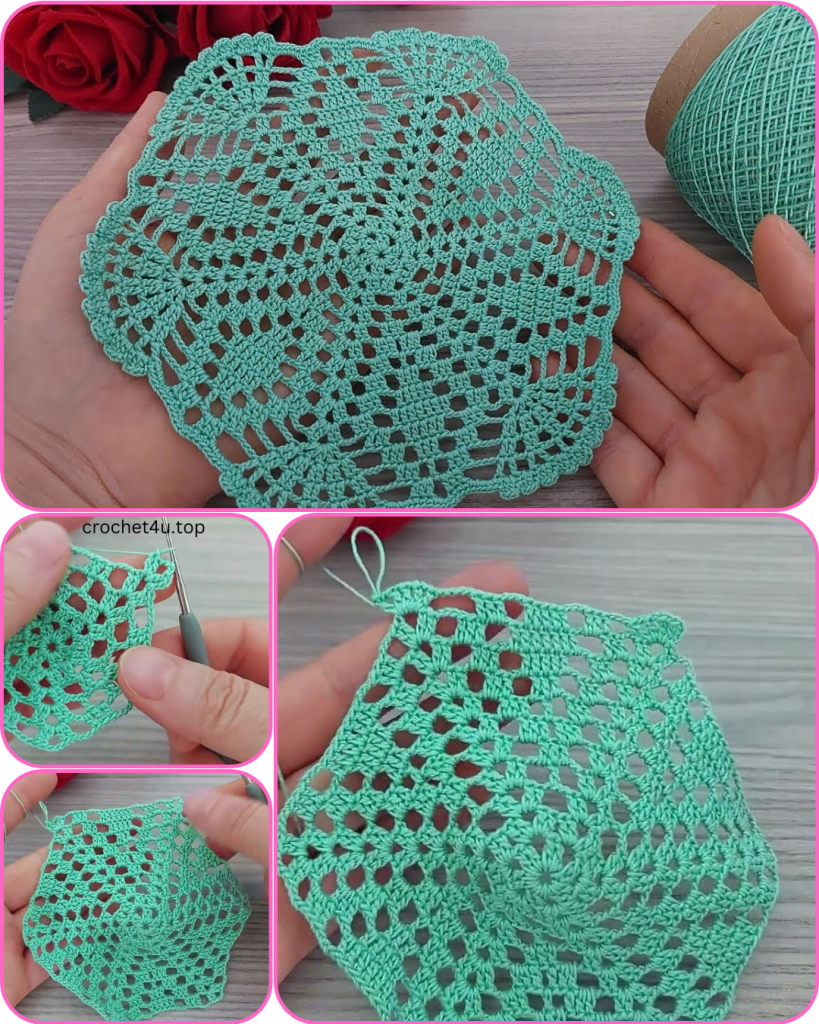
Welcome, crafters! Are you looking for a project that is both beautiful and rewarding? Today, I’m excited to share an original pattern for a timeless crochet doily, which I’ve named the Willowbrook Doily. This design features a delicate, textured center and a series of expanding lace rounds that create a stunning, airy finished piece. It’s an intermediate-level project that will help you practice a variety of stitches while creating something truly special for your home.
This pattern uses US crochet terminology. For the best results, use a fine or fingering weight cotton yarn or crochet thread. A hook size between 1.5 mm and 2.25 mm is ideal, as it will give you the crisp stitch definition needed for this detailed design.
Materials
- Yarn: Fine or fingering weight cotton yarn or thread (approximately 75-100 yards)
- Hook: 1.5 mm to 2.25 mm crochet hook
- Scissors
- Tapestry Needle for weaving in ends
- Stitch Markers (optional, but helpful for marking the beginning of rounds)
Special Stitches
- Beginning Cluster (BCl): Chain 3 (counts as a double crochet), yarn over, insert hook into the same stitch or space, pull up a loop, yarn over, pull through 2 loops. (Yarn over, insert hook into the same stitch or space, pull up a loop, yarn over, pull through 2 loops) twice. You should have 4 loops on your hook. Yarn over, pull through all 4 loops.
- Cluster (Cl): Yarn over, insert hook into the specified stitch or space, pull up a loop, yarn over, pull through 2 loops. (Yarn over, insert hook into the same stitch or space, pull up a loop, yarn over, pull through 2 loops) 3 more times. You should have 5 loops on your hook. Yarn over, pull through all 5 loops.
- Picot: Chain 3, slip stitch into the first chain.
Pattern Instructions
Note: The doily is worked in the round. Join each round with a slip stitch unless otherwise instructed. A chain-3 at the beginning of a round counts as a double crochet (dc).
Center Section

Round 1: Make a magic ring. Chain 3, then make 11 dc in the ring. Join with a sl st to the top of the beginning ch-3. (12 dc)
Round 2: Chain 3. Dc in the same stitch. 2 dc in the next stitch. Repeat from * to * around. Join with a sl st to the top of the beginning ch-3. (24 dc)
Round 3: Chain 3. Dc in the next stitch. 2 dc in the next stitch, dc in the next stitch. Repeat from * to * around, ending with 2 dc in the last stitch. Join with a sl st to the top of the beginning ch-3. (36 dc)
Lace and Lattice Section
Round 4: Chain 1 (does not count as a stitch). Sc in the same stitch. Chain 4, skip 2 stitches, sc in the next stitch. Repeat from * to * 11 more times. Chain 4, skip the last 2 stitches, join with a sl st to the first sc. (12 ch-4 loops)

Round 5: Slip stitch into the first ch-4 space. Chain 3. (2 dc, ch 1, 3 dc) in the same space. Chain 1, skip the next sc. In the next ch-4 space, make (3 dc, ch 1, 3 dc). Repeat from * to * around. Chain 1, join with a sl st to the top of the beginning ch-3. (12 shells)
Round 6: Slip stitch into the next 2 dc and into the ch-1 space. Chain 3. (2 dc, ch 1, 3 dc) in the same space. Chain 1. Sc in the next ch-1 space between shells. Chain 1. In the next ch-1 space of the shell, make (3 dc, ch 1, 3 dc). Repeat from * to * around. Join with a sl st to the top of the beginning ch-3.
Round 7: Slip stitch into the next 2 dc and into the ch-1 space. Chain 3. (2 dc, ch 1, 3 dc) in the same space. Chain 1. Sc in the next ch-1 space. Chain 1. Sc in the next sc. Chain 1. Sc in the next ch-1 space. Chain 1. In the next ch-1 space of the shell, make (3 dc, ch 1, 3 dc). Repeat from * to * around. Join with a sl st to the top of the beginning ch-3.
Round 8: Slip stitch into the next 2 dc and into the ch-1 space. Chain 3. (2 dc, ch 1, 3 dc) in the same space. Chain 1. Sc in each of the next 3 ch-1 spaces. Chain 1. In the next ch-1 space of the shell, make (3 dc, ch 1, 3 dc). Repeat from * to * around. Join with a sl st to the top of the beginning ch-3.
Cluster and Final Border

Round 9: Slip stitch into the next 2 dc and into the ch-1 space. BCl in the same space. Chain 5. Cluster in the next ch-1 space. (Chain 5, Cluster in the next ch-1 space) twice. Chain 5. Cluster in the ch-1 space of the next shell. Repeat from * to * around. Join with a sl st to the top of the beginning BCl. (36 Clusters)
Round 10: Chain 1 (does not count as a stitch). Sc in the top of the BCl. 5 sc in the next ch-5 space. Sc in the top of the next Cluster. Repeat from * to * around. Join with a sl st to the first sc.
Round 11: Chain 1 (does not count as a stitch). Sc in the same stitch. Chain 3, skip 2 stitches, sc in the next stitch. Chain 3, skip 2 stitches, sc in the next stitch. Repeat from * to * around. Join with a sl st to the first sc.
Round 12: Slip stitch into the first ch-3 space. Chain 3. (2 dc, Picot, 3 dc) in the same space. Chain 1. In the next ch-3 space, make (3 dc, Picot, 3 dc). Repeat from * to * around. Chain 1, join with a sl st to the top of the beginning ch-3.
Fasten off and weave in all ends securely.
Video Tutorial:
Finishing Your Doily
After completing the final round and weaving in your ends, your doily will likely look a bit bunched up. This is perfectly normal and is easily fixed with blocking. Blocking is a crucial step for any lacy crochet piece, as it helps the stitches settle, opens up the pattern, and gives your doily a professional, crisp finish.
Here’s how to block your Willowbrook Doily:
- Get it damp: Submerge your doily in cool water or use a spray bottle to saturate it completely. Avoid wringing or twisting it, which can stretch the stitches.
- Remove excess water: Gently squeeze the water out and then roll the doily in a clean towel to absorb more moisture.
- Shape and pin: Lay the doily on a foam blocking mat, a thick towel, or a piece of cork board. Gently stretch the doily into a perfect circle, making sure the lace points and curves are all evenly spaced. Use rust-proof pins to secure it in place.
- Let it dry: Leave the doily pinned until it is completely dry. This may take a day or two.
- Unpin: Carefully remove the pins, and your doily is ready to be displayed!
Enjoy the beautiful result of your hard work! The Willowbrook Doily makes a wonderful gift or a lovely addition to your own home decor. Happy crocheting!


