
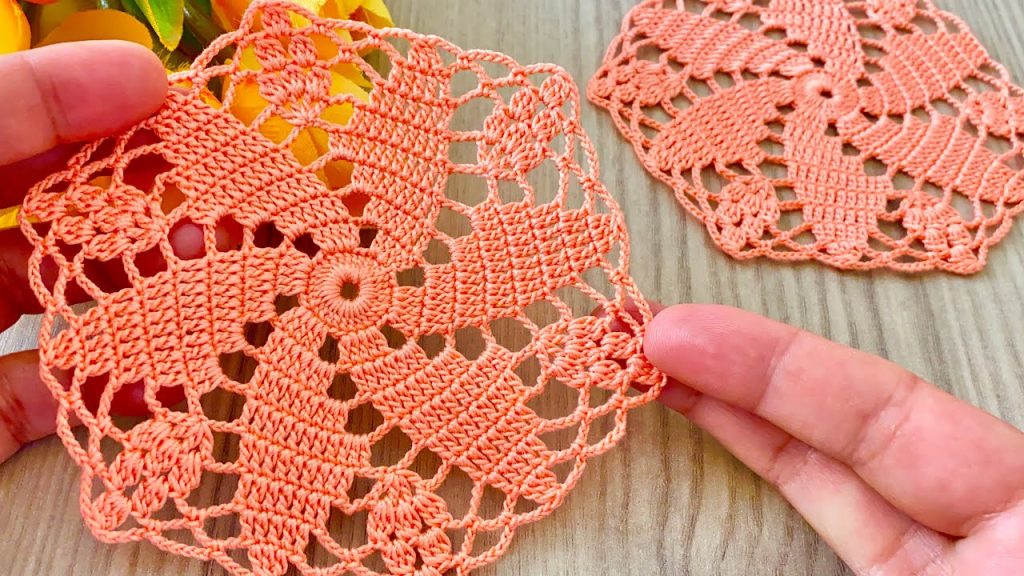
Welcome, geometric pattern enthusiasts! Today’s motif is a gorgeous square that beautifully marries a delicate central bloom with a structured, almost tapestry-like border. The combination of open lacework and dense corner sections gives this square incredible visual texture and stability, making it ideal for large, heirloom-quality projects like bedspreads or curtains.
This pattern is worked in the round from the center out. It is written using U.S. Crochet Terminology.
✨ Part 1: Materials, Gauge & Preparation
| Icon | Item | Details & Notes |
| 🧶 | Yarn/Thread | Use Size 10 or Size 20 Mercerized Cotton Thread for a crisp finish, or a Sport Weight yarn for a larger, softer blanket square. The apricot/peach color is lovely! |
| 鉤 | Crochet Hook | A steel hook suitable for your thread (e.g., 1.75 mm to 2.5 mm), or a 3.5 mm to 4.0 mm hook for thicker yarn. |
| ✂️ | Tools | A sharp pair of scissors and a tapestry needle for weaving ends. |
| 📏 | Size | The finished square should measure approx. 5.5′′×5.5′′ after blocking when using thread/fingering yarn. |
📚 Part 2: Essential Stitches and Special Terms
This pattern requires a variety of stitches to achieve the detailed shaping and texture.
| Stitch | Abbreviation | Description |
| Chain | ch | Yarn over, pull through loop on hook. |
| Slip Stitch | sl st | Insert hook, yarn over, pull through work and loop on hook. |
| Single Crochet | sc | Standard single crochet. |
| Double Crochet | dc | Standard double crochet. |
| Treble Crochet | tr | Standard treble crochet (yarn over twice). |
| Picot | P | ch 3, sl st into the first ch made. |
| Beginning Cluster (beg-cl) | beg-cl | ch 2, dc in the same space. |
| Cluster (cl) | cl | (dc2tog) or dc twice in the same st/sp. |
🌸 Part 3: The Central Flower (Rounds 1–4)
We begin with a tight center that defines the petals of the bloom.

Foundation:
- ch 5, sl st into the first ch to form a ring.
Round 1 (Center Ring):
- ch 3 (counts as first dc).
- Work 15 dc into the center ring.
- sl st to the top of the starting ch-3 to join. (16 dc)
Round 2 (Petal Bases):
- ch 1 (does not count as a stitch).
- sc in the first st.
- ch 4.
- Skip 1 st.
- sc in the next st.
- Repeat from ** around.
- End with ch 4. sl st to the first sc to join. (8 ch-4 loops)
Round 3 (Forming Petals):
- sl st into the ch-4 space.
- ch 3 (counts as first dc).
- Work (2 dc, ch 2, 3 dc) in the same ch-4 space (a Shell).
- sc in the sc between loops.
- Work (3 dc, ch 2, 3 dc) in the next ch-4 space.
- sc in the sc between loops.
- Repeat from ** around.
- sl st to the top of the starting ch-3 to join. (8 Shells, 8 sc)
Round 4 (Defining the Petal Points):
- ch 3 (counts as first dc).
- dc in the next 2 dc.
- ch 1.
- In the ch-2 space of the shell, work (dc, ch 3, dc) (This will be the petal point).
- ch 1.
- dc in the next 3 dc.
- ch 2.
- sc in the sc between shells.
- ch 2.
- Repeat from ** around.
- sl st to the top of the starting ch-3 to join.
📐 Part 4: Squaring the Motif (Rounds 5–6)
We begin the transition to a square shape, introducing the solid, tapestry-like sections.

Round 5 (Building the Solid Blocks):
- sl st across to the ch-1 space.
- ch 4 (counts as tr).
- 2 tr in the ch-1 space.
- 3 tr in the ch-3 space (Petal point).
- 3 tr in the next ch-1 space.
- ch 2 (Side Mesh).
- dc in the sc.
- ch 2.
- Corner: In the next ch-2 space, work (3 tr, ch 3, 3 tr).
- ch 2.
- Repeat the pattern around: (tr in 3 ch-sp’s, ch 2, dc, ch 2, Corner).
- sl st to the top of the starting ch-4 to join.
Round 6 (The Lacy Diamond):
- sl st across the first 3 tr.
- ch 1.
- sc in the next 3 tr.
- ch 5.
- sc in the next 3 tr.
- ch 5.
- sc in the next dc.
- ch 5.
- Corner: In the ch-3 corner space, work (3 tr, ch 3, 3 tr).
- ch 5.
- sc in the next dc.
- ch 5.
- Repeat the pattern around: (sc in 3 tr, ch 5, sc in 3 tr, ch 5, sc in dc, ch 5, Corner).
- sl st to the first sc to join.
🧡 Part 5: The Outer Detail (Rounds 7–9)
These final rounds define the edge, finalize the diamond shapes, and add the finishing scallops.

Round 7 (Solidifying the Side):
- ch 3 (counts as first dc).
- 2 dc in the next ch-5 space.
- dc in the next sc.
- 5 dc in the next ch-5 space.
- dc in the next sc.
- 5 dc in the next ch-5 space.
- dc in the next sc.
- 5 dc in the next ch-5 space.
- Corner: In the ch-3 corner space, work (2 dc, ch 3, 2 dc).
- Repeat the pattern around, working solid dc over all chain spaces and single crochet stitches.
- sl st to the top of the starting ch-3 to join.
Round 8 (Lace Arches):
- ch 5 (counts as dc + ch 2).
- Skip 2 dc. dc in the next dc.
- Continue the (ch 2, skip 2 dc, dc) pattern across the side.
- Corner: In the ch-3 corner space, work (dc, ch 3, dc).
- Continue the (ch 2, skip 2 dc, dc) pattern across the side.
- sl st to the 3rd ch of the starting ch-5 to join.
Round 9 (Final Scallops and Joining Points):
- sl st into the ch-2 space.
- ch 1.
- In the ch-2 space, work (sc, 3 dc, sc) (a Small Shell).
- sc in the next dc.
- Repeat the (Small Shell, sc) pattern across the side.
- Corner: In the ch-3 corner space, work (sc, P, sc) (This is the main joining point).
- sc in the next dc.
- Continue the (Small Shell, sc) pattern across the side.
- sl st to the first sc to join.
- Fasten off.
🧩 Part 6: Joining Motifs (The Tapestry Fabric)
This square is designed to be easily joined to create a larger, seamless fabric.

Joining Method: Single Crochet Join
When working Round 9 on your second and subsequent motifs, you will replace some of the chains and single crochets with a slip stitch (sl st) join to connect to a finished motif.
- Corner Join: When working the (sc, P, sc) in the corner, replace the Picot (P) with a Joining Picot (JP): ch 1, sl st into the corner Picot of the finished motif, ch 1, sl st into the sc just made on the current motif.
- Side Join: The side shells are joined at their center 3rd dc. Replace the 3rd dc of the Small Shell with a Joining DC (JDC): ch 1, sl st into the center 3rd dc of the corresponding shell on the finished motif, ch 1, dc in the ch-2 space on the current motif.
By joining at the corners and the center of the side shells, your motifs will create a continuous and structured piece.
Video Tutorial:
📌 Part 7: Finishing and Blocking
- Secure Ends: Fasten off your yarn, leaving a tail long enough to weave in securely. Use your tapestry needle to bury all tails deeply into the back of the solid blocks created in Round 7.
- Blocking (Absolute Necessity!): Blocking is crucial for defining the star center and setting the sharp corners of the square.
- Wet Block: Fully dampen the finished square.
- Pin: Pin the square to a blocking mat or foam board, pulling gently to set the four corner points and open the inner lace. Use an accurate ruler to ensure the sides are straight and the corners form a perfect 90-degree angle.
- Dry: Allow the piece to air dry completely before unpinning.
Your intricate Tapestry Bloom Granny Square is now complete! What kind of beautiful lace fabric will you create by joining these stunning squares?


