
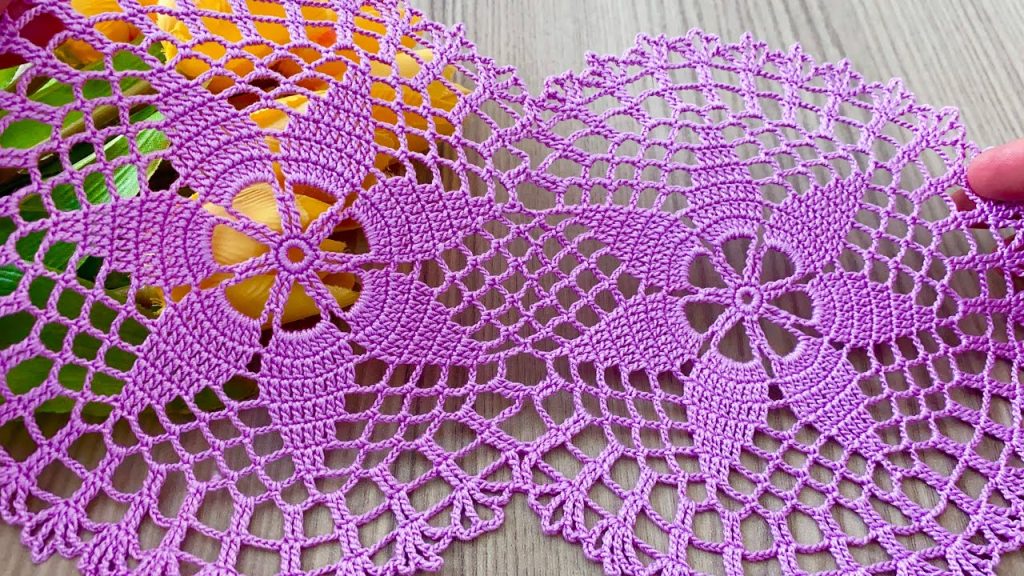
This pattern creates a sophisticated, continuous lace border, perfect for finishing scarves, table runners, blankets, or even turning into a belt or choker. The design features a repeating floral star motif connected by delicate lattice netting and finished with a lovely scalloped edge. The resulting fabric is sturdy, yet beautifully airy and elegant.
⭐️ Project Overview and Technique Check
| Feature | Detail |
| Skill Level | Intermediate. Requires focused stitch counting, understanding of chain/netting placement, and working in the round (for the motif). |
| Stitches Used | Chain (ch), Slip Stitch (sl st), Single Crochet (sc), Double Crochet (dc), Treble Crochet (tr). |
| Construction | Motifs are worked partially in the round, then extended and joined continuously in rows to form the border. |
| Yarn Type | Fine cotton thread is essential for the structure and crisp detail. |
| Motif Repeat | The pattern repeats every 14 rows, or every full flower cycle. |
Export to Sheets
🧵 Materials & Gauge
Yarn
- Weight: Crochet Thread Size 10 or a Lace/Fingering Weight (Category 0 or 1) yarn. The fine thread is crucial for achieving the sharp detail and drape seen in the image.
- Fiber: 100% Mercerized Cotton thread is ideal for its strength, definition, and blocking properties.
- Color: A vibrant purple (like the sample), or a classic white/ecru.
- Yardage: Low yardage—a small ball of thread (e.g., 100 grams of Size 10 thread) will yield a very long piece of trim.
Hook
- Size: 1.5 mm to 1.75 mm (Steel Hook US 8 or 7), or the size that matches your chosen thread. Use a hook that gives a firm, tight tension.
Notions
- Tapestry Needle for weaving in ends.
- Scissors.
- T-pins and blocking board (recommended for final shaping).
Gauge (Approximate)
Due to the complex nature of the lace, gauge is measured by the motif size. The final width of the lace border (from top edge to bottom fringe) should be approximately 2.5 inches to 3 inches. Your tension must be consistent to ensure uniform motifs.
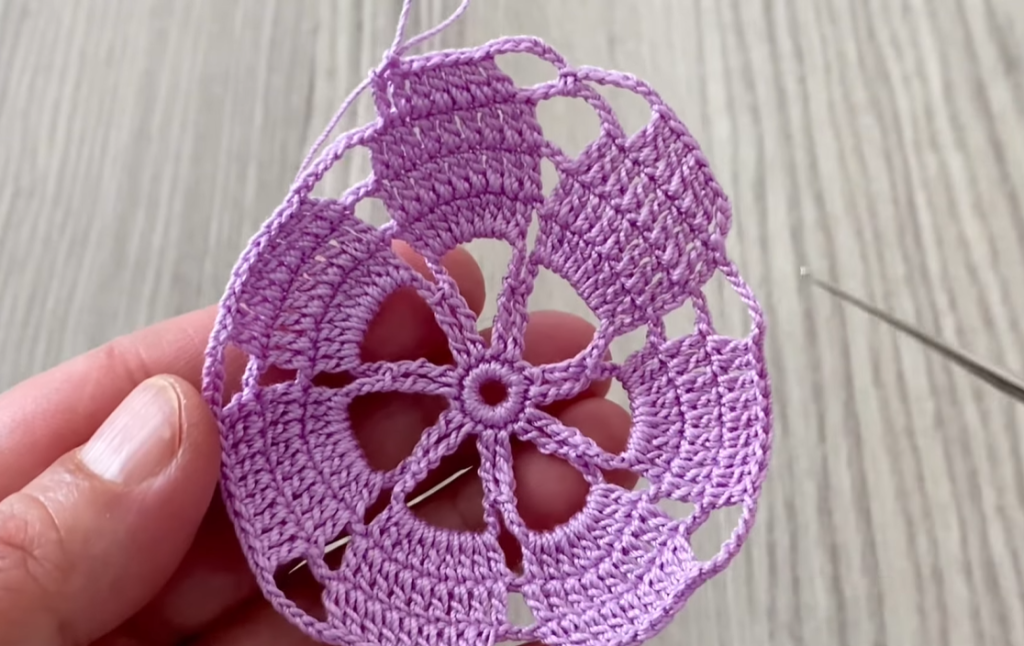
🌸 Motif Section: The Floral Star (Starting Point)
The border starts with the central star motif, which is built in the round.

Round 1 (Center Ring): ch 6, sl st to the first ch to form a ring. ch 3 (counts as dc), 11 dc into the ring. sl st to the top of the starting ch 3 to join. (12 dc)
Round 2 (Petal Setup): ch 1 (sc in the first stitch). ch 5, sc in the 2nd dc from the hook. ch 5, sc in the 2nd dc from the previous sc. Repeat this sequence (ch 5,sc in 2nd dc) 4 times more. You should have 6 ch 5 loops. sl st to the first sc to join. (6 loops)
Round 3 (Solid Petals): sl st into the first ch 5 loop. ch 4 (counts as tr). In the same loop, work: 4 tr,ch 2,5 tr. This forms the first petal. sl st into the next ch 5 loop. In the loop, work: 5 tr,ch 2,5 tr. Repeat this sequence 4 times more. sl st to the top of the starting ch 4 to join. (6 petals)
Do NOT fasten off. This work is now partially in the round and partially in rows to form the straight edge.
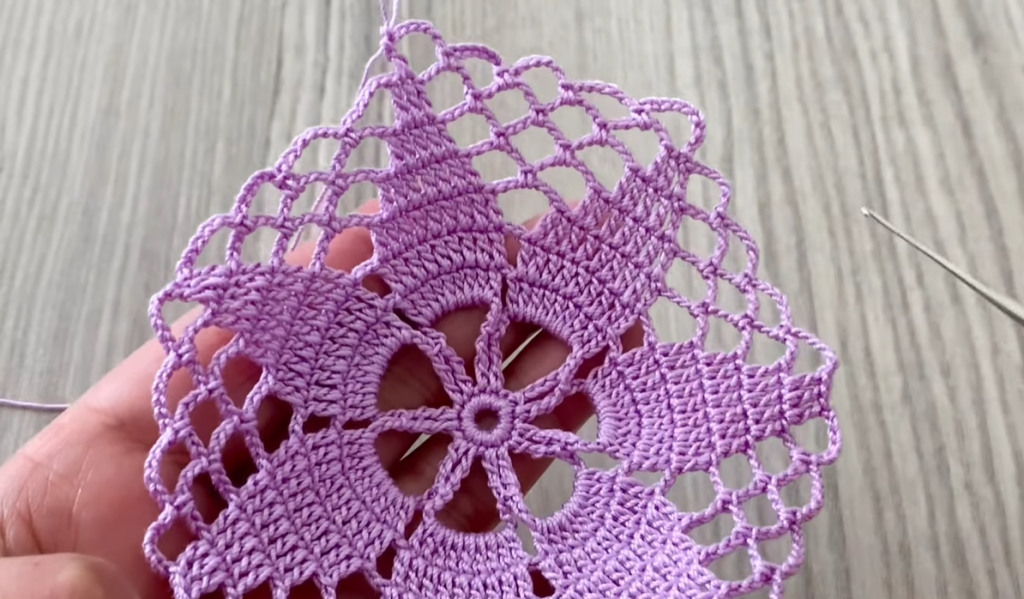
🔗 Body Section: Lattice Netting and Joining
This section begins working back and forth across a segment of the motif to create the linear border and attach subsequent motifs.
Establishing the First Edge
Row 4 (Lattice Side 1 – WS): ch 1 (sc in the sl st join). ch 5, sc into the ch 2 space at the top of the next petal. ch 5, sc into the sl st join between the next two petals. ch 5, sc into the ch 2 space of the 3rd petal. ch 5, sc into the sl st join between the 3rd and 4th petals.
Stop here. You have worked across the first 3 petals and have 4 ch 5 loops. Turn.
Row 5 (Top Edge – RS): sl st into the first 3 ch of the ch 5 loop. ch 3 (counts as dc), 2 dc in the same loop. ch 1. 3 dc in the next ch 5 loop, ch 1. Repeat twice. 3 dc in the last ch 5 loop. Turn.
Row 6 (Lattice Side 2 – WS): ch 1 (sc in the first dc). ch 5, sc into the center dc of the next 3 dc group. ch 5, sc into the center dc of the next 3 dc group. ch 5, sc into the center dc of the last 3 dc group. Turn.
Joining the Second Motif (First Side)
Row 7 (Joining Row – RS): ch 1 (sc in the sc below). ch 5. sc into the center ch of the ch 5 loop below. ch 5. sc into the next sc.

Start Second Motif: ch 6, sl st to the ch just worked to form a new ring. ch 3 (counts as dc), 11 dc into the new ring. sl st to the top of the starting ch 3 to join. (12 dc) Continue Motif 2: Repeat Rounds 2 and 3 exactly as for the first motif. 6 petals created. Do NOT fasten off.
Connecting the Motifs (Second Side)
Row 8 (Joining Back – WS): ch 1 (sc in the sl st join of Motif 2). ch 2, sl st into the center of the third ch 5 loop of the previous motif’s Row 6. ch 2, sc into the ch 2 space of the next petal on Motif 2.
Continue the ch 5 lattice and sc joins across Motif 2 exactly as in Row 4. Stop when you have worked across 3 petals of Motif 2 (4 ch 5 loops total). Turn.
- Continue repeating the sequence from Row 5 onward for the top edge and lattice, and embed a new motif in the same manner as Row 7 every time you reach the bottom edge.
🌊 Finishing Edge: The Scalloped Bottom
This edging works over the remaining unworked petals of the motifs to create the fringe.
- Attach Yarn: Join yarn with a sl st to the ch 2 space of the last unworked petal (Petal 6) of your last motif.
- Scallop: In the ch 2 space, work: 3 sc,ch 3,3 sc.
- Connecting Chain: ch 5.
- Next Scallop: sc into the center sl st join between the motifs below. ch 5.
- Petal 4/5 Scallop: In the ch 2 space of the 4th petal, work 3 sc,ch 3,3 sc. ch 5.
- Next Scallop: sc into the center sl st join between the next set of motifs. ch 5.
Repeat this pattern across the entire length of the border, creating a scallop on the 4th, 5th, and 6th petals of each motif, and connecting with the ch 5 lattice.
Video Tutorial:
🔨 Final Shaping and Blocking
Blocking is absolutely essential to make the pattern “pop” and achieve the flat, crisp geometry seen in the image.
- Weave: Weave in all yarn ends securely on the back of the work.
- Soak: Soak the lace in cool water with a small amount of liquid starch (for a crisp finish) or a gentle detergent. Do not wring or twist.
- Pin: Lay the wet lace on a blocking mat. Use T-pins to carefully pin out every single corner point, the center of each motif, and the outer points of the scallops. Pin the top edge perfectly straight.
- Dry: Allow the lace to dry completely flat for 24 hours before unpinning.
This beautiful Royal Lattice Lace is now ready to add an elegant touch to any project. What will you use this intricate border for?


