
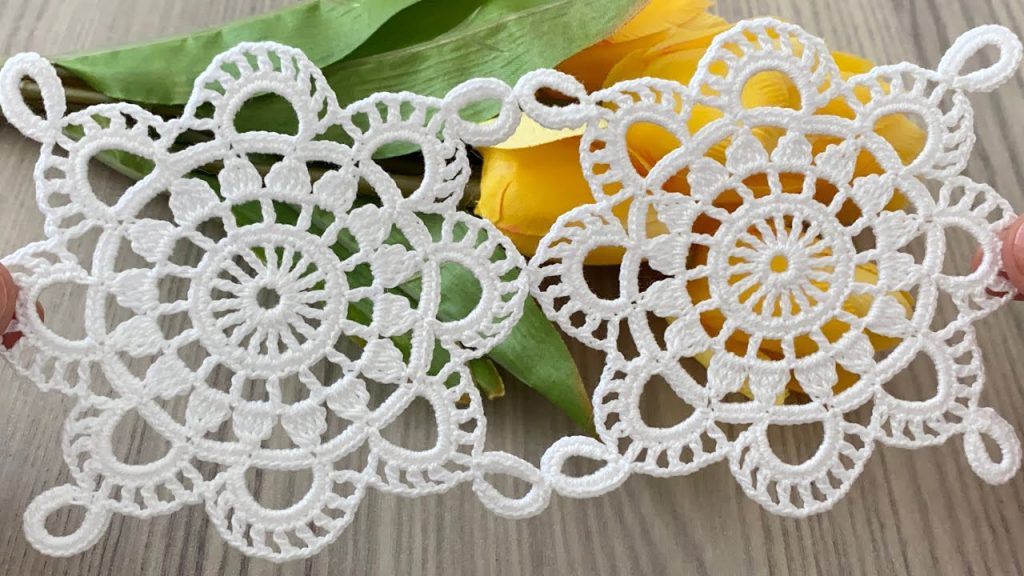
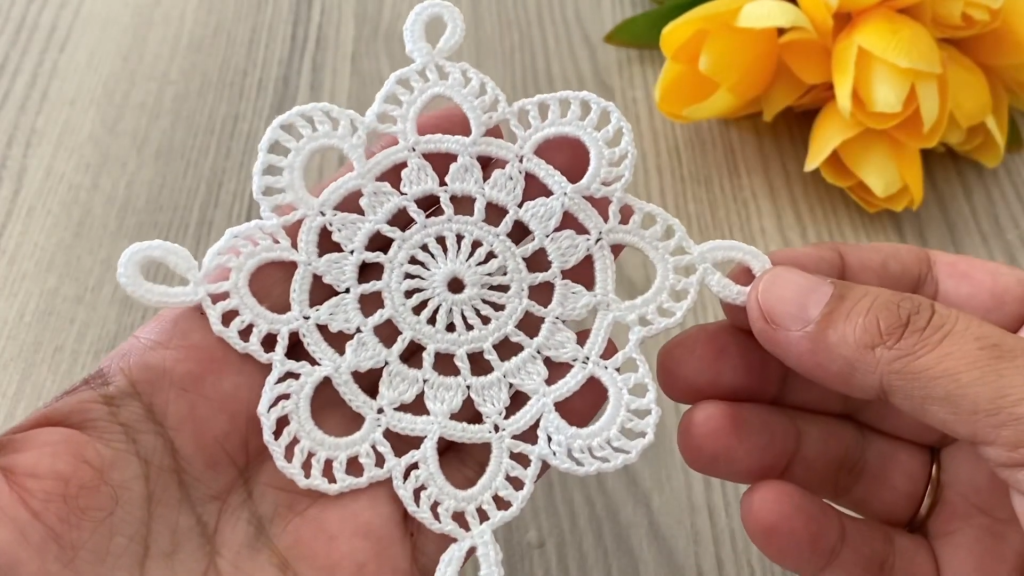
🌟 Introduction: Crafting Continuous Delicate Lace
Welcome to the craft table! Today, we’re diving into a project that creates a stunning, repeating lace motif, perfect for use as an edging, trim, bookmark, or decorative garland. The piece in the image showcases a lovely, multi-round circular medallion with a distinctive star center and a full, lacy shell border, connected by elegant chain links. This pattern is worked by completing the first motif entirely, and then joining subsequent motifs as you crochet the final round.
This project is a fantastic way to practice consistency in tension and achieve that crisp, lightweight lace look. We’ll be using standard US crochet terms throughout.
Skill Level: Intermediate
Requires comfort with working in the round, shells, picots, and joining with slip stitches.
🛍️ Materials: Your Essential Supplies
To capture the beautiful, crisp detail of the white lace in the photo, cotton thread is the best choice.
- Yarn: Lace Weight or Thread Weight Cotton (Size 10 is standard for doilies, but Size 20 or 30 will yield a finer, more delicate result). The sample is a bright white.
- Hook: A steel crochet hook sized appropriately for your thread. For Size 10 thread, a 1.5mm to 1.75mm hook (US 7 or 8 steel) is recommended.
- Tapestry Needle: For weaving in ends.
- Scissors
- Blocking Supplies: Highly recommended to define the shell scallops and the circular shape.
📋 Abbreviations (US Terms)
- ch: chain
- sl st: slip stitch
- sc: single crochet
- dc: double crochet
- tr: treble crochet (or triple crochet)
- sk: skip
- sp: space
- ch-sp: chain space
- Picot: ch 3, sl st into the first ch
- Shell: 5 dc in the same stitch or space
- ( ): Instructions in parentheses are worked into the same stitch or space.
- **: Instructions between asterisks are repeated.
- [ ]: Total number of stitches/spaces at the end of the round.
- JOIN: Join with a sl st to the corresponding ch-sp or stitch on the previous motif.
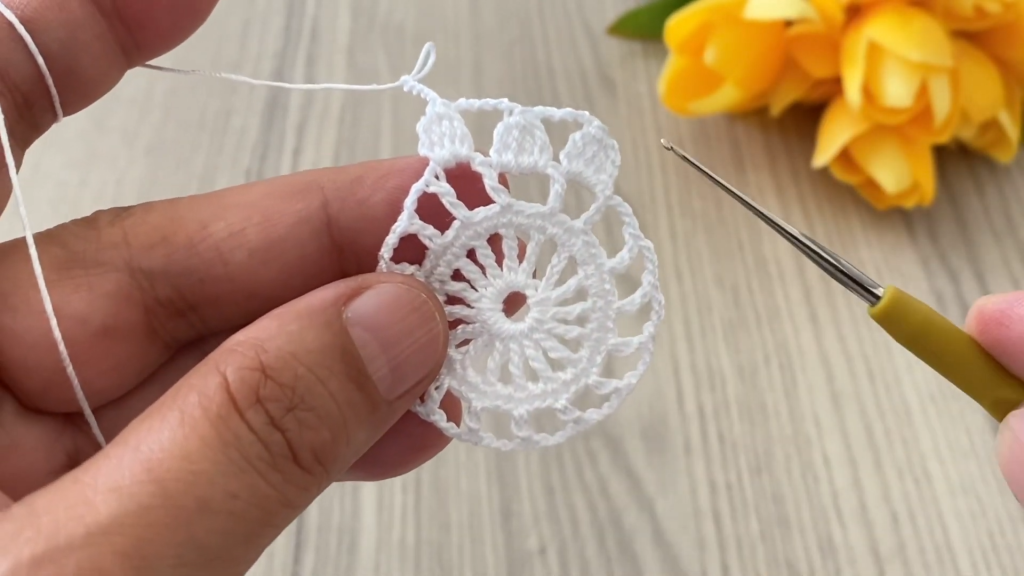
🌹 Part 1: The Layered Medallion Motif (Base)
We will create a motif with 12 points, which translates nicely into a circular floral shape.
Round 1: The Dense Center
- Ch 4, sl st into the first ch to form a ring. (Or use a Magic Ring).
- Ch 3 (counts as first dc), work 19 dc into the ring.
- Sl st to the top of the beginning ch 3 to join. [20 dc]
Round 2: Starburst Spokes
- Ch 5 (counts as 1 dc, ch 2). Sk 1 dc, dc in the next dc.
- *Ch 2, sk 1 dc, dc in the next dc.*
- Repeat from * to * around. You will have 10 chain-2 spaces.
- Ch 2, sl st to the 3rd ch of the beginning ch 5 to join. [10 dc, 10 ch-2 sps]
Round 3: Building the Shell Base
- Sl st into the first ch-2 sp.
- Ch 3 (counts as 1 dc), work (2 dc, ch 1, 3 dc) into the same ch-2 sp. This is your first Petal Shell.
- *Sk next dc. Petal Shell (3 dc, ch 1, 3 dc) in the next ch-2 sp.*
- Repeat from * to * around.
- Sl st to the top of the beginning ch 3 to join. [10 Petal Shells]
Round 4: Lacy Round
This round establishes the lacy openwork between the main petal shape and the final shell border.
- Ch 1 (does not count as a stitch), sc in the top of the first dc.
- *Ch 5. Sc into the ch-1 sp at the peak of the shell.
- Ch 5. Sc into the first dc of the next shell.*
- Repeat from * to * around.
- Sl st to the beginning sc to join. [20 ch-5 sps]
- Note: You should have a loop over the center of each shell and a loop over the “valley” between shells.
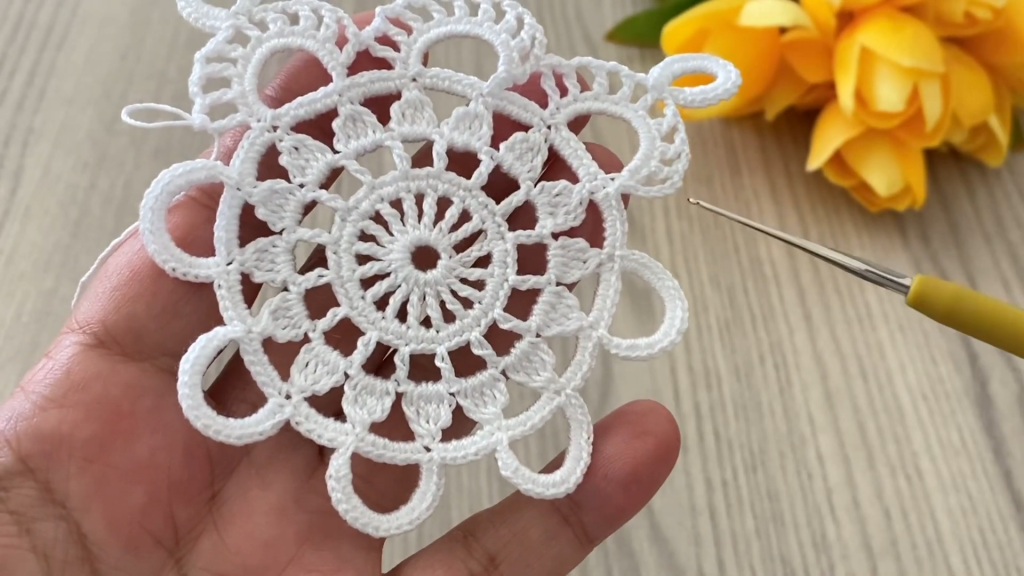
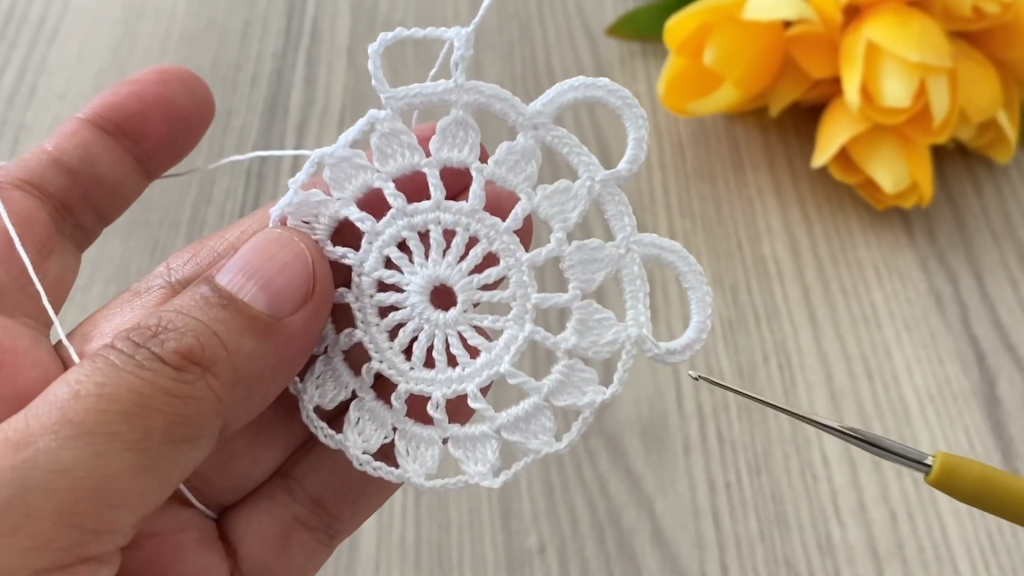
🌊 Part 2: The Scalloped Edge and Joining
This final round creates the beautiful, full scallops and the linking loops seen in the strip.
Round 5: Scalloped Edge (First Motif ONLY)
- Sl st into the first ch-5 sp.
- Ch 3 (counts as 1 dc), work (5 dc, ch 1, 6 dc) into the same ch-5 sp (this should be the loop over the shell peak). This creates a large Scallop.
- Sc in the next ch-5 sp (this should be the loop over the valley).
- *Large Scallop (6 dc, ch 1, 6 dc) in the next ch-5 sp.
- Sc in the next ch-5 sp.*
- Repeat from * to * around. [10 Scallops]
- Sl st to the top of the beginning ch 3 to join. Fasten off and weave in the ends.
Round 5: Scalloped Edge and Joining (Second & Subsequent Motifs)
When working the second motif, you will join it to the first motif at two specific points, using the ch-1 space at the peak of the scallops for joining.
Joining Technique (Chain Loop Join – CJ):
- Work ch 5, JOIN (sl st into the center of the large joining loop on the previous motif), ch 5.
- Work the round as written until you are ready to work the Large Scallop that will sit directly on the side that touches the previous motif. You need to identify four scallops to join to the previous motif (two joining points on the top edge and two on the bottom edge).
- First Joining Scallop (Top Edge):
- Work 6 dc into the ch-5 sp.
- Ch 1, JOIN (sl st into the ch-1 sp of the corresponding scallop on Motif 1), ch 1.
- Work 6 dc into the same ch-5 sp.
- Sc into the next ch-5 sp.
- Connecting Loop (Center):
- Work the next Scallop completely as written (6 dc, ch 1, 6 dc) into the next ch-5 sp.
- Sc into the next ch-5 sp.
- Now, this is where the motifs are connected by the chain loops:
- CJ (Chain Loop Join): Work ch 5, JOIN (sl st into the center of the large joining loop on Motif 1), ch 5.
- Sc into the next ch-5 sp.
- Second Joining Scallop (Bottom Edge):
- Work 6 dc into the ch-5 sp.
- Ch 1, JOIN (sl st into the ch-1 sp of the corresponding scallop on Motif 1), ch 1.
- Work 6 dc into the same ch-5 sp.
- Sc into the next ch-5 sp.
- Complete the Motif:
- Continue the pattern (Scallop, Sc, Scallop, Sc) for the remaining scallops on the motif.
- Sl st to the top of the beginning ch 3 to join.
Repeat this process for every subsequent medallion until your strip reaches the desired length.
Video Tutorial:
✨ Finishing and Blocking: Defining the Lace
Blocking is absolutely necessary to make the scallops and the joining links lay flat, open up the center star, and create a uniform, professional finish like the one pictured.
- Preparation: Wet the entire strip thoroughly (wet blocking) or use steam (steam blocking).
- Pinning: Lay the damp lace strip on a blocking mat or towel. Pin out the center of the motifs. Crucially, pin out every single ch-1 space on the final scallop edge to ensure a sharp point.
- The Loops: Gently stretch and pin the small joining loops (the ch 10 section with the sl st) to define their perfectly round shape.
- Drying: Allow the lace to dry completely and stiffen before unpinning.
Your beautiful Layered Lace Medallion Strip is now complete and ready to adorn your home or clothing!


