
💡 Introduction: Weaving Light and Texture
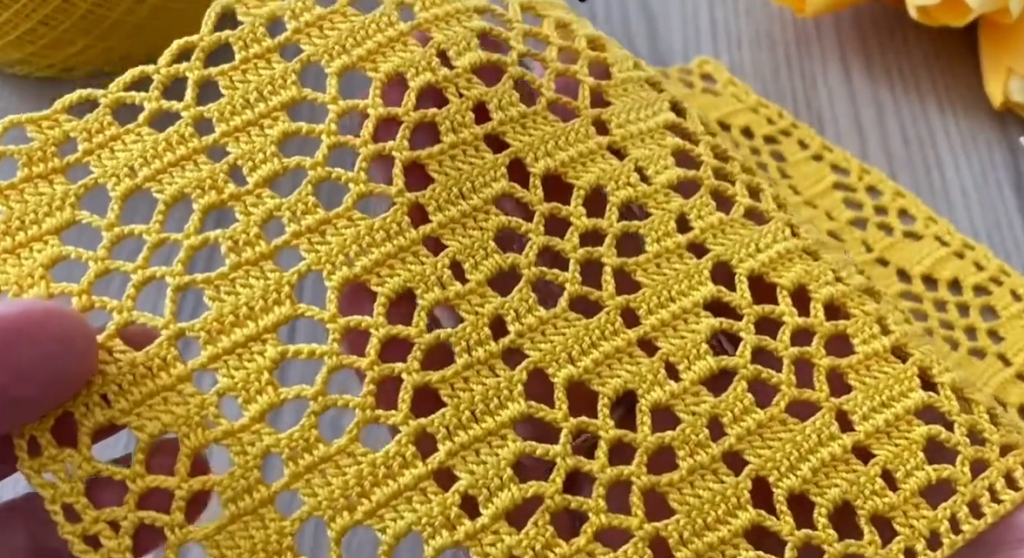
Welcome to a pattern that proves lace doesn’t have to be fussy! The gorgeous yellow fabric in the image uses a rhythmic two-row repeat to create an interlocking network of dense ‘V’ shapes and open lattice work. This design offers a wonderful balance of warmth and ventilation, making it perfect for year-round accessories like shawls, table runners, or even beach cover-ups.
The pattern is achieved by alternating a ‘Fan’ or ‘Cluster’ Row (which builds the solid V-shapes) with a ‘Lattice’ Row (which creates the airy connecting chains). We will be working in straight rows, and the pattern is easily adaptable to any width. We’ll be using standard US crochet terms.
Skill Level: Intermediate
Requires comfort with basic stitches, chaining, and accurate stitch placement in chain spaces.
🛍️ Materials: Your Essential Supplies
Since this is an open lace fabric, choosing a yarn with good drape will best show off the stitch definition.
- Yarn: Choose a lightweight yarn (Sport, DK, or light Fingering weight) in cotton, acrylic, or a blend. The vibrant yellow in the sample is striking!
- Hook: Select a hook size appropriate for your yarn weight, or one size larger to ensure the lattice work remains open and airy. (e.g., a 4.0 mm [US G/6] hook for a DK weight yarn).
- Tapestry Needle: For weaving in ends.
- Scissors
📋 Abbreviations (US Terms)
- ch: chain
- sl st: slip stitch
- sc: single crochet
- dc: double crochet
- tr: treble crochet (or triple crochet)
- sk: skip
- sp: space
- ch-sp: chain space
- Fan: (dc, ch 1, dc) worked into the same space
- Cluster: 3 dc worked together into the same space (similar to a decrease, but into a space)
- **: Instructions between asterisks are repeated.
- ( ): Instructions in parentheses are worked into the same stitch or space.
📐 Pattern Instructions: The Golden Lattice Stitch
This pattern is worked in rows and uses a stitch multiple of 8 plus 4 for the foundation chain.
Foundation Chain
- Chain a multiple of 8 plus 4.
- Example for a small swatch: Ch $24 + 4 = 28$.
Row 1: Foundation V-Row
- Ch 3 (counts as first dc). Dc in the 4th ch from hook. Ch 1, sk 1 ch, dc in the next ch.
- *Ch 1, sk 1 ch, V-St (dc, ch 1, dc) in the next ch. Ch 1, sk 1 ch, dc in the next ch. Ch 1, sk 1 ch, dc in the next ch.*
- Repeat from * to * across the row.
- End with ch 1, sk 1 ch, V-St (dc, ch 1, dc) in the final ch. Turn.
Note: This row establishes the starting V-Stitches and the chain-1 lattice.
Row 2: Building the Solid Fans (The Cluster Row)
- Ch 1 (does not count as a stitch), sc in the first dc.
- Ch 3, sc in the ch-1 sp of the first V-St.
- *Ch 3. Sc in the next ch-1 sp. Ch 3. Sc in the next ch-1 sp.
- Ch 3. Shell (5 dc) in the ch-1 sp of the V-St.*
- Repeat from * to * across the row.
- End the last repeat with a Shell. Then, ch 3, sc in the final ch-1 sp.
- Ch 3, sc in the top of the turning ch 3 from the previous row. Turn.

Row 3: Creating the Lattice and Diamond Shape (The Lattice Row)
This row creates the airy diamond shapes, working into the ch-3 sps.
- Ch 4 (counts as 1 tr, or ch 3 for dc + ch 1 for sp). Tr in the first ch-3 sp.
- *Ch 3, sk the next sc and ch-3 sp. Tr in the next ch-3 sp.
- Ch 1, sk 1 dc, dc in the next dc. Ch 1, sk 1 dc, V-St (dc, ch 1, dc) in the center (3rd) dc of the Shell. Ch 1, sk 1 dc, dc in the next dc. Ch 1, sk 1 dc, tr in the next ch-3 sp.*
- Repeat from * to * across the row.
- End with Ch 3, sk the next sc and ch-3 sp, tr in the final ch-3 sp. Ch 1, dc in the last sc. Turn.

Row 4: Returning to the Solid Fans
This row re-establishes the solid fan texture, shifting the fans slightly from Row 2.
- Ch 1 (does not count as a stitch), sc in the first ch-1 sp.
- Ch 3. Shell (5 dc) in the ch-3 sp below.
- *Ch 3. Sc in the ch-1 sp. Ch 3. Sc in the ch-1 sp of the V-St. Ch 3. Sc in the ch-1 sp.
- Ch 3. Shell (5 dc) in the ch-3 sp below.*
- Repeat from * to * across the row.
- End with ch 3, sc in the last ch-1 sp. Ch 3, sc in the 4th chain of the turning ch 4 from the previous row. Turn.
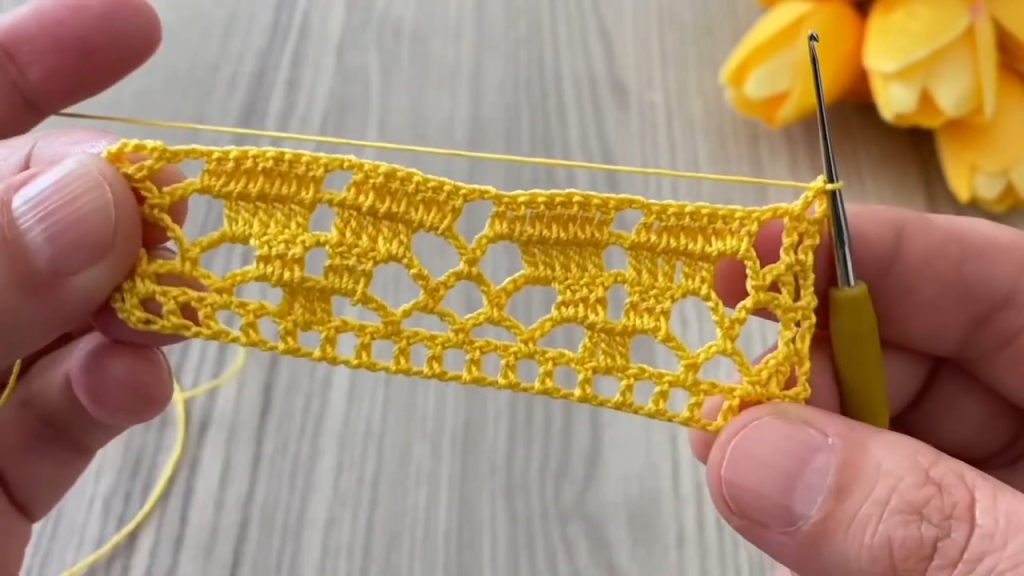
🔁 The Repeat and Continuing the Fabric
The core of the Golden Lattice Lace pattern is the two-row repeat that alternates the dense work with the open lattice.
To Continue the Fabric:
- Repeat Row 3 (Lattice Row) and Row 4 (Fan Row) until your piece reaches the desired length.
Important Notes on Repeat:
- Row 3 (Lattice): This row positions the V-Stitches into the center of the Shells from the previous row, forming the diamond base.
- Row 4 (Fan): This row positions the Shells into the center of the large ch-3 spaces created by Row 3, which fall between the V-Stitches.
Video Tutorial:
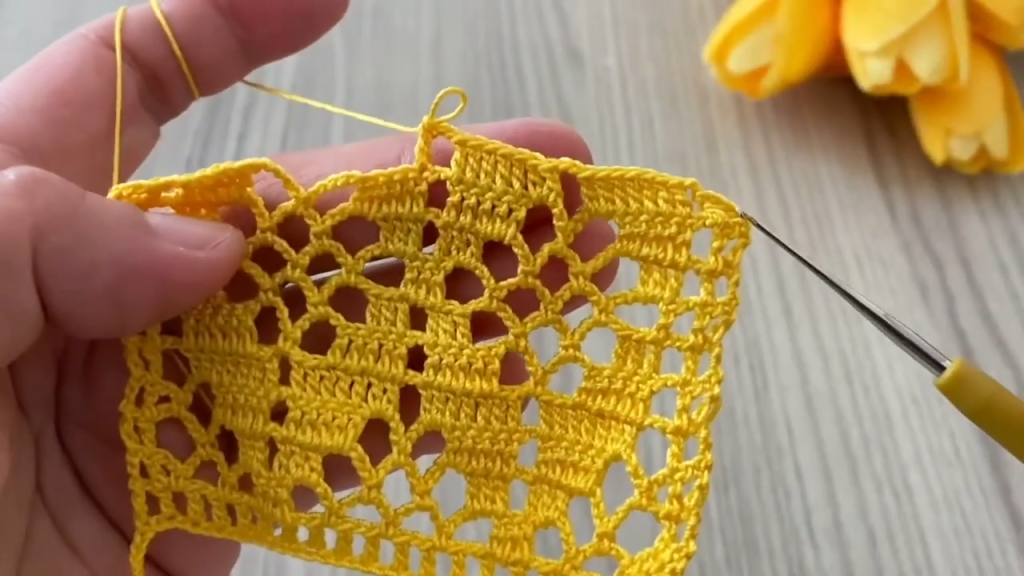
✂️ Finishing: Edging and Blocking
Edging
To give your fabric a clean, finished look, you can work a final edging around the entire perimeter. The sample has a simple scallop along the top and bottom.
- Side Edges: Work a neat, even row of sc stitches down the raw edges of your piece. For example, work 2 sc in the side of each dc or 3 sc in the side of each tr to keep the edge flat.
- Scallop Edges (Top/Bottom): Work (sc, ch 3, sc) into the peak of each fan/shell and sc into the valleys/ch spaces.
Blocking: Opening the Lattice
Blocking is highly recommended to fully open up the intricate lattice work and straighten the edges.
- Dampen: Wet the fabric completely or use steam.
- Pin: Gently stretch the piece, pinning the top and bottom edges (where the scallops are) and the side edges to ensure a straight, even shape. Pin out the points of the scallop or V-shapes along the top and bottom edge.
- Dry: Allow the piece to dry completely before unpinning.
Your beautiful Golden Lattice Lace fabric is ready! What stunning project will you turn this into?


