
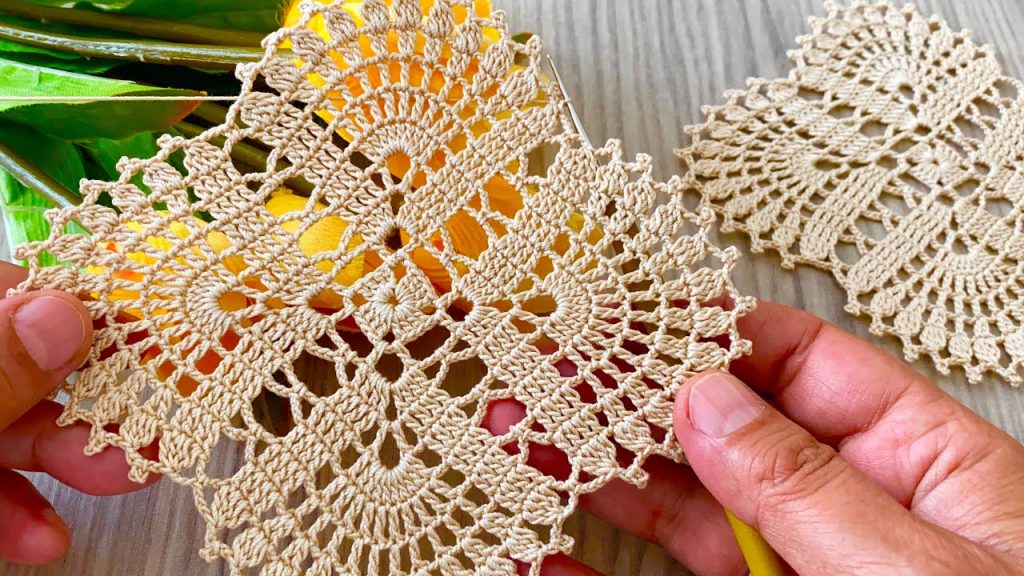
Welcome, crocheters! Prepare to fall in love with the “Blooming Lace Square Motif,” a design inspired by the delicate and elegant stitchwork shown in the video. This motif uses a delightful combination of V-stitches, shell clusters, and chain spaces to create a stunning, lacy square that appears to bloom from the center. It’s perfect for everything from heirloom blankets and shawls to light scarves and modular garments.
This pattern is designed to build out from the center, using increasing rows to maintain a flat, square shape while introducing beautiful openwork texture.

🪢 Materials & Tools
| Icon | Item | Details |
| Yarn | Main Yarn (MC) | Light Worsted (DK/Category 3) or Fingering Weight yarn is recommended for the lacy appearance. Choose a solid color for maximum texture visibility. |
| Hook | Main Hook | 4.0 mm (G/6) for DK yarn, or the size recommended on your yarn label. |
| Notions | Finishing Tools | Scissors, Yarn Needle (for weaving ends), Stitch Markers (essential for marking corners). |
| Notions | Optional Accent | A small amount of contrasting yarn for a different-colored final border round. |
📏 Sizing & Gauge
The gauge for a lace motif is flexible, as it depends heavily on your yarn choice. The key is to maintain a loose, even tension.
| Measurement | Result |
| Single Motif | Approx. 15 cm x 15 cm (6 x 6 inches) using DK weight yarn and a 4.0 mm hook, after light blocking. |
| Gauge Swatch | After completing Round 4, the side length should measure approximately 6.5 cm (2.5 inches). |
| Note | You can easily adjust the size of the final square by adding or subtracting repeat rounds at the end. |
📚 Abbreviations & Special Stitches
This pattern uses US terminology. The key to the motif is the Shell Cluster, which creates the lacy fan effect.
| Abbreviation | U.S. Terminology | Description |
| ch | Chain | |
| sl st | Slip Stitch | |
| sc | Single Crochet | |
| dc | Double Crochet | |
| tr | Treble Crochet | |
| sp | Space | |
| sk | Skip | |
| st(s) | Stitch(es) | |
| rep | Repeat | |
| CS | Corner Space |
🌟 Special Stitch: 5-DC Shell Cluster (Shell)
Work 5 Double Crochet stitches into the same chain space or stitch.
📝 Pattern Notes
- Chain 3: Ch 3 at the start of a round always counts as one Double Crochet (dc).
- Corner Definition: All four corners are always defined by the sequence of (3 dc, ch 2, 3 dc), or as specified for height expansion.
- Joining: Always join rounds with a sl st to the top of the starting ch-3 or first stitch.
🌼 Part 3: The Blooming Lace Square
Foundation Round (Starting Point):

Ch 4, sl st into the first ch to form a ring, OR start with a Magic Ring.
Round 1 (DC Base):
Ch 3 (counts as 1 dc), 11 dc into the ring. Sl st to the top of the starting Ch 3 to join. Pull the tail tight if using a Magic Ring.
(12 dc).
Round 2 (V-Stitch Expansion):
Ch 3 (counts as 1 dc), dc in the same stitch (forming an increase).
Work [ch 1, sk 1 st, 2 dc in the next st] 5 times.
Ch 1, sk 1 st. Sl st to the top of the starting Ch 3.
(12 dc, 6 ch-1 spaces).
Round 3 (Establishing Corners):
Sl st into the first ch-1 space.
Ch 3 (counts as 1 dc), 2 dc into the same ch-1 sp.
- Side: Work [ch 2, sk the 2-dc cluster, 3 dc into the next ch-1 sp] once.
- Corner: Work [ch 2, sk the 2-dc cluster, (3 tr, ch 2, 3 tr) into the next ch-1 sp] once.
- Repeat: Rep the sequence of [Side, Corner] two more times.
- Side: Work [ch 2, sk the 2-dc cluster, 3 dc into the next ch-1 sp].
- Final Corner: Work [ch 2, sk the 2-dc cluster, (3 tr, ch 2)] into the last ch-1 sp. Sl st to the top of the starting Ch 3.(4 corners, 4 side clusters, 8 ch-2 spaces).
Round 4 (Shells & Picot Effect):
Ch 1, sc in the first 3 dc.
- Side: Work [sc in the ch-2 sp, ch 3, sc in the next ch-2 sp]. Sc in the next 3 dc.
- Corner: Work [sc in the next 3 tr, (sc, ch 3, sc) into the ch-2 corner sp]. Sc in the next 3 tr.
- Repeat: Rep the entire sequence [Side, Corner] three more times around.
- Finish: Sl st to the starting sc.(Total 4 picot corners, 4 side picots).
Round 5 (Lacy Expansion):
Sl st into the next st until you reach the center ch-3 corner sp.
Ch 3 (counts as 1 dc), 2 dc, ch 2, 3 dc into the ch-3 corner sp (first CS made).
- Side: Work [ch 1, sk 3 sc, 3 dc into the next ch-3 sp] once.
- Corner: Work [ch 1, sk 3 sc, (3 dc, ch 2, 3 dc) into the next ch-3 corner sp].
- Repeat: Rep the sequence [Side, Corner] two more times.
- Side: Work [ch 1, sk 3 sc, 3 dc into the next ch-3 sp].
- Finish: Work ch 1, sk 3 sc. Sl st to the top of the starting Ch 3.(4 corners, 4 side clusters, 8 ch-1 spaces).
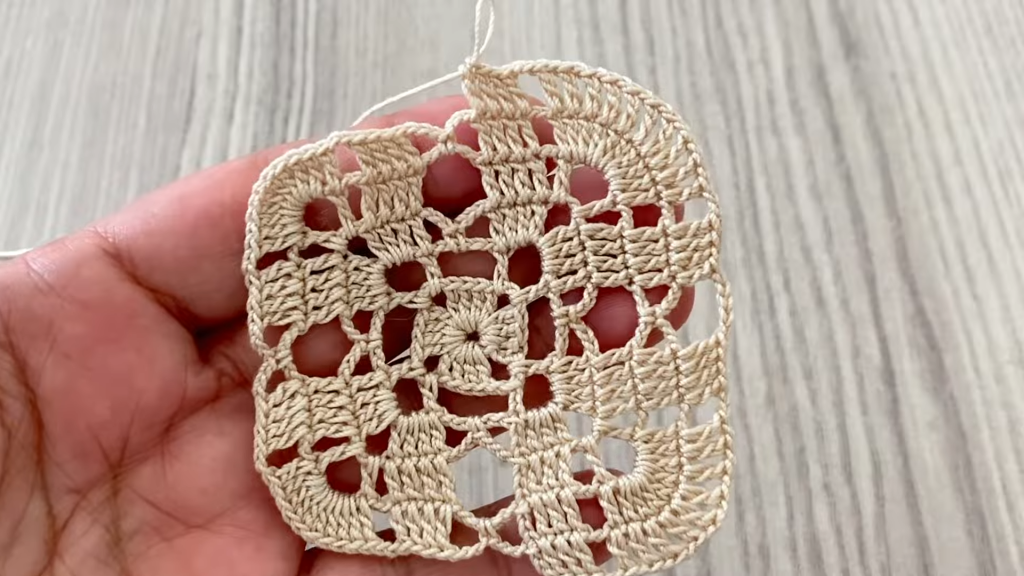
Round 6 (The Flower Shells):
Sl st into the next 2 dc and the first ch-1 sp.
Ch 3 (counts as 1 dc), 2 dc into the ch-1 sp (first half of shell).
- Corner: Work [ch 1, sk 3 dc, (3 dc, ch 2, 3 dc) into the ch-2 corner sp] once.
- Side: Work [ch 1, sk 3 dc, 5-DC Shell into the next ch-1 sp, ch 1, sk 3 dc].
- Repeat: Rep the sequence [Corner, Side] two more times.
- Final Corner: Work [ch 1, sk 3 dc, (3 dc, ch 2, 3 dc) into the ch-2 corner sp].
- Side Finish: Work [ch 1, sk 3 dc, 2 dc into the starting ch-1 sp]. Sl st to the top of the starting Ch 3 to complete the first shell.(4 corners, 4 large shells, 8 ch-1 spaces).
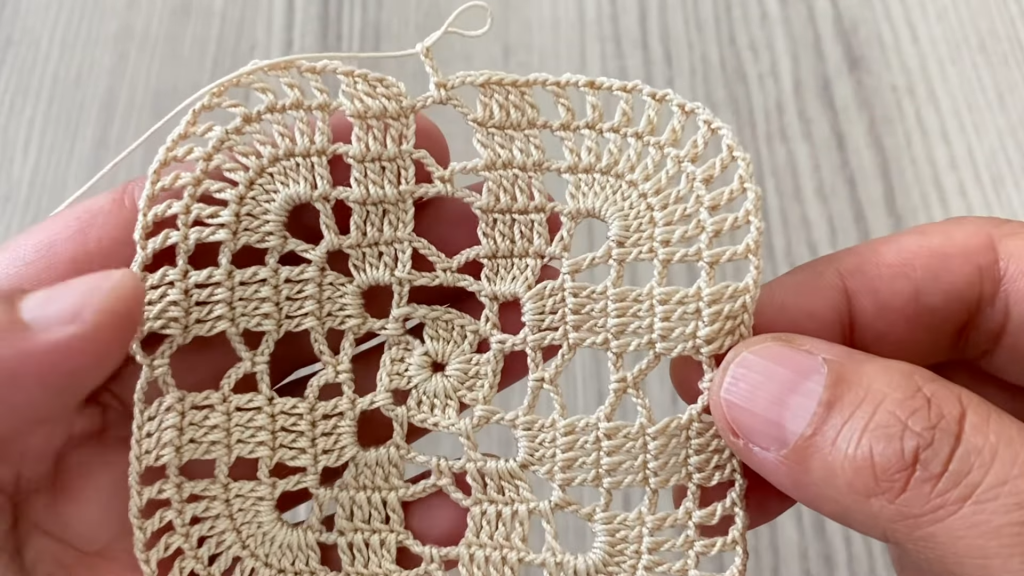
Round 7 (Final Expansion/Joining Round):
Sl st into the next 2 dc and the first ch-1 sp.
Ch 3 (counts as 1 dc), 2 dc into the ch-1 sp (first half of shell).
- Corner: Work [ch 1, sk 3 dc, (3 dc, ch 2, 3 dc) into the ch-2 corner sp] once.
- Side: Work [ch 1, sk 3 dc, 3 dc into the 3rd dc of the 5-DC Shell (the center dc)].
- Side 2: Work [ch 1, sk 2 dc, 3 dc into the next ch-1 sp].
- Repeat: Rep the sequence [Corner, Side, Side 2] three more times.
- Final Corner: Work [ch 1, sk 3 dc, (3 dc, ch 2, 3 dc) into the ch-2 corner sp].
- Side Finish: Work [ch 1, sk 3 dc, 3 dc into the 3rd dc of the 5-DC Shell, ch 1, 2 dc into the starting ch-1 sp]. Sl st to the top of the starting Ch 3 to complete the shell.(4 corners, 8 side clusters, 12 ch-1 spaces).

✂️ Joining & Finishing
This square is perfect for joining using several popular methods to create large textiles.
- Blocking: Due to the extensive use of chain spaces and clusters, wet blocking is mandatory for this motif to open up the lace, define the square’s corners, and ensure consistent size for joining. Pin each motif to size and allow it to dry completely.
- Invisible Join: Fasten off the final round and use an invisible join technique to create a seamless finish at the end of Round 7.
- Joining Method (SC Method): This method creates a flat, durable seam.
- With the Wrong Sides (WS) together, align two motifs.
- Join yarn in the ch-2 corner space of both motifs. Work
(sc, ch 1, sc)into the corner of both squares simultaneously. - Work SC through the corresponding stitch/chain space of both motifs, across the entire side, using a loose tension.
- Repeat at the next corner.
- Joining Method (Sl St Method): This method creates a subtle raised braid effect.
- With the Wrong Sides (WS) together, align two motifs.
- Join yarn in the ch-2 corner space of both motifs.
- Work Sl st through the corresponding stitch/chain space of both motifs, across the entire side. This is worked tightly to create the braid.
- Weaving Ends: Weave all tails securely into the backs of the stitches, following the path of the existing yarn. Since the work is lacy, take extra care to hide the tails within the bulk of the DC clusters.


