
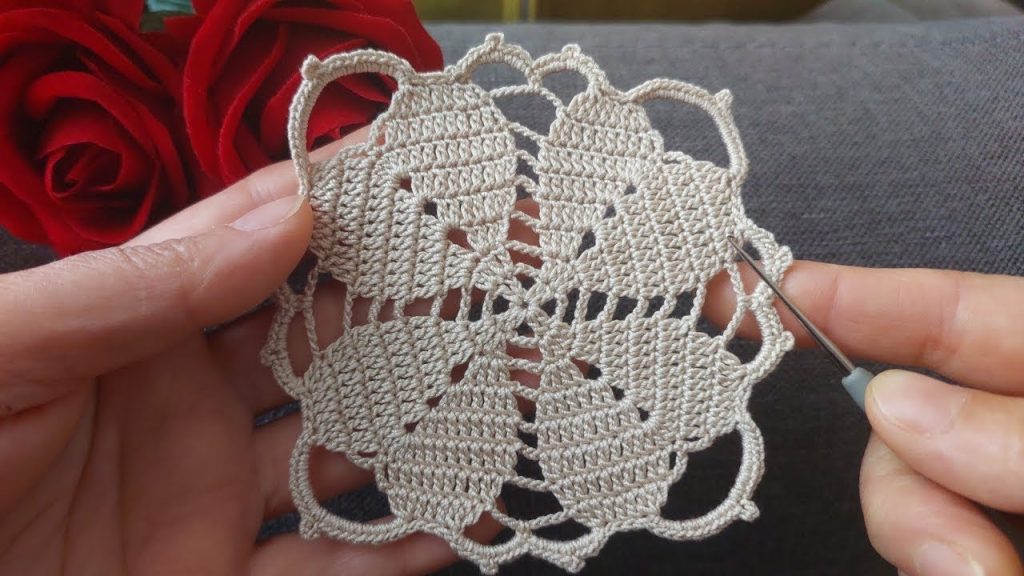
Hello, fellow yarn lovers! I’m excited to share a new pattern that combines classic crochet techniques with a modern, elegant twist. This pattern is for the Stella Doily, a beautiful square piece with a delicate, lacy border that creates a lovely contrast with its solid center. The design is perfect for adding a touch of handmade charm to your home decor or for creating a thoughtful gift.
This pattern uses US crochet terminology. For the best results, use a fine or fingering weight cotton yarn or crochet thread. A size 1.5 mm to 2.25 mm crochet hook is ideal, but as always, choose a hook that works best with your chosen yarn to achieve a nice drape and crisp stitch definition.
Materials
- Yarn: Fine or fingering weight cotton yarn or thread (approximately 50-75 yards)
- Hook: 1.5 mm to 2.25 mm crochet hook
- Scissors
- Tapestry Needle for weaving in ends
- Stitch Markers (optional, but helpful for marking corners)
Special Stitches
- Beginning Cluster (BCl): Chain 3 (counts as a double crochet), yarn over, insert hook into the same stitch or space, pull up a loop, yarn over, pull through 2 loops. (Yarn over, insert hook into the same stitch or space, pull up a loop, yarn over, pull through 2 loops) twice. You should have 4 loops on your hook. Yarn over, pull through all 4 loops.
- Cluster (Cl): Yarn over, insert hook into the specified stitch or space, pull up a loop, yarn over, pull through 2 loops. (Yarn over, insert hook into the same stitch or space, pull up a loop, yarn over, pull through 2 loops) 3 more times. You should have 5 loops on your hook. Yarn over, pull through all 5 loops.
- Picot: Chain 3, slip stitch into the first chain.
Pattern Instructions
Note: The doily is worked in the round, forming a square. Join each round with a slip stitch unless otherwise instructed. A chain-3 at the beginning of a round counts as a double crochet (dc).
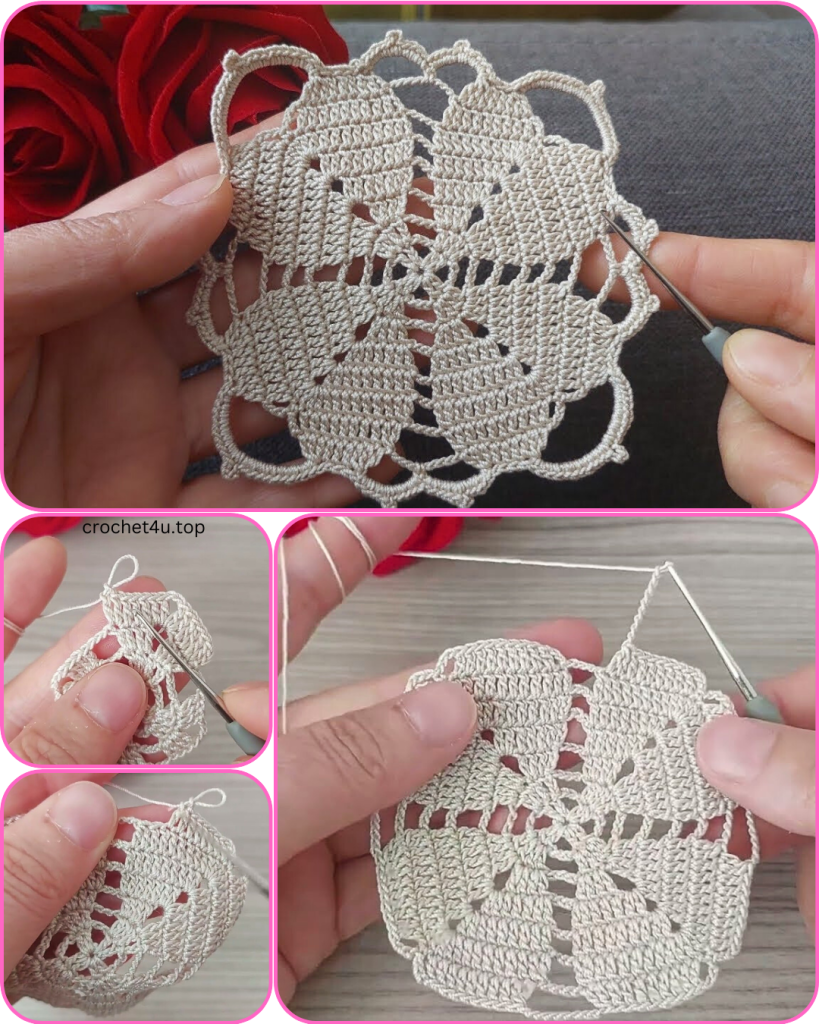
Solid Center Section
Round 1: Make a magic ring. Chain 3, then make 2 dc in the ring. (Chain 2, 3 dc in the ring) 3 times. Chain 2, join with a sl st to the top of the beginning ch-3. (12 dc, 4 ch-2 spaces)
Round 2: Chain 3. Dc in the next 2 stitches. (2 dc, ch 2, 2 dc) in the corner ch-2 space. Dc in the next 3 stitches. Repeat from * to * 3 more times, omitting the last 3 dc on the final repeat. Join with a sl st to the top of the beginning ch-3. (28 dc, 4 ch-2 spaces)
Round 3: Chain 3. Dc in each stitch to the corner ch-2 space. (2 dc, ch 2, 2 dc) in the corner ch-2 space. Dc in each stitch to the next corner ch-2 space. Repeat from * to * 3 more times, omitting the last dc group on the final repeat. Join with a sl st to the top of the beginning ch-3. (44 dc, 4 ch-2 spaces)
Rounds 4-5: Repeat Round 3. You should have 60 dc (Round 4) and 76 dc (Round 5) plus the 4 ch-2 corner spaces.
Lace Transition
Round 6: Chain 1 (does not count as a stitch). Sc in the same stitch. Chain 3, skip 2 stitches, sc in the next stitch. Repeat from * to * to the corner ch-2 space. In the corner ch-2 space, make (sc, ch 3, sc). Then, repeat the ch 3, skip 2, sc pattern along the side to the next corner. Repeat from * to * around. Join with a sl st to the first sc.
Round 7: Slip stitch into the first ch-3 space. Chain 3. (2 dc, ch 2, 3 dc) in the same space. Chain 1, skip the next sc. In the next ch-3 space, make (3 dc, ch 2, 3 dc). Repeat from * to * around. Join with a sl st to the top of the beginning ch-3. (This will create a shell in each ch-3 space around the doily, including the corners, giving it a subtle wave).
Rounded Corner Border
Round 8: Slip stitch into the next 2 dc and into the ch-2 space. BCl in the same space. Chain 5. Cluster in the next ch-1 space between shells. (Chain 5, Cluster in the next ch-2 space of the shell) until you reach the next corner. In the corner ch-2 space, make (Cluster, ch 3, Cluster). Repeat from * to * around. Join with a sl st to the top of the beginning BCl. (The corner will now have a defined chain space).
Round 9: Chain 1 (does not count as a stitch). Sc in the top of the BCl. 5 sc in the next ch-5 space. Sc in the top of the next Cluster. Repeat this pattern around the sides. When you reach a corner ch-3 space, make (3 sc, Picot, 3 sc) in that space. Continue the pattern of 5 sc in the ch-5 spaces and 1 sc in the Cluster tops around the entire doily. Join with a sl st to the first sc.
Round 10: Chain 1 (does not count as a stitch). Sc in the same stitch. Chain 3, skip 2 sc. Sc in the next sc. Repeat this pattern until you reach the corner. At the corner, make (sc, ch 3, sc, ch 3, sc) in the corner Picot. Continue the chain-3, skip 2, sc pattern along the sides. Join with a sl st to the first sc.
Round 11: Slip stitch into the first ch-3 space. Chain 3. (Dc, Picot, 2 dc) in the same space. Chain 1, skip the next sc. In the next ch-3 space, make (2 dc, Picot, 2 dc). Repeat from * to * around. When you get to a corner, you will work into the three ch-3 spaces. In each of the three corner ch-3 spaces, make (2 dc, Picot, 2 dc). Continue around the doily. Join with a sl st to the top of the beginning ch-3.
Fasten off and weave in all ends securely.
Video Tutorial:
Finishing Your Doily
After completing all the rounds and weaving in the ends, your doily may not be a perfect square. This is where blocking comes in. Blocking is the key to giving your crochet piece a professional, crisp finish.
Here’s how to block your Stella Doily:
- Wet it: Submerge your doily in cool water, or use a spray bottle to get it thoroughly damp. Do not wring or twist it.
- Remove excess water: Gently squeeze the water out and then roll the doily in a clean towel to absorb more moisture.
- Shape and pin: Lay the doily on a foam blocking mat or a thick towel. Gently stretch and shape the doily, focusing on making the center square and the outer border as straight and symmetrical as possible. Use rust-proof pins to secure the corners and each of the rounded points of the border.
- Let it dry: Allow the doily to air dry completely. This can take a day or two.
- Unpin: Once dry, carefully unpin the doily. The stitches will be set, and the pattern will be perfectly defined.
Your beautiful Stella Doily is now ready to be used as a decoration, a coaster, or a stunning gift. I hope you enjoyed creating this piece!


