
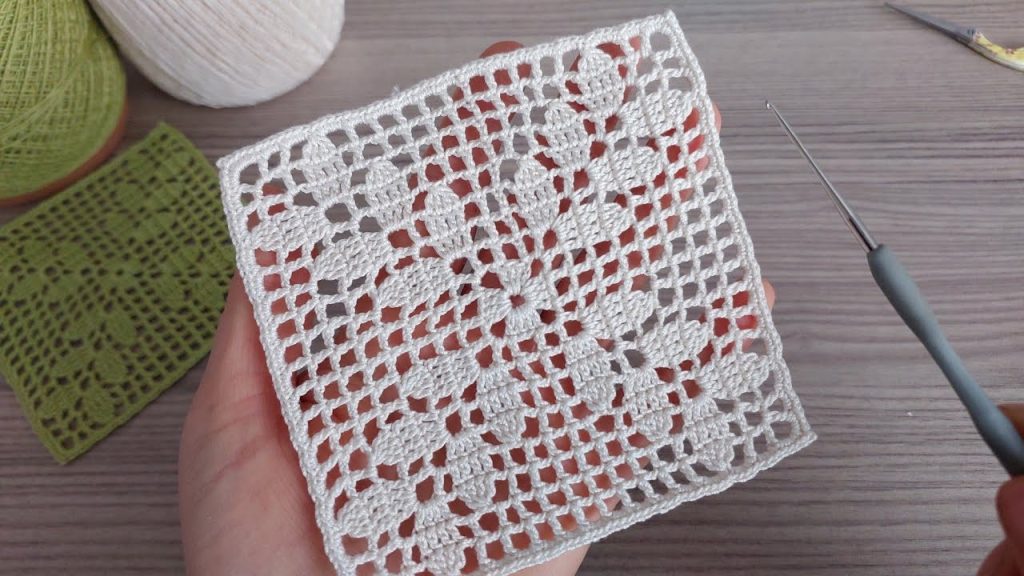
Welcome back to the hook! Today we’re tackling a beautiful project that combines a solid, textured center with an open, airy filet border. This square is perfect for learning how to transition from working in the round to creating a straight, squared edge, and it’s a stunning motif for any heirloom project.
This pattern is written using U.S. Crochet Terminology.
✨ Materials & Gauge
| Icon | Item | Notes |
| 🧶 | Yarn | Approx. 50–75 yards of a lightweight cotton or acrylic yarn (fingering, sport, or light worsted weight). Cotton works best for defined stitches like this. The white in the photo is very classic! |
| 鉤 | Crochet Hook | A hook size appropriate for your yarn. I recommend a 3.0 mm to 4.0 mm hook to achieve a soft but not overly loose fabric. |
| ✂️ | Tools | Tapestry needle for weaving in ends, and a pair of scissors. |
| 📏 | Gauge | The finished square should measure approximately 5.5′′×5.5′′ after blocking. Gauge check: The solid center (after Rnd 5) should measure about 2.5′′ across. |
Export to Sheets
📚 Stitches & Techniques
You’ll need to know the following stitches and a few specific techniques:
| Stitch | Abbreviation | Description |
| Chain | ch | Yarn over, pull through loop on hook. |
| Slip Stitch | sl st | Insert hook, yarn over, pull through work and loop on hook. |
| Single Crochet | sc | Insert hook, yarn over, pull through stitch (2 loops on hook), yarn over, pull through both loops. |
| Double Crochet | dc | Standard double crochet. |
| Treble Crochet | tr | Standard treble crochet (yarn over twice). |
| Picot | picot | ch 3, sl st into the first ch made. |
| Cluster (CL) | CL | (Yarn over, insert hook, yarn over, pull up loop, yarn over, pull through 2 loops) three times in the same stitch/space. Yarn over, pull through all 4 loops on hook. |
Export to Sheets
💠 Part 1: The Central Medallion (Working in the Round)
This section builds the dense floral heart of the square.
Foundation:
- ch 4, sl st into the first ch to form a ring.

Round 1:
- ch 3 (counts as first dc).
- Work 11 dc into the ring.
- sl st to the top of the starting ch-3 to join. (12 dc)
Round 2 (Petals):
- ch 1 (does not count as a stitch).
- sc in the first st.
- ch 5.
- Skip 1 st.
- sc in the next st.
- Repeat from ** around.
- You will end with a ch 5 space. sl st to the first sc to join. (6 ch-5 loops)
Round 3:
- sl st into the first ch-5 space.
- ch 3 (counts as first dc).
- Work 4 dc into the same ch-5 space.
- ch 1.
- Work 5 dc into the next ch-5 space.
- Repeat from ** around.
- End with ch 1. sl st to the top of the starting ch-3 to join. (30 dc, 6 ch-1 spaces)

Round 4 (Clusters):
- sl st across the first 2 dc to move the starting point.
- ch 3 (counts as first dc).
- Work CL in the same st (this is your first cluster).
- ch 3.
- Skip 4 dc and the ch-1 space.
- Work CL in the 3rd dc of the 5-dc group.
- Repeat from ** around.
- End with ch 3. sl st to the top of the starting ch-3 to join. (6 Clusters, 6 ch-3 spaces)
Round 5 (Squaring the Circle):
- sl st into the first ch-3 space.
- ch 3 (counts as first dc).
- Work 2 dc in the same space.
- ch 2.
- In the next ch-3 space, work (3 dc, ch 2, 3 dc) (this is your first Corner).
- ch 2.
- In the next ch-3 space, work 3 dc (this is your first Side).
- ch 2.
- In the next ch-3 space, work (3 dc, ch 2, 3 dc) (Corner).
- ch 2.
- Work 3 dc in the next ch-3 space (Side).
- ch 2.
- Work (3 dc, ch 2, 3 dc) in the next ch-3 space (Corner).
- ch 2.
- Work 3 dc in the next ch-3 space (Side).
- ch 2.
- Work 3 dc in the starting ch-3 space (to complete the last corner).
- ch 2. sl st to the top of the starting ch-3 to join.
- Square is formed!

▦ Part 2: The Filet Mesh Border (Working Square)
The rest of the square is worked in Filet Crochet, which uses Solid Blocks (3 dc) and Open Spaces (dc, ch 2, dc) to create the grid-like lace pattern.
Round 6 (Transition to Mesh):
- ch 3 (counts as first dc).
- dc in the next 2 dc. (First solid block).
- ch 2.
- dc in the ch-2 space.
- ch 2.
- In the corner ch-2 space, work (dc, ch 2, dc, ch 2, dc). (Corner block).
- ch 2.
- dc in the ch-2 space.
- ch 2.
- Skip 3 dc. dc in the ch-2 space.
- ch 2.
- Repeat from ** around, working the corner as instructed.
- sl st to the top of the starting ch-3 to join.
Round 7 (First Full Mesh Row):
- ch 5 (counts as dc + ch 2).
- Skip 2 dc. dc in the next dc.
- ch 2.
- dc in the next dc.
- ch 2.
- Corner: (dc, ch 2, dc, ch 2, dc) in the corner ch-2 space.
- ch 2.
- dc in the next dc.
- ch 2.
- dc in the next dc.
- Repeat the ch 2, dc pattern across the side, ensuring you work 5 open blocks before the corner.
- Repeat the Corner instructions and the side pattern for the remaining sides.
- sl st to the 3rd ch of the starting ch-5 to join.
Rounds 8 – 14 (Continuing the Mesh):
- Repeat Round 7 seven more times (or until you have 8-10 mesh rows total, depending on your desired size).
- The number of open blocks on each side will increase by one with each round.

🎀 Part 3: The Final Border
To give the square a clean, defined edge like the one in the photo, we’ll finish with a simple border round.
Round 15 (Solid Border):
- ch 3 (counts as first dc).
- dc in each ch and each dc around the square.
- In the corner ch-2 spaces, work 4 dc.
- sl st to the top of the starting ch-3 to join.
Round 16 (Picot Edge):
- ch 1 (does not count as a stitch).
- sc in the first 2 sts.
- ch 3, sl st into the 3rd ch from hook (Picot).
- sc in the next 4 sts.
- Picot.
- Repeat the sc in 4, Picot pattern across each side.
- Corner: In the corner stitches (which should be the 2nd and 3rd dc of the 4-dc group), work sc, Picot, sc.
- sl st to the first sc to join.
Video Tutorial:
📌 Finishing and Blocking
- Secure Ends: Fasten off your yarn and use your tapestry needle to carefully weave in all loose ends on the back side of your work.
- Blocking (Essential!): To make sure your square is perfectly square and the lace detail is crisp and open, blocking is a must.
- Dampen your square using cool water.
- Gently pin the square to a flat, padded surface (like a foam board), pulling gently but firmly on all four corners to make sure the sides are straight and the corners are 90∘.
- Allow the square to dry completely before unpinning.
You now have a beautiful Lacy Medallion Filet Square! What project will this lovely motif become—a throw blanket, a runner, or perhaps a pillow cover?


